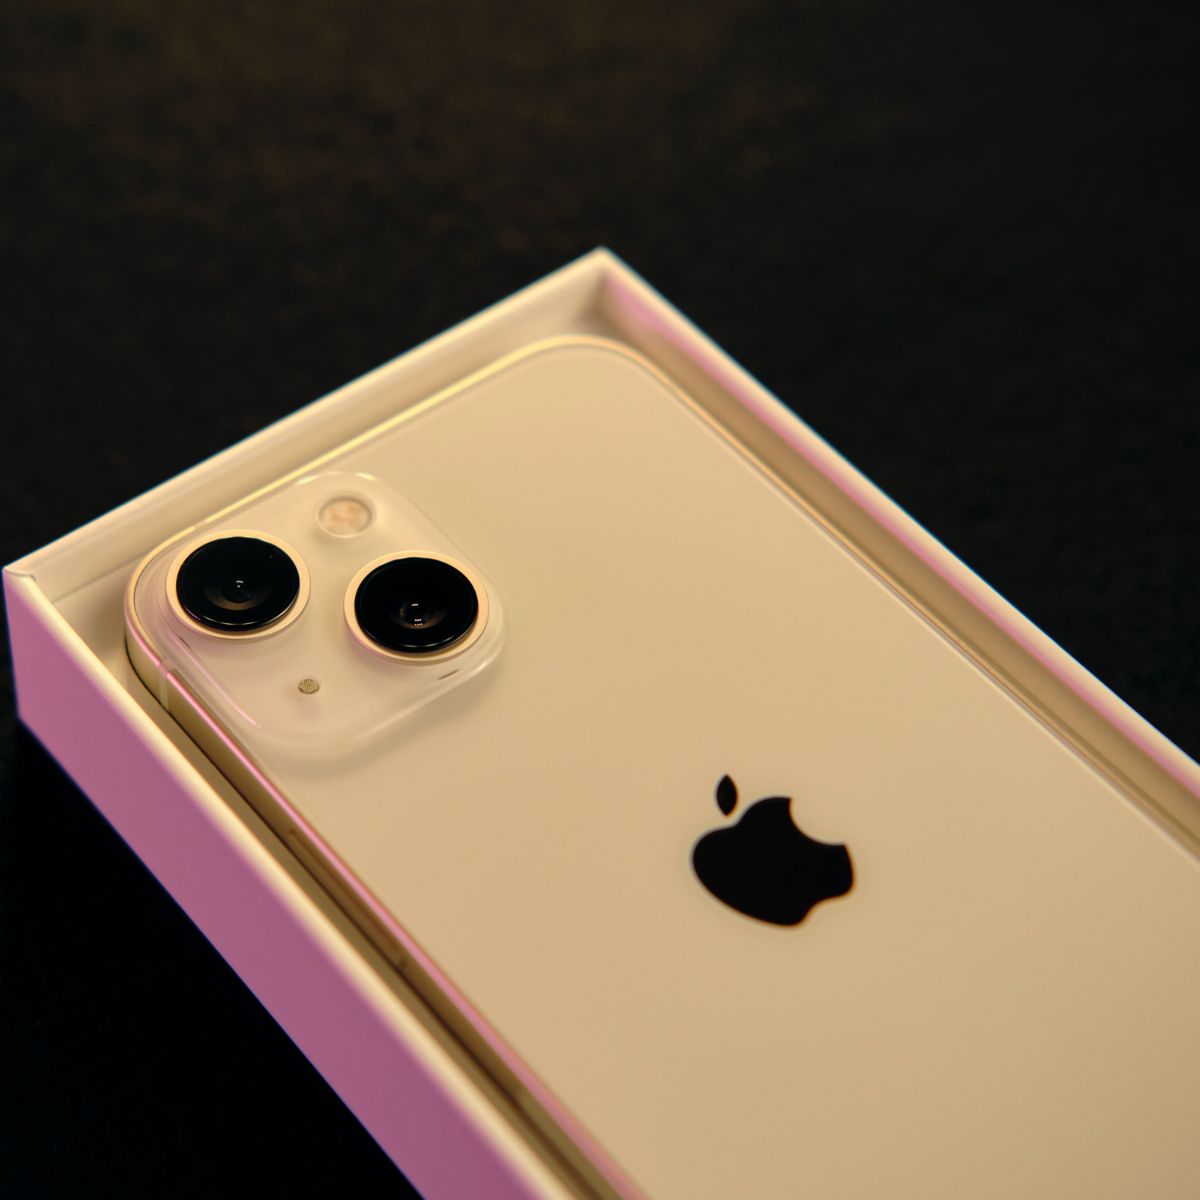
This post highlights potential solutions to a problem about the iPhone 13 that’s unable to connect to Wi-Fi after installing the latest iOS version. Read on to learn what to do if your iPhone 13 won’t connect to WiFi after iOS 15.2 update.
iPhone 13 Not Connecting To Wifi
Post-iOS Update Wi-Fi Issues
Bumping into internet problems in mobile devices is inevitable. Even high-end devices like the latest Apple iPhone 13 series are not absolved from having such issues.
There are many factors that can trigger internet problems to occur on a mobile device. Among the common culprits include unexpected technical difficulties affecting your ISP’s network base, software glitches affecting network features on the phone, incorrect settings, corrupted network, incorrect network credentials and post-update bugs. The transpiring symptoms vary depending on the underlying cause.
Tackled in this troubleshooting guide is a pertinent issue on the iPhone 13 that’s attributed to an iOS bug.
Feel free to try any of the outlined solutions if you need more inputs when dealing with the same problem on your iPhone 13 following the recent iOS 15.2 update implementation.
What to do if your iPhone 13 won’t connect to Wi-Fi after iOS update?
The following solutions will help eliminate software-related factors that might have triggered a post-update Wi-Fi problem to occur on the iPhone 13.
These methods are also applicable when dealing with the same Wi-Fi issue on other iPhone variants that have the same iOS version.
Actual screens and menu options may vary between device models and wireless service providers.
Important Notes:
- Verify and ensure that you’re connecting to the correct Wi-Fi network and the Wi-Fi network credentials (SSID and password) you entered are correct. An incorrect Wi-Fi password is often the main reason why many people have trouble connecting to a Wi-Fi network. If the Wi-Fi password field auto-populates, delete the existing entry and carefully re-type the correct password.
- To rule out proximity from the underlying causes, make sure that you’re near the wireless router/modem while troubleshooting. Your iPhone may not be able to connect or acquire a better connection to the Wi-Fi network when it’s way too far from the network equipment.
- Also ensure that the modem/router is turned on and is not having any problem. If you see any light indicator on the wireless router/modem particularly with the line of sight (LOS), it means that it has no connection to the main server and therefore you need to contact your internet service provider to fix it.
Once you’ve got everything set, you may go ahead and begin performing these outlined tweaks. Don’t forget to test connect to the Wi-Fi network after applying each of the given solutions to determine whether or not the problem is fixed.
Solution #1: Reboot your iPhone (soft reset).
A simple reboot can help fix various software issues including the ones triggered by minor iOS bugs. This is why rebooting an iPhone after installing an update is highly recommended. It’s also a way of clearing any errant cache from individual apps and system services.
To reboot or soft reset an iPhone 13, just follow these steps:
- Press and hold the Power/Side button and either Volume buttons for a few seconds and then release when the Power off slider appears.
- Then, drag the slider to turn your iPhone completely off.
- After 30 seconds, press and hold the Side button again until the Apple logo appears.
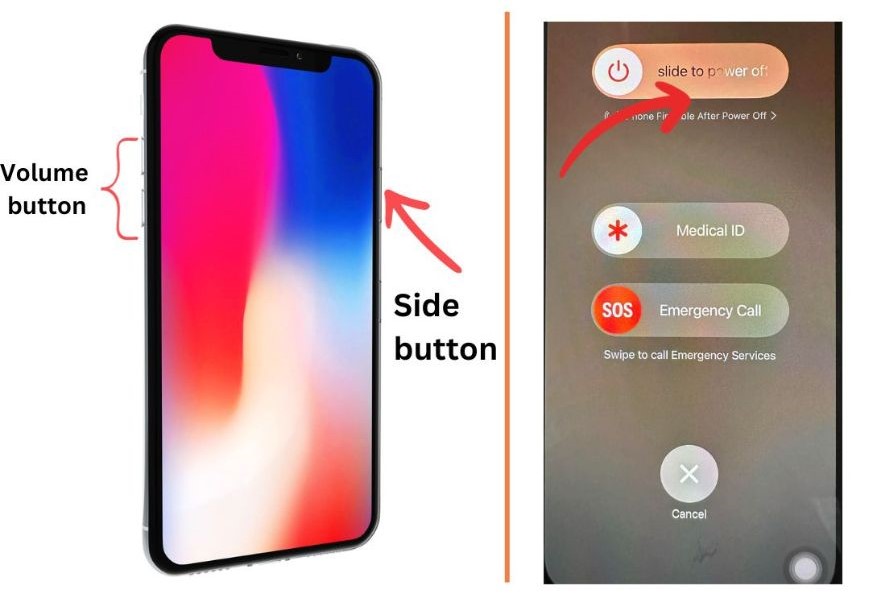
Wait for your iPhone to finish loading up to the Home screen and once it’s up, retry connecting to Wi-Fi and see if it’s already working.
Solution #2: Power cycle the wireless router/modem.
Rebooting the network equipment is also recommended when dealing with random Wi-Fi problems.
Just like other electronic devices, modems and routers also succumb to random firmware issues that could result in various internet problems.
Although the symptom has instigated from an iOS update, it doesn’t always mean that an iOS bug is to blame.
To rule out random firmware glitches from the wireless modem or router in use, try to power cycle your network equipment with these steps:
- Turn off the modem/wireless router as you normally do.
- While it’s powered off, unplug its AC adapter from the power source and keep it unplugged for about 30 seconds to 1 minute.
- After the elapsed time, plug it back in then turn it back on.
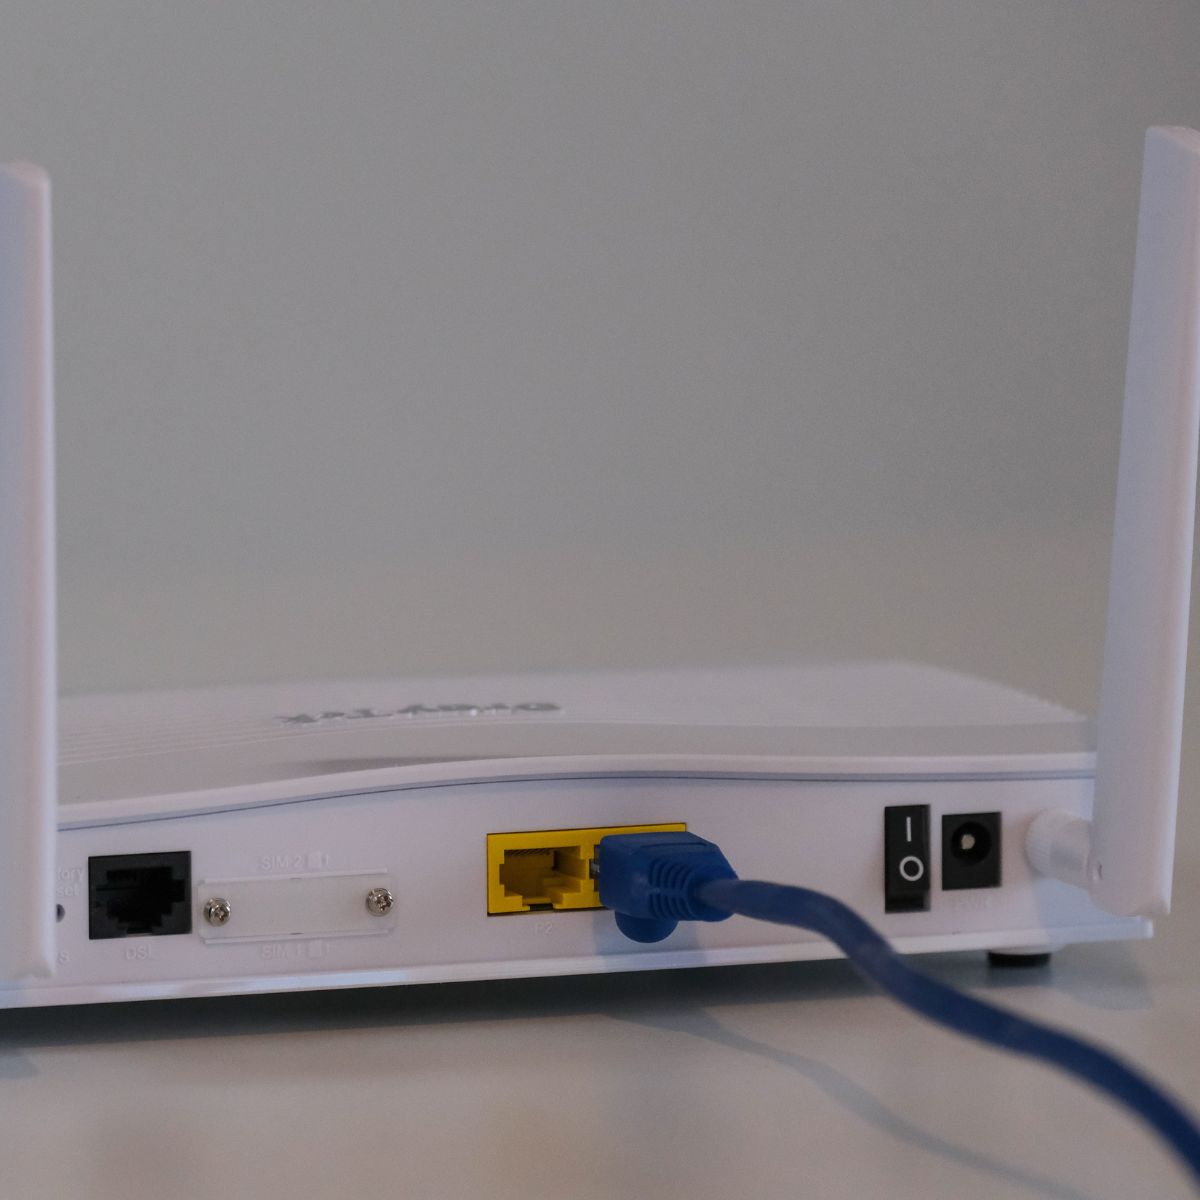
Wait for all the modem light indicators to become stable and your iPhone should re-establish Wi-Fi signal reception.
Solution #3: Perform the Airplane Mode trick.
Another handy tweak to deal with random Wi-Fi errors including post-update symptoms is the so-called Airplane mode trick. It’s another way to refresh your iPhone’s wireless functions and fix wifi issues.
If you wish to try your luck in this method, just follow these steps:
- Go to Settings-> Airplane mode menu and then toggle to turn the Airplane mode switch on for a few seconds.
- Reboot your iPhone while Airplane mode is enabled.
- As soon as it’s finished rebooting, head back to the Airplane mode menu and toggle the switch to turn the feature off again.
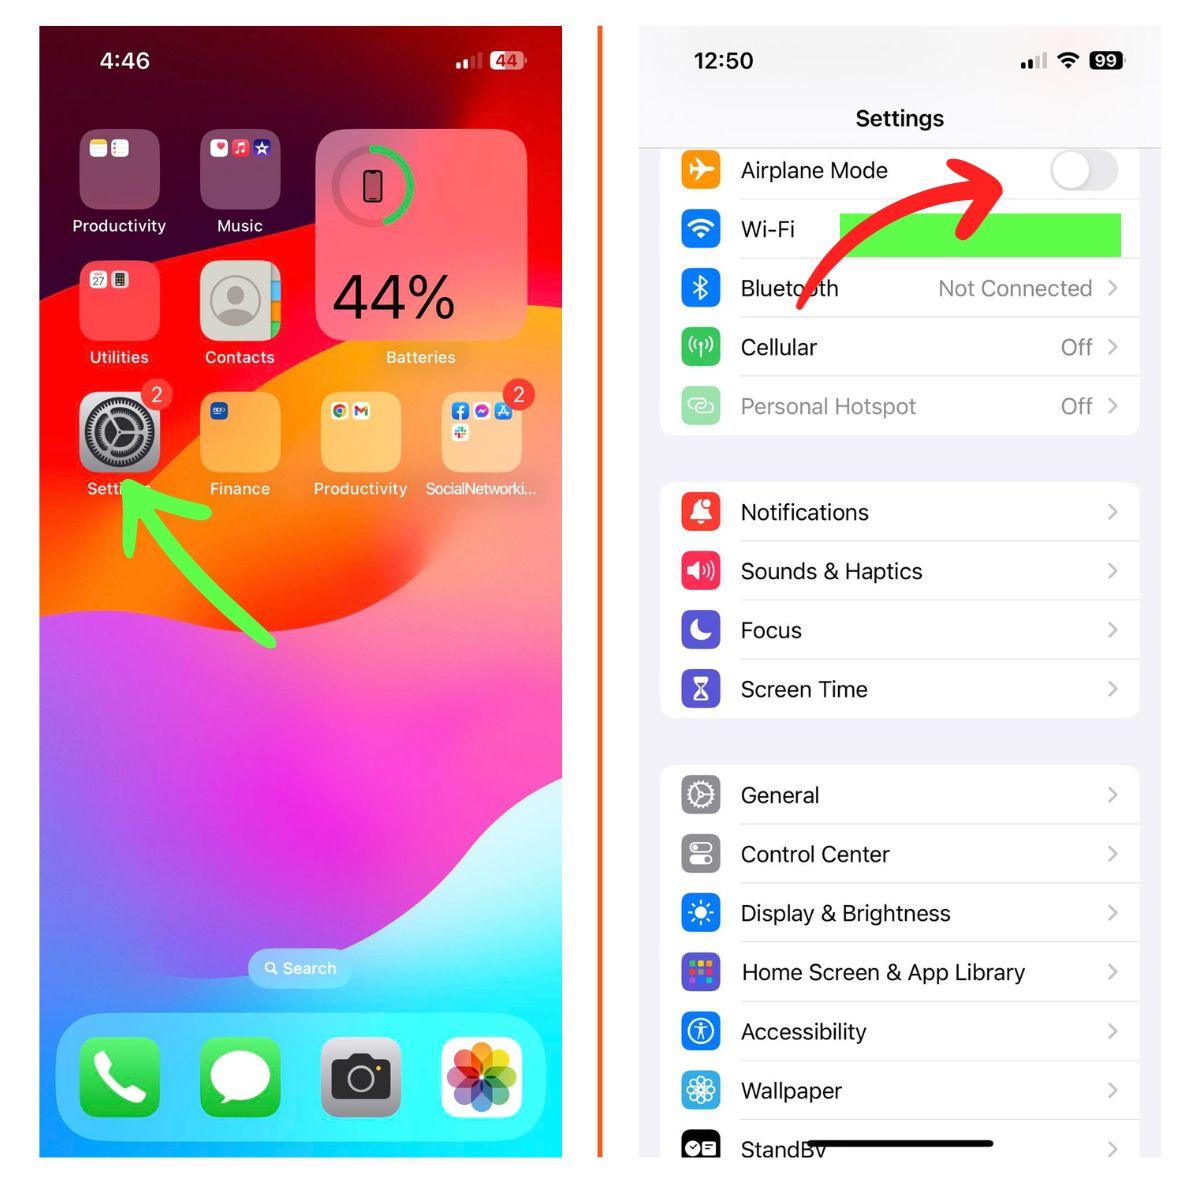
This workaround gives your iPhone’s wireless features a simultaneous restart and thereby corrects any minor flaws transpiring on the wireless network system following the recent iOS revamp.
Solution #4: Forget WiFi network then re-add it.
A corrupted Wi-Fi network could also be the underlying cause of the problem despite the fact that the symptom started from the recent iOS update implementation.
If the Wi-Fi network you’re trying to connect to somehow got corrupted, chances are that it’s no longer working. In this case, deleting the corrupted network and setting up a new network is recommended.
To delete a Wi-Fi network on the iPhone 13, just follow these steps:
- First, go to your Home screen then navigate to Settings-> Wi-Fi menu. Make sure that the Wi-Fi switch is turned on so you’ll be able to view all registered Wi-Fi networks on your device.
- Scroll down and select your Wi-Fi network.
- While your network is selected, tap the information (i) icon next to the name of your Wi-Fi network (SSID).
- Next, tap Forget this Network.
- If prompted, enter your passcode to proceed.
- Finally, tap the option to confirm that you want to delete the Wi-Fi network.

The selected Wi-Fi network will then be deleted from your iPhone.
If you see any unused Wi-Fi networks, repeat the same steps to forget all of them. This is recommended to prevent your iPhone from switching between accessible Wi-Fi networks, whenever the current Wi-Fi network reception is poor or unstable.
If there’s no other saved Wi-Fi network, just forget the current Wi-Fi network that your iPhone is connected to and then add it back.
Be sure to enter the correct Wi-Fi network password to connect successfully.
Solution #5: Reset network settings
If the problem continues after applying the previous solutions, resorting to iOS resets would be the next recommendation.
The first applicable iOS reset you can try is the reset network settings. A network settings reset works by deleting all recent changes made to the network settings including custom network options and faulty settings overrides from the recent update.
The reset network settings command affect any user data from the iPhone storage so there’s no need to back up files beforehand.
Just follow these steps whenever you’re all set to carry out a network reset on your iPhone 13:
- Go to your Home screen and then open the Settings app.
- Scroll to and tap General.
- Tap Transfer or Reset iPhone to proceed.
- Then tap on Reset.
- On the succeeding menu, tap Reset network settings from the given options.
- Enter your device passcode if prompted and then tap Reset settings to confirm.
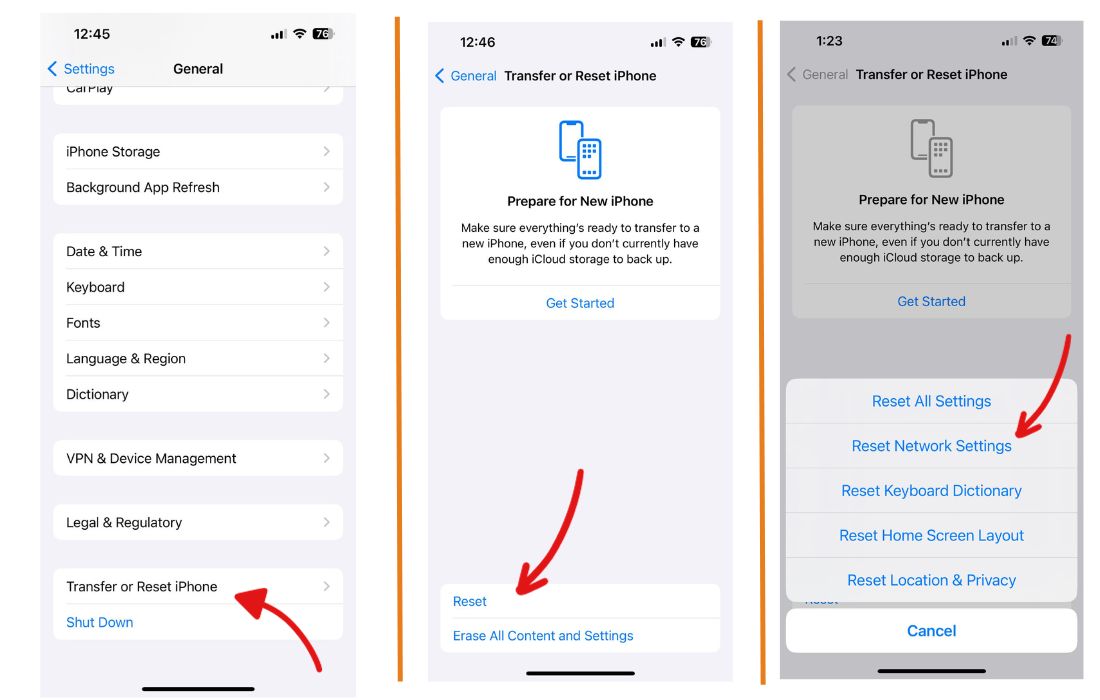
After the network settings reset your phone reboots automatically and then loads up all default network values and options.
By then you can start setting up the wifi network like the first time.
Solution #6: Reset all settings
Another type of reset you can try if the reset network settings command fails is the reset all settings command. This reset works by deleting all system settings including custom settings for apps, network configurations, app preferences and the like without affecting user data.
As a result, all default system settings are restored.
Should you wish to proceed and give this reset a shot, just follow these steps:
- Go to your Home screen and then open the Settings app.
- While on the Settings app main menu, find and then tap General.
- Tap Transfer or Reset iPhone to proceed.
- Then tap on Reset.
- On the succeeding menu, tap Reset all settings from the given options.
- Enter your device passcode if prompted.
- Tap the option to confirm all system settings reset on your iPhone.
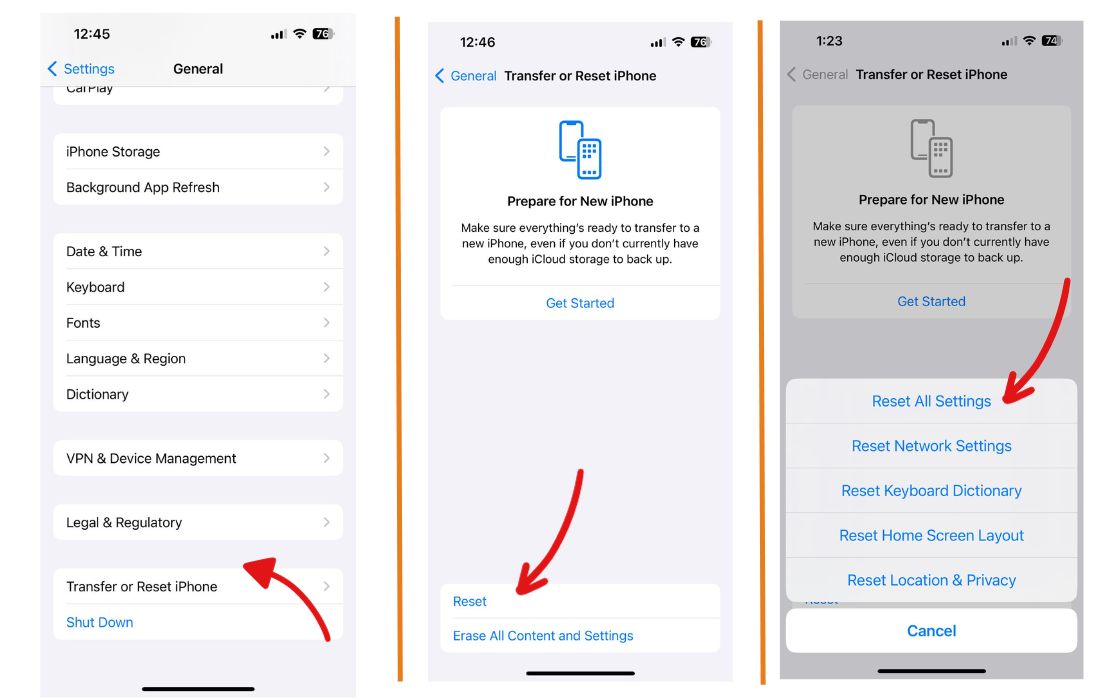
Wait for your iPhone to finish resetting and then reboot automatically.
By then you can start re-enabling necessary features and set default apps for certain file types and protocols.
Solution #7: Factory reset your iPhone 13 (via settings)
The next reset you may consider resorting to if the problem continues even after resetting all settings is a factory reset.
Compared to the previous two resets, a factory reset deletes everything from your iPhone including downloaded apps and files along with custom settings and other user information. As a result, your iPhone will return to its factory state.
On a positive note, most complex system issues including recurring post-update symptoms are resolved as stubborn bugs and malware are likewise obliterated in the process.
Should you wish to proceed, back up all your important files to iCloud or iTunes.
Once all your backup files are secured, just follow these steps to perform a factory reset through your iPhone 13 settings menu.
- Go to your Home screen and then open the Settings app.
- Scroll to and tap General.
- Tap Transfer or Reset iPhone to proceed.
- Tap Reset and then select Erase all Content and Settings option.
- If prompted, confirm that you’d like to erase your device.
- Wait for the phone to finish resetting and then restore all default values and options.
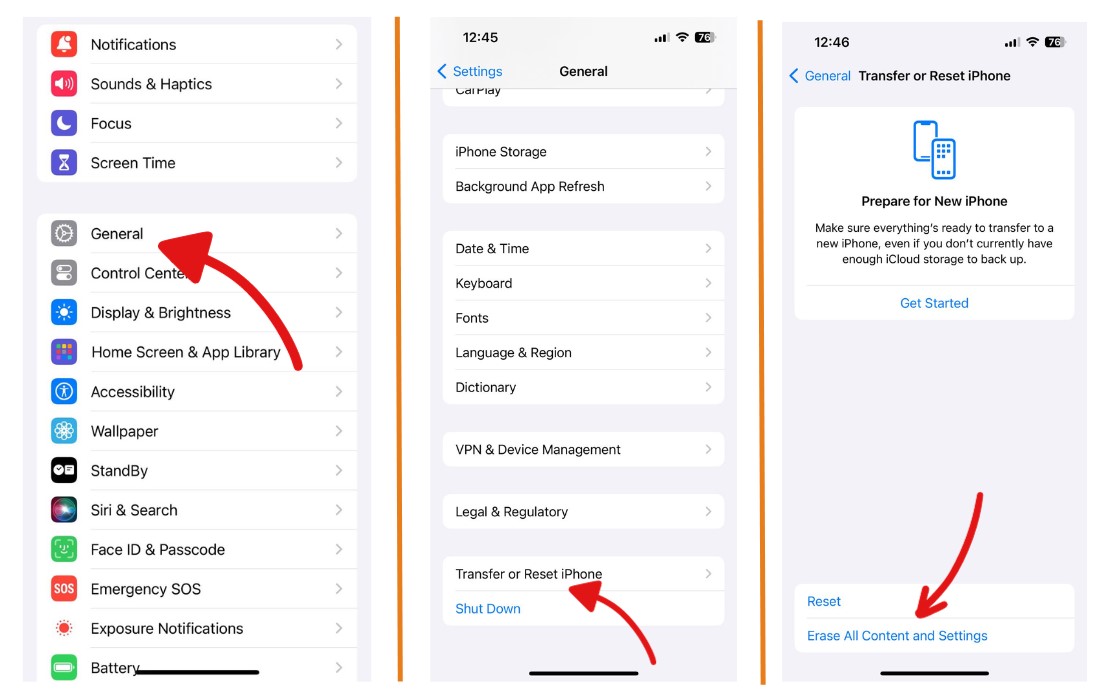
After the reset, you can proceed with the initial setup process and set up everything on your device as new.
Is your iPhone 13 still not connecting to Wi-Fi?
Deemed among the last options when dealing with complex post-iOS update problems including Wi-Fi connection errors is an iOS restore.
Should you wish to troubleshoot your iPhone further, performing an iOS restore via recovery mode or a DFU mode restore would be the next recommended solutions.
Both these iOS restore methods are carried out using iTunes on a Windows PC or Mac computer.
How does Recovery Mode restore work?
A recovery mode restore will put your device in a recovery state and then attempt to fix major iOS flaws through iTunes.
How does DFU Mode restore work?
A DFU or Device Firmware Update mode restore on the other hand will put your device in a more advanced state where it’s still able to communicate with iTunes without activating the bootloader or operating system.
Once the device is in a DFU state, iTunes will then attempt to fix any major iOS errors that might have caused the iOS Wi-Fi system malfunction.
Both a recovery mode restore and DFU mode restore are proven to effectively resolve major iOS problems including those that were inflicted by an iOS bug.
But the main downside for both is the fact that they will delete all user data from the iPhone storage including downloads and personal files.
If you’ve done all the above solutions and still your iPhone is unable to connect to Wi-Fi, then perhaps you should already consider escalating the problem to either your Internet service provider or Apple Support.
Letting Apple Support know that such a problem occur from the recent iOS update and persisted is imperative to obtaining a definite solution.
Repair Options
Taking your device to the nearest Apple genius bar in your area can also be deemed among the last options, should you suspect hardware damage is present on your iPhone.
Please keep posted for more comprehensive iOS tutorials and troubleshooting guides on this site. Or you can check out this YouTube channel to view more comprehensive tutorial and troubleshooting videos including recent iOS devices.