iPhone stuck in headphones mode? Here’s the fix!

If your iPhone is stuck on headphones mode, sound and audio functions are likewise affected and may not working as well. Thus, you’ve got a problem to fix. Majority of iPhones stuck on headphones mode are due to hardware damage. If this happens, your iPhone won’t be able to play sound as its audio functions are likely not working as well. Even so, it’s still imperative to troubleshoot and rule out software-related attributes that might have caused your iPhone to think that headphones are plugged in even if they’re not.

Highlighted below are some helpful methods you can try on before taking your device to a Genius bar. We’ve considered every possibility and this post will help you rule them all out so you can easily determine what the problem really is. Continue reading as this article may be able to help you one way or another.

Eliminating software problems

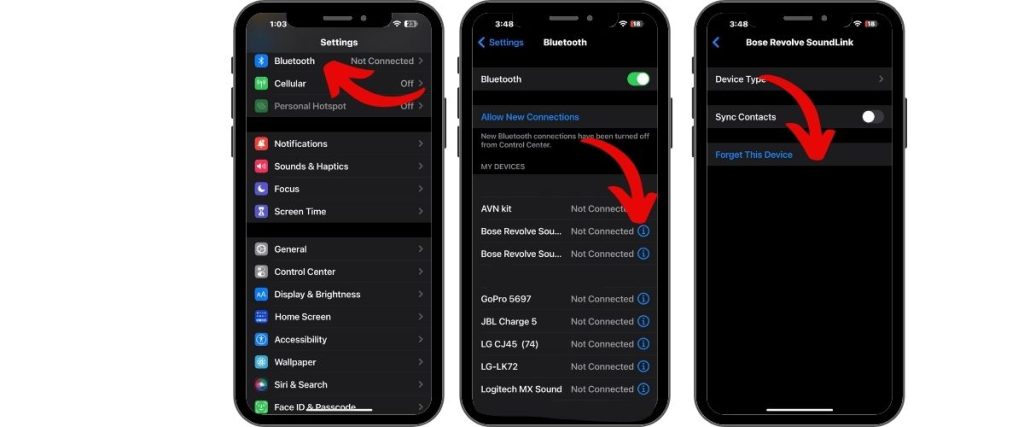
You are certain that nothing is plugged into the head jack or Lightning port but your iPhone still says that the headphones are plugged in, it’s possibly just a random glitch. This can happen to any device after pairing to a Bluetooth-enabled headset. To make sure that this isn’t causing you this trouble, disconnect your iPhone from any Bluetooth device or better yet, forget all saved Bluetooth devices by heading to Settings-> Bluetooth menu and then scroll down to the list of saved Bluetooth devices.

Then tap on the information (i) icon next to a Bluetooth device you’d like to forget or delete. Or you can just turn off Bluetooth on your iPhone from Settings-> Bluetooth menu and then toggle the switch to turn the feature OFF. The problem can also be inflicted by some bad updates or relevant data corruption. These are the common factors that you should consider ruling out before opting for service.iphone stuck in headphones mode disable

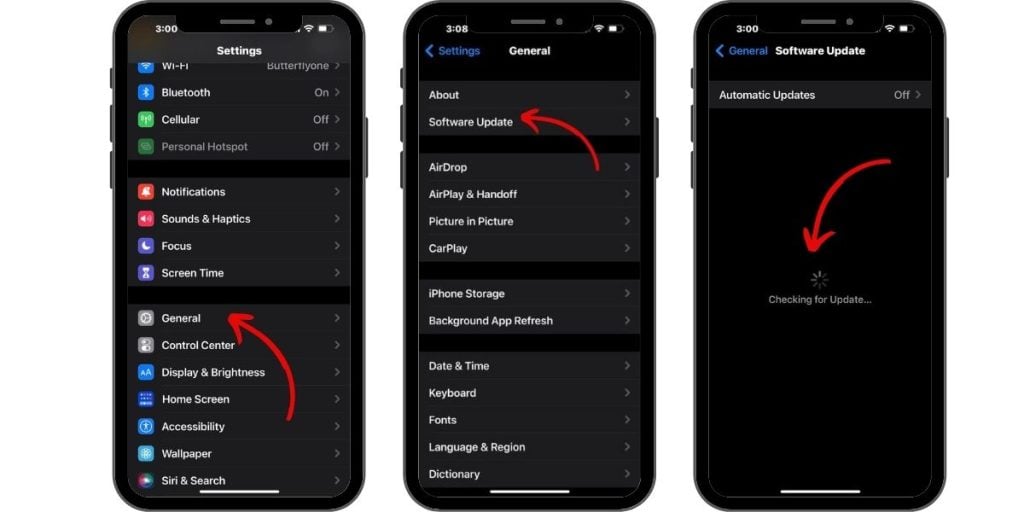
Before you begin troubleshooting, check and make sure that your iPhone is running on the latest iOS version. If it’s not, then consider updating iOS firsthand. Simply head to your iPhone Settings-> General-> Software Update menu. From there you should see an update notification if a new iOS version is available. Just follow the onscreen instructions to update your iPhone. If your iPhone remains stuck on headphones mode when its software is already up-to-date, then you may go ahead and try performing these subsequent procedures.

First solution: Force restart to get out of headphones mode.

Random software glitches are to be the first factors to eliminate. And the simplest yet every effective solution to this would be a forced restart. As the name implies, it forcibly stops running/background apps and services then triggers automatic system reboot. Minor errors due to random firmware crashes including stuck errors are often rectified in the process.

If you’re using an iPhone 7 or iPhone 7 Plus, follow these steps to force restart:

  • Press and hold the Volume Down button and the Power (Sleep/Wake) button simultaneously and then release both buttons with the Apple logo appears.

If you’re using an iPhone 6s, 6s Plus and earlier variants, a forced restart is done this way:

  • Press and hold both the Power (Sleep/Wake) button and the Home button for a few seconds and then release both buttons when the Apple logo is displayed on the screen.

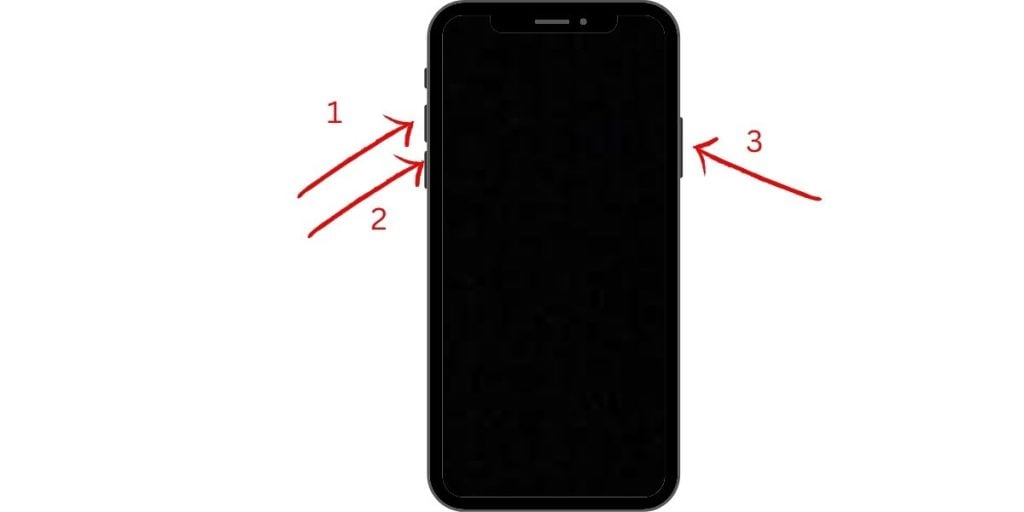
If you’re using an iPhone 8, 8 Plus and later iPhones, here’s how a forced restart is carried out:

  1. Press and release the Volume Up button.
  2. Then press and release the Volume Down button.
  3. Finally, press and hold the Side button and then release it when the Apple logo appears.

Let the phone finish booting up and see if it’s still stuck on headphones mode or not anymore. If your iPhone still thinks that headphones are plugged in, then it could be something worse than a minor system glitch. At this point, try other methods to rule out more complex system errors.

ALSO READ: Facebook won’t open on Apple iPhone XR. Here’s the fix.

Second solution: Reset all settings to get out of headphones mode.

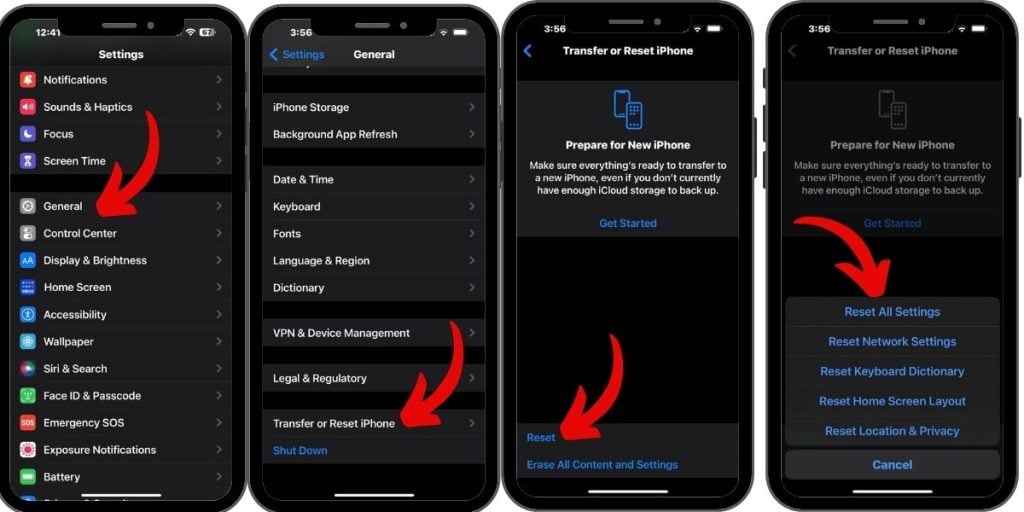
Invalid or misconfigured system settings can also trigger similar errors on the phone. If your iPhone started to act up or got stuck on headphones mode after customizing some settings or installing new updates, then resetting all settings will likely solve the problem. This reset clears out all customized information and then restores the default configuration without affecting saved information on the phone. Here’s how it’s done:

1. Tap Settings from your Home screen.

2. Select General.

3. Scroll down and tap Reset.

iphone stuck in headphones mode reset settings

4. Choose the option to Reset all settings.

5. Enter your passcode when asked to continue.

6. Tap Reset All Settings at the bottom of the screen.

7. Tap Reset All Settings again to confirm.

iphone stuck in headphones mode reset all settings successful

Your iPhone should restart automatically when the reset is finished and then loads up the original options and values. In order to use the features that are disabled by default, you will have to enable them again individually.

This reset is usually recommended when your iPhone is acting up after implementing an iOS update. However, if your iPhone is still stuck on headphones mode, then move on to the next solution. 

Third solution: Erase your iPhone in iTunes.

Performing a master reset can be considered among the last options if the problem continues after applying prior methods. What you’re dealing with is likely a major problem caused by some tough bugs or fatal system error. In that case, your device may require a full system wipe out so it can start fresh and flawless. But also note that while this reset effectively clears out major system errors, it also wipes out all saved information on the phone storage including contacts, downloads, customized settings and other personal information saved on your iPhone’s internal memory. Thus, it results to permanent data loss. To recover your files, you must create a backup before you start erasing your device. You can back up your iPhone data to iCloud or iTunes as you would prefer. Once you have secured your backup, follow these steps to factory reset your iPhone through settings:

  1. From the Home screen, go to Settings.
  2. Select General.
  3. Scroll down to and tap Reset.
  4. Select Erase all content and settings option.
  5. Enter your device passcode when prompted.
  6. Then tap Erase all content and settings to confirm the factory reset.

After the reset, your phone reboots automatically and then loads up its factory default settings. To use your phone again, you need to set it up first. Just use the start-up wizard to set up your iPhone as new.

ALSO READ: How to fix poor Wi-Fi reception or weak Wi-Fi signal on your Apple iPhone XR

Fourth solution: Recovery Mode restore.

Some system errors are able to withstand a factory reset and so the associated symptom or error may continue. In this case, performing a system restore is recommended. And the next method you can try would be a recovery mode restore. This method can also result to permanent data loss thus, backing up files is necessary beforehand. To get started, you will need to secure a computer either Windows or Mac, for as long as it has the latest version of iTunes app in it. Once you’ve got the equipment set, refer to any of these methods to enter recovery mode and carry out iOS restore through iTunes:

  • On an iPhone 8, 8 Plus, or later models, press and hold the Side button and either Volume buttons until the Power Off slider appears. Drag the slider to power off your device. While your phone is turned off, connect it to the computer via USB cable while holding the Side button. Keep holding the Side button until the Recovery Mode screen appears.
  • On an iPhone 7 and iPhone 7 Plus, press and hold the Side button until the Power off slider appears. Then drag the slider to power off your phone. While it’s turned off, connect it to the computer via USB cable while holding the Volume Down button. Keep holding down the Volume Down button until the Recovery Mode screen appears.
  • On an iPhone 6s or earlier models, press and hold the Side/Top button until the Power off slider appears. Then drag the slider to power of the phone. Connect your phone to the computer via USB cable while holding the Home button. When the Recovery Mode screen appears, you can release the button.

Shortly after releasing the last button, iTunes will prompt you to either Restore or Update your device. Select the option to Restore so that iTunes will instigate downloading of your phone’s software. The download process usually takes 15 minutes. If it exceeds 15 minutes and the download process isn’t finished yet, your device will exit recovery mode. If that happens, just let the download to finish then put your iPhone in recovery mode again to finish restoring iOS.

Fifth solution: DFU Mode restore.

The last option and possible solution you can try on if a recovery mode restore still failed to fix the error is the DFU mode restore. It is the deepest type of system restore done on an iPhone. It puts your device in a state wherein it’s still able to communicate with iTunes on a computer even when the bootloader isn’t activated. Hence, there’s still a chance for iTunes to repair your iPhone system even when it’s totally corrupted. But then again, you will lose all your saved data in the process. That being said, this is but only considered as the last optional solution. If you wish to continue at your own risk, then you can refer to the outlined steps below.

To get started, connect your iPhone to the computer via USB/Lightning cable. Once it’s connected, continue with these steps to put your device in a DFU or Device Firmware Update mode:

  • Quickly press and release the Volume Up button, then quickly press and release the Volume Down button. Finally, press and hold the Side/Power button until the screen turns completely black.
  • As soon as the screen turns goes black, press and hold the Volume Down button while you keep holding the Side/Power button.
  • After 5 seconds, release the Side/Power button but continue to hold the Volume Down button until your iPhone shows up in iTunes on your computer.
  • When your iPhone appears in iTunes and prompts you to restore your device, you can release the Volume button.
  • Then follow the onscreen commands to begin repairing and restoring your phone’s operating system in DFU mode through iTunes.

Fatal system errors that caused persistent symptoms are often remedied by a DFU mode restore. If that still doesn’t work, then you are most likely dealing with a hardware issue.

ALSO READ: How to fix an Apple iPhone XR that’s suddenly crashing or shutting down unexpectedly

Other options

  • Use iTunes alternatives. There are many other iOS repair tools that you can use aside from iTunes fix iOS stuck problems like stuck on headphones mode. If you’re still not convinced the your iPhone has hardware damage, then you can try using any of these tools to repair your iPhone system. Among the widely used tools to serve this purpose are Tenorshare ReiBoot, Dr. Fone-Repair, FonePaw iOS System Recovery, and iMyFone iOS System Recovery, to name some. These tools already support iOS 12 devices so it should work with later iPhone models too. Just download and install your preferred tool on a compatible computer and then connect your iPhone to the computer whenever you’re all set to start repairing your device.
  • Clean the headphone jack. Dust or debris might be clogging the headphone jack thus, leading your iPhone to think that headphones are still plugged in. in this case, removing any debris that’s stuck on the Lightning port or headphone jack of your iPhone can be considered an option. You can use compressed air, thin tweezers or anti-static brush to clean up the headphone jack or Lightning port of your iPhone. Just be sure to clean it with care, otherwise you might end up having worse problems afterwards.
  • Use Bluetooth headset. Another temporary solution is to use a Bluetooth headset or speaker dock for audio functions like making/receiving phone calls and using audio-enabled applications.

But if that won’t suffice, then this is the point where you should visit an Apple-authorized service center for iPhone repair. Some of your iPhone components might have obtained some sort of physical or liquid damage from a previous incident of accidental drops or liquid exposure. The symptoms of liquid damage may take longer to manifest and so you’d think that everything is still working good even after getting your iPhone slightly wet.

If your iPhone is still covered by the AppleCare Warranty, then you better contact your carrier so that you can avail for warranty instead. If your device is eligible for warranty, your carrier will help you decide whether or not to get a service warranty or go for a new unit replacement.

RELEVANT POSTS: