How to fix Apple iPhone XR alarm system that is not working, sound alerts for alarm doesn’t work [Troubleshooting Guide]

Many people these days are already making use of smartphones to serve as alarm clocks. Aside from the fact that the setting up alarms on the phone is very easy and simple, you can place it anywhere you want, either nearer or a little farther. However, there are some factors that can make such simple things complicated and you would just realize that something is wrong if your phone doesn’t sound the alarm on the specified date and time.

Generally, these problems are attributed to random app glitches, likely on the Clock app as well as system errors. Highlighted below are recommended workarounds and potential solutions that are used to deal with alarm problems on the new iPhone XR handset. Read on to learn what to do whenever your new iPhone failed to sound the alert on time.

Before going further, if you found this post because you were trying to find a solution to your problem, then try to visit our troubleshooting page as we’ve already addressed most of the commonly reported issues with the phone. We’ve already provided solutions to some of the problems reported by our readers so try to find issues that are similar with yours and use the solutions we suggested. If they don’t work for you and if you need further assistance, fill up our iPhone issues questionnaire and hit submit.

YouTube video

How to troubleshoot iPhone XR with its alarm system that doesn’t work

Before you begin troubleshooting, delete any other relevant applications from the phone. If you have installed other alarm apps (third-party), try deleting them first to make sure they’re not causing conflict with the Clock app’s built-in alarm functions.

Also check and ensure that the date and time settings on your iPhone XR are properly configured. If necessary, set the date and time to automatic so it will use the date and time information based on the time zone of your current location.

If adhering to these requisites still failed to solve the problem and your iPhone XR alarm system is still not working as intended, then go ahead and apply any of the following workarounds.

First solution: Toggle the Ringer switch off and on, then reboot your iPhone.

An obvious reason why you don’t hear alarm sounds from your iPhone is because the device may be set to mute or silent. Hence, this should be the very first thing to consider checking on when having trouble hearing your iPhone sound for alarms or other functions.

You can find the Ringer switch on the upper-left side of your iPhone. Make sure that the switch is flip to Ring mode. If it’s already positioned to Ring mode but you still don’t hear your iPhone’s alarm sound, flip the switch back and forth. Make sure it’s set back to Ring mode.

Aside from the Ringer switch, toggling the Volume Up and Volume Down controls can also help clear out minor sound problems on the phone. To increase the volume level, press the Volume Up control.

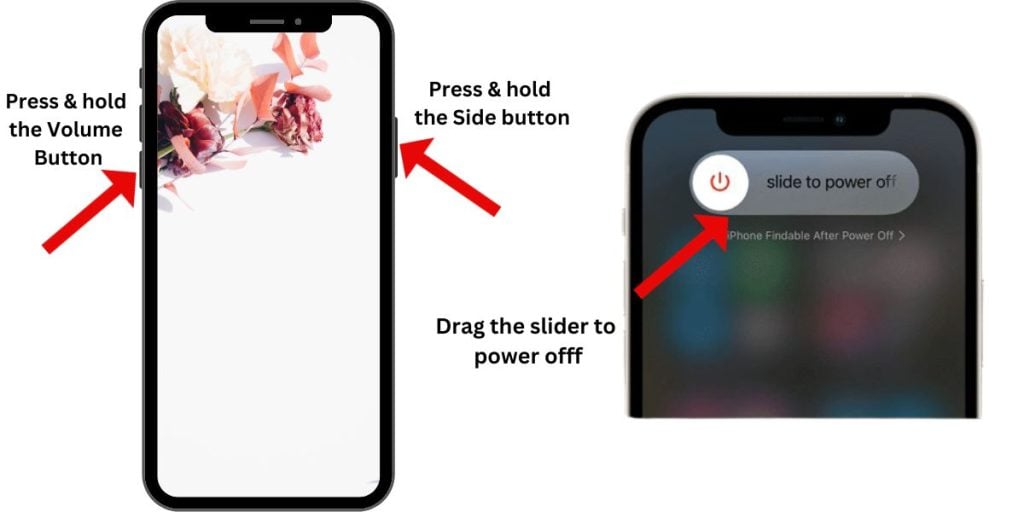
After adjusting your iPhone’s sound controls, perform a soft reset with these steps:

  1. Press and hold the Side/Power button and either Volume buttons simultaneously for a few seconds.
  2. Release the buttons when the Slide to Power Off command appears.
  3. Drag the power off slider to the right.
  4. After 30 seconds, press and hold the Power/Side button again until the phone boots up.

Wait until your phone is finished booting up then test to see if the clock alarm or alarm sound is already working.

Second solution: Check and manage your alarm sound selection and adjust volume.

Verify and ensure that your alarm sound is not set to None. Apparently with this selection, your iPhone won’t be able to render any sound for the alarm simply because you haven’t set a specific sound or tone for your alarm. To check and manage this setting, refer to these steps:

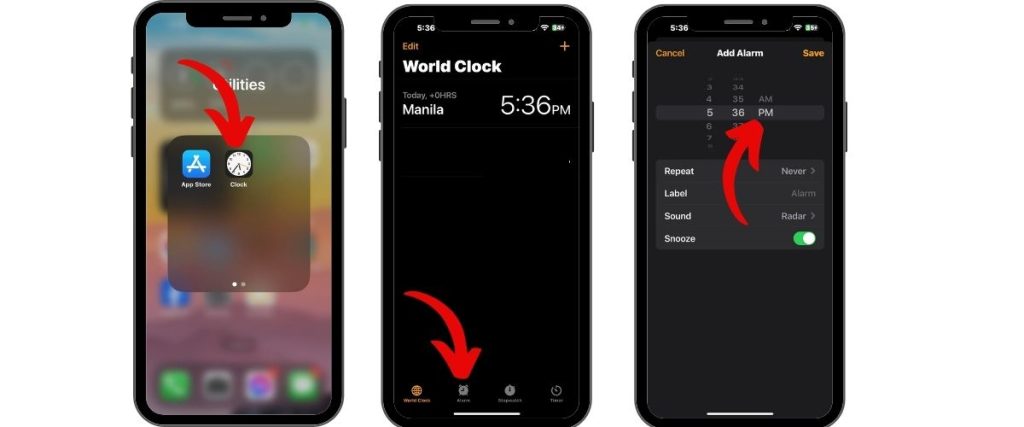
  1. Tap to open the Clock app.
  2. Tap on Edit.
  3. Select the alarm you want to edit.
  4. Then tap to check the Sound selection. Try selecting a different alarm sound or tone.

After selecting sound alert or alarm tone, adjust the sound/volume to a higher level then test the alarm sound to determine if it’s audible enough.

Third solution: Delete then recreate alarm on your iPhone XR.

The alarm may also fail to work when it’s corrupted. Many factors can make this happen, thus it’s imperative that you should rule this factor out too. The easiest solution to this would be to delete and recreate the alarm. To delete existing alarm from your iPhone XR, follow these steps:

  1. Tap Clock to open the clock app on your iPhone.
  2. Select the alarm you want to delete.
  3. Then tap the Minus (-) symbol in a red circle located before the alarm time.

Delete all saved alarms from the clock app to prevent any of them from causing conflict with your current alarm.

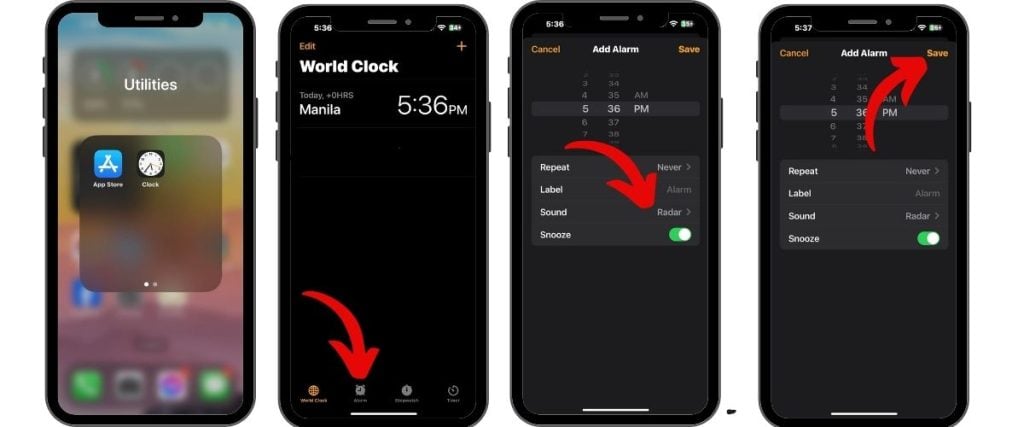
After deleting alarms, reboot your iPhone and then recreate your alarm with these steps:

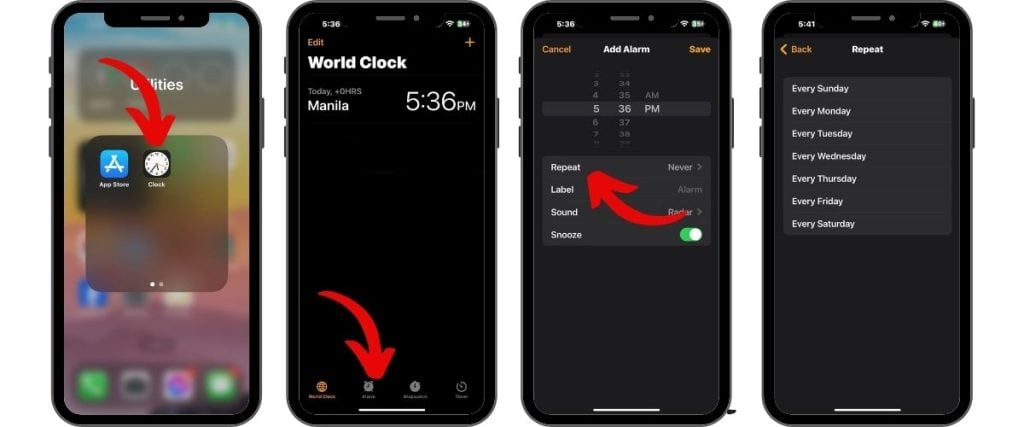
  1. Open the Clock app from your Home screen.
  2. Scroll down to and then tap Alarm or BedTime (for bedtime reminders).
  3. Tap the Plus (+) symbol on the upper-right corner of the screen.
  4. Enter the details for your alarm based on your preferences. Be sure to set the alarm sound to something that’s audible.
  5. When you’re done entering all required details for your alarm, tap Done to save it.

If you’re using BedTime for your alarm, make sure BedTime is turned or enabled on the Clock app. Here’s how to check:

  1. Open the Clock app.
  2. Tap the Bedtime tab.
  3. Toggle the Bedtime switch on the top-right corner to enable it (green-ON)

To configure your Bedtime options, tap Options on the top-left corner then select the option to enable Do Not Disturb During Bedtime, as you desire. Enabling this feature mutes calls and alerts that arrive while the phone is locked. Notifications will be sent to history. Select your preferred Wake Up Sound for your alarm. Then adjust or increase the Wake Up Sound volume by dragging the slider to the right.

Note that enabling Bedtime turns off both the Alarm and Reminder functions of your clock app. So make sure to turn Bedtime off whenever you prefer to use alarms and reminders instead.

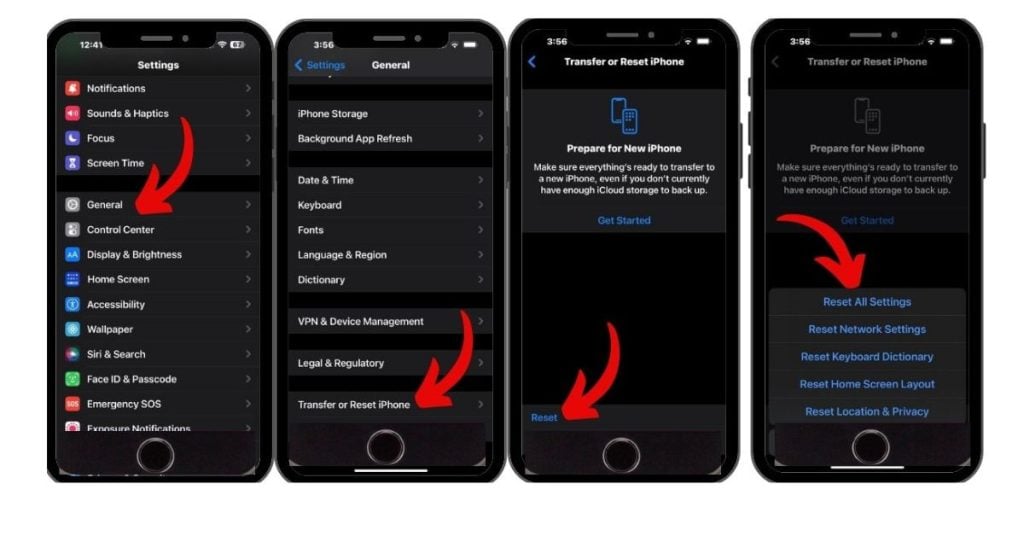
Fourth solution: Reset all settings on your iPhone XR.

To eliminate settings conflicts or misconfigured options from the possible triggers, try clearing all customized settings from your device and then restore the defaults or original values. Here’s how it’s done:

  1. Tap General.
  2. Scroll down to and tap Reset.
  3. Select the option to Reset all settings.
  4. If prompted, enter your device passcode.
  5. Then tap the option to confirm all settings reset.

Unlike a factory reset, performing this reset won’t result to data loss as it doesn’t affect any saved data on the internal memory. So expect all your contents to stay intact afterwards. Wait for your iPhone to reboot and then set up or create a new alarm to use on your device.

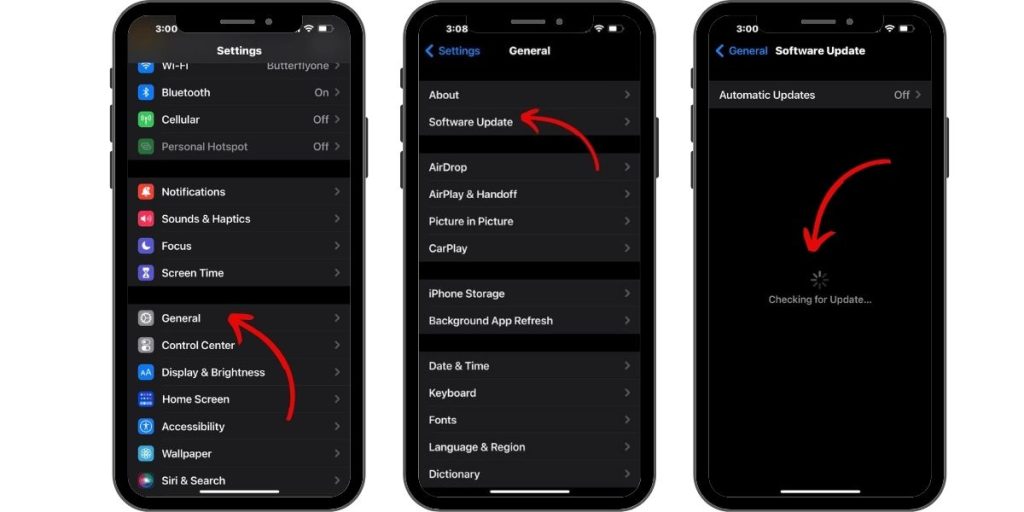
Fifth solution: Update your iPhone software to the latest version available.

Installing the latest iOS version available can also be considered among the possible solutions. Software updates generally offer fix patches to address bug-inflicted errors including affecting the alarm functions of the built-in Clock application. If your phone has strong and stable Internet connection, then you can check for new OTA updates to download and install with these steps:

  1. Go to Settings.
  2. Tap General.
  3. Select Software Update.

Read and review the update details if prompted and then select the option to Download and Install. Follow the rest of the given instructions to finish installing new iOS update on your iPhone. Then reboot the phone to apply the new system changes and refresh apps.

Other options

If the alarm problem started after installing the latest iOS update on your iPhone XR and it persisted, then you may opt to further troubleshoot and perform system resets and restore. Otherwise, you escalate the problem to Apple Support for other official recommendations. A fix patch may be necessary to eliminate the alarm bug and to get your iPhone XR clock and alarm functions to work properly again.

I hope that this how-to post has helped you one way or another. Please help us spread the word by sharing this post to your friends or people who may also have similar problems. Thanks for reading!