
How To Fix iPhone Battery Draining Fast After Update
Experiencing iPhone battery draining fast after update? This comprehensive guide provides practical solutions to address the issue of your iPhone battery draining fast. Whether you’ve recently updated to the latest iOS version or installed new apps, follow the step-by-step instructions below to troubleshoot and fix the problem. From adjusting settings to optimizing battery usage, we’ll help you restore your iPhone’s battery life and ensure longer-lasting performance.
Why Your iPhone battery draining fast after update
Has your iPhone battery been draining faster since you updated to the latest iOS version? This is a common issue that can be frustrating, but there are ways to improve battery life after an iOS update.
It’s Normal for Battery to Drain Faster Right After Updating
It’s completely normal for your iPhone battery to drain faster immediately after installing a major iOS update. Here’s why:
- Indexing and Optimization: Your iPhone needs to re-index apps and data for the new OS, which uses extra battery. This typically lasts 24-48 hours.
- App Updates: Developers need to optimize their apps for the new OS. Outdated apps can drain battery faster until updated.
- New Features: New software introduces new features that require more processing power and battery. Animations, widgets, etc. use more juice.
So try not to panic if your iPhone battery drains faster after updating. It’s usually temporary. But if it persists, try these troubleshooting tips:
Update Apps to Avoid Battery Drain
Outdated apps are a huge cause of battery drain after an iOS update. Be sure to update all your apps to the latest versions optimized for the new OS.
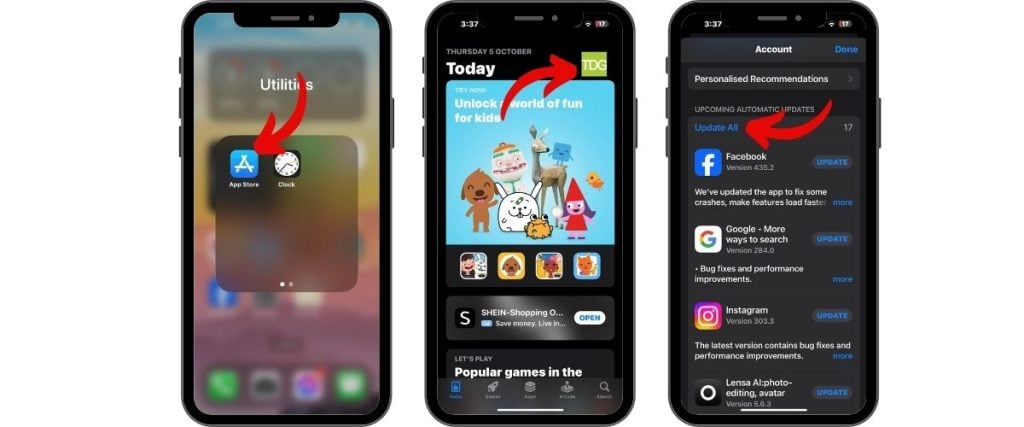
To update apps:
- Open the App Store
- Tap your profile icon
- Tap “Update All”
This ensures apps aren’t wasting battery trying to run on an incompatible OS.
Adjust Settings to Improve Battery Life
Tweak settings to reduce battery drain. Things like screen brightness, Background App Refresh, Location Services, and Reduce Motion can help optimize battery consumption.
Key settings to check:
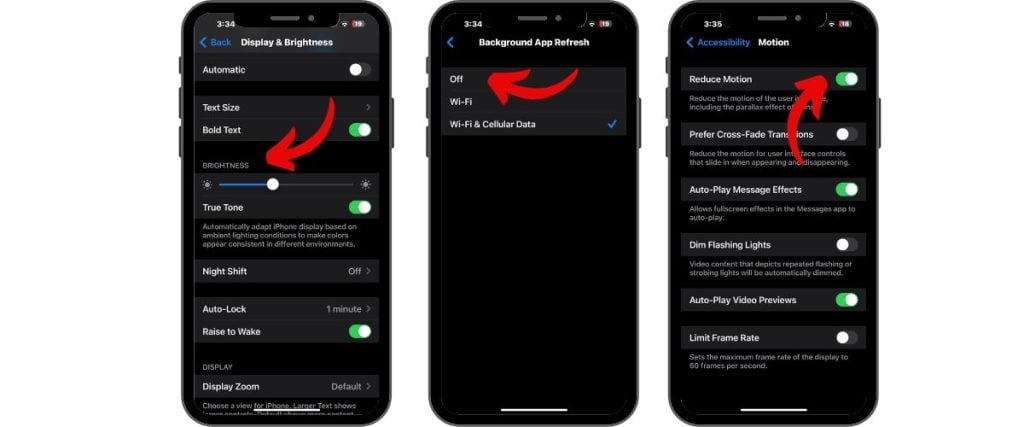
- Lower screen brightness
- Turn off Background App Refresh
- Limit Location Services
- Reduce Motion effects
- Disable unnecessary widgets
Disable battery draining features you don’t really need. But keep useful ones on.
Let Indexing Complete
As mentioned, indexing and optimization runs for 24-48 hours after an iOS update. Don’t judge battery life during this period.
Use your iPhone normally during this time to allow the system to complete indexing. Battery life should improve once finished.
Update iOS to Latest Version
Apple releases frequent iOS updates with bug fixes and battery improvements. Always update to the latest iOS version to resolve drainage issues.
To update iOS:
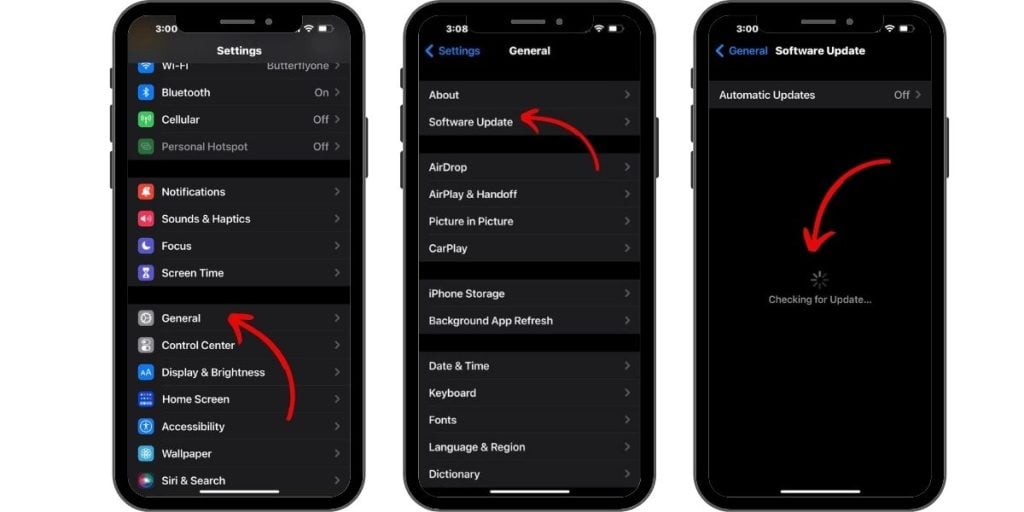
- Open Settings
- Go to General > Software Update
- Download and install any available updates
This ensures you have the most optimized iOS version.
Check Battery Health
An aging battery that needs replacement can also cause rapid battery drain after updating iOS.
To check battery health:
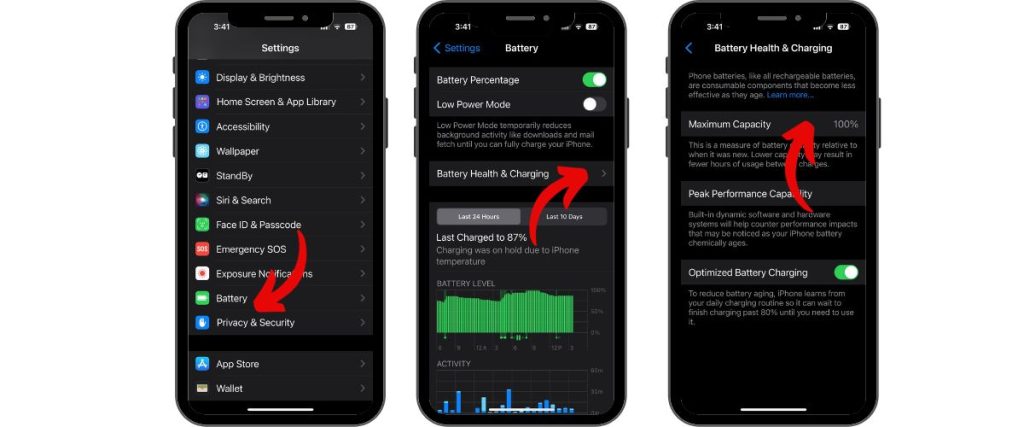
- Go to Settings > Battery > Battery Health & Charging
- Look at Maximum Capacity
If it’s below 80%, your battery needs replacement. Get it swapped by Apple.
Be Patient!
Battery life fluctuations right after an iOS update are perfectly normal. Let your iPhone fully re-optimize and iPhone battery draining fast after update issue should resolve itself within a few days. But try the tips above if battery drain persists.