
How to Fix iPad Keeps Crashing: A Step-by-Step Guide Is your iPad crashing repeatedly?
If your iPad keeps freezing, restarting, or shutting down unexpectedly, you’re not alone. iPad crashes are a common frustration for many users. The good news is that with the right troubleshooting steps, you can often fix an iPad that keeps crashing and get your tablet working normally again.

In this comprehensive guide, we’ll walk you through the top reasons an iPad crashes and show you step-by-step how to troubleshoot and resolve the issue. Here’s how to fix iPad keeps crashing:
Why Does My iPad Keeps Crashing? Common Causes
Before you can fix the problem, it helps to understand why iPads crash in the first place. Here are some of the most common culprits:
- Buggy apps – Apps that are incompatible, outdated or buggy can cause iPad crashes and freezes.
- Insufficient storage space – When your iPad storage space runs low, apps can crash more frequently.
- Software issues – iPadOS bugs, glitches or conflicts after an update can trigger crashes.
- Hardware problems – An aging battery, faulty memory chip or other hardware issue can cause stability problems.
- Overheating – Excessive heat from intensive gaming, multitasking or direct sunlight exposure can push an iPad to crash.
Now that you know why iPads crash, let’s look at how to troubleshoot and stop the crashes for good.
Step 1: Close All Apps and Restart Your iPad
The simplest first step is to close out all apps and restart your iPad. This essentially gives the iPadOS a fresh start, clearing out any memory-hogging apps that could be destabilizing your system.
Here’s how to close all apps and restart:
- On iPad with Home button: Double press the Home button to show your recent apps. Swipe up on each app preview to close it.
- On iPad without Home button: Swipe up from the bottom and hold to show your open apps. Swipe up on each app to close it.
- Once all apps are closed, press and hold the Power button to bring up the “Slide to Power Off” slider.
- Turn your iPad back on by pressing and holding the Power button until you see the Apple logo. Give your iPad a few minutes after restarting to see if crashes have stopped. This simple restart fixes many intermittent iPad crashing problems.
Step 2: Check for Software Updates
Outdated iPadOS software is a prime suspect in random crashes. Software updates include bug fixes that patch crashes and stabilize performance.
Here’s how to update your iPadOS version:
- Tap Settings > General > Software Update to check for available updates.
- If an update is available, tap Download and Install.
- Connect your iPad to power and WiFi to allow the large update file to download.
- When prompted, tap Install to install the iPadOS update.
Updating to the latest iPadOS or iPadOS beta often resolves instability and crashing issues caused by software bugs. After updating, monitor your iPad for a few days to see if crashes are resolved.
Step 3: Reset Your iPad (Without Losing Data)
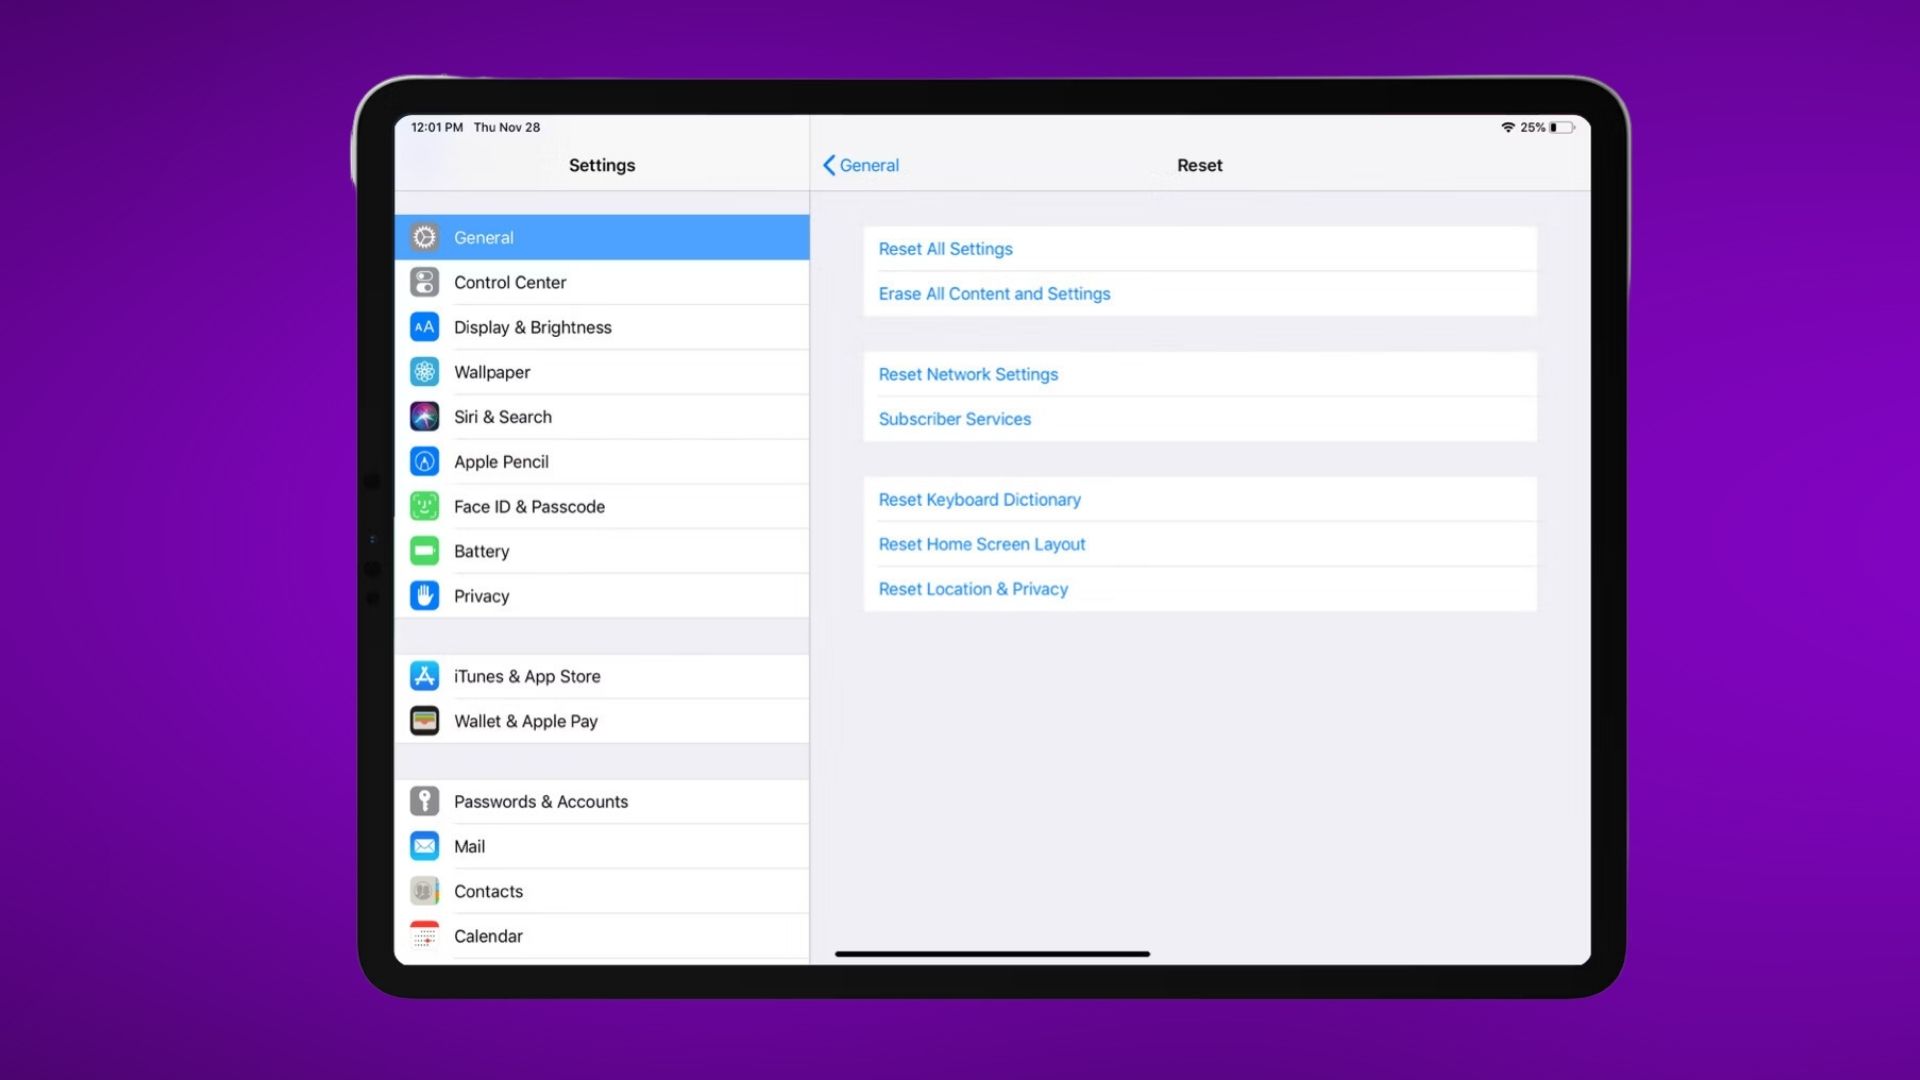
Resetting your iPad restores iPadOS to a clean, fresh state which can eliminate software glitches causing crashes. You can reset without erasing your data.
Here’s how to reset your iPad while keeping your content intact:
- Go to Settings > General > Reset.
- Tap Reset All Settings.
- Enter your passcode if prompted.
- Confirm that you want to reset all settings when prompted.
Your iPad will restart fresh with default settings, but all your apps and data will remain untouched. This seems to resolve iPad crashing for many users with buggy settings.
Step 4: Restore Your iPad Using iTunes or Finder
If crashes continue even after resetting your iPad, the next step is to connect and restore using iTunes or Finder. This will reinstall a clean version of iPadOS and should eliminate any deeper software issues.
Before restoring, be sure to back up your iPad either locally to your computer or to iCloud. Restoring will wipe your iPad.
To restore your iPad using a computer:
- Connect your iPad to your computer using a USB cable and open iTunes or Finder.
- In iTunes or Finder, select your iPad and click Restore.
- Follow the on-screen prompts to confirmation the restore process. Do not disconnect your iPad until finished.
- Once the restore is complete, you can set up your iPad as new or restore your backup.
This should conclusively fix an iPad that keeps crashing if the issue stems from system files. Monitor your iPad’s stability for a few days afterwards.
Step 5: Delete Problematic Apps
If you find your iPad only crashes when using certain apps, uninstalling those apps may stop the crashes.
To uninstall apps that may be causing crashes:
- Hold your finger down on the app icon until the icons start to shake.
- Tap the X icon on the top left corner of the app icon you want to delete.
- Tap Delete when prompted to confirm.
Delete any apps that seem to trigger crashing one-by-one and test to see if it stops the crashes. You can always reinstall apps later. Removing buggy apps often resolves iPad crashing.
Step 6: Free Up Storage Space
If you’re very low on storage space, your iPad has to work harder to manage memory and crashes can occur.
Try freeing up storage space:
- Go to Settings > General > iPad Storage.
- Review suggestions to free up space or offload unused apps.
- Delete old photos/videos, clear cached app data, save files to iCloud, and remove unneeded apps.
Freeing up gigabytes of storage gives iPadOS room to breathe and prevents iPad crashing in constrained memory. Aim to have 10-15% of your total storage free.
Step 7: Update or Reinstall Buggy Apps

Like iPadOS, apps can also contain bugs that make them crash. Updating your apps or reinstalling buggy apps can fix these app issues.
- Open the App Store app and tap your profile icon at the top.
- Go to Available Updates and tap Update All to update your apps.
- To reinstall an app, delete it, then re-download it from the App Store.
App updates and fresh installs will upgrade to the latest versions without crashing bugs or glitches. This resolved crashes for users with a few bad apps.
Step 8: Check Your iPad Battery Health
An aging iPad battery that can’t provide steady power can also cause random crashes and reboots.
Check your battery health and consider replacing your battery if needed:
- Go to Settings > Battery > Battery Health.
- Review your Maximum Capacity – lower than 80% may cause stability issues.
- Tap Battery Health for details on battery replacement options.
Replacing an old battery can restore power stability and stop iPad crashes related to power fluctuations. Consider battery replacement after 3 years of use or 500+ charge cycles.
Step 9: Reset Your iPad to Factory Settings
If you continue experiencing random crashes, a last resort is to erase your iPad entirely and reset to factory default settings.
Important: This will erase all of your data and content on your iPad. Before resetting, be sure to backup your iPad to iCloud or iTunes.
To reset your iPad to factory settings:
- Go to Settings > General > Reset.
- Tap Erase All Content and Settings.
- Enter your passcode if prompted.
- Tap Erase [iPad] to confirm and erase your iPad.
Once your iPad reboots, you can restore your backup or set it up as new. This fail-safe reset will fix even severe instability caused by corrupt software files if no other fix resolves your crashing issues.
Step 10: Contact Apple Support

If you still face random crashes, bugs or instability after trying all troubleshooting steps, your last option is to contact Apple support.
- On your iOS device, open the Apple Support app to chat, call or schedule an appointment at the Genius Bar.
- Visit getsupport.apple.com to request support by email or phone.
- Ask about your options to send your iPad in for evaluation and repair.
Apple support can run diagnostics on your iPad, check logs and determine if you need hardware repair to resolve ongoing crashing problems. Mobile repair or mail-in repair options are available if an issue like faulty memory is suspected.
Final Thoughts
Random iPad crashes, freezes and restarts can certainly be frustrating. But in most cases, you can resolve these issues on your own with some patience and diligent troubleshooting using the steps outlined above.
Start with simpler software-based fixes like closing apps, updating iPadOS, removing apps and freeing up storage. Move towards resets and restores if you isolate the issue to software. Consider hardware factors like battery and contact Apple as a last resort.
With the right fix, you can stop an irritating iPad that keeps crashing and get back to enjoying stable use of your tablet. Let us know in the comments below if any of these troubleshooting tips resolved your iPad crashing issues!