
15 Effective Ways to Fix iMessage Not Working on iPad
iMessage Not Working on iPad? iMessage is Apple’s popular messaging service that allows iPhone, iPad, and Mac users to send messages, photos, videos, and more over WiFi or cellular data instead of using SMS or MMS. iMessage conversations are shown in blue bubbles, while regular texts appear green. But what if those blue bubbles turn green or stop showing up entirely? Read on as we walk through the top troubleshooting tips to get iMessage working again when it stops functioning on your iPad.
Test iMessage by Messaging Multiple Contacts
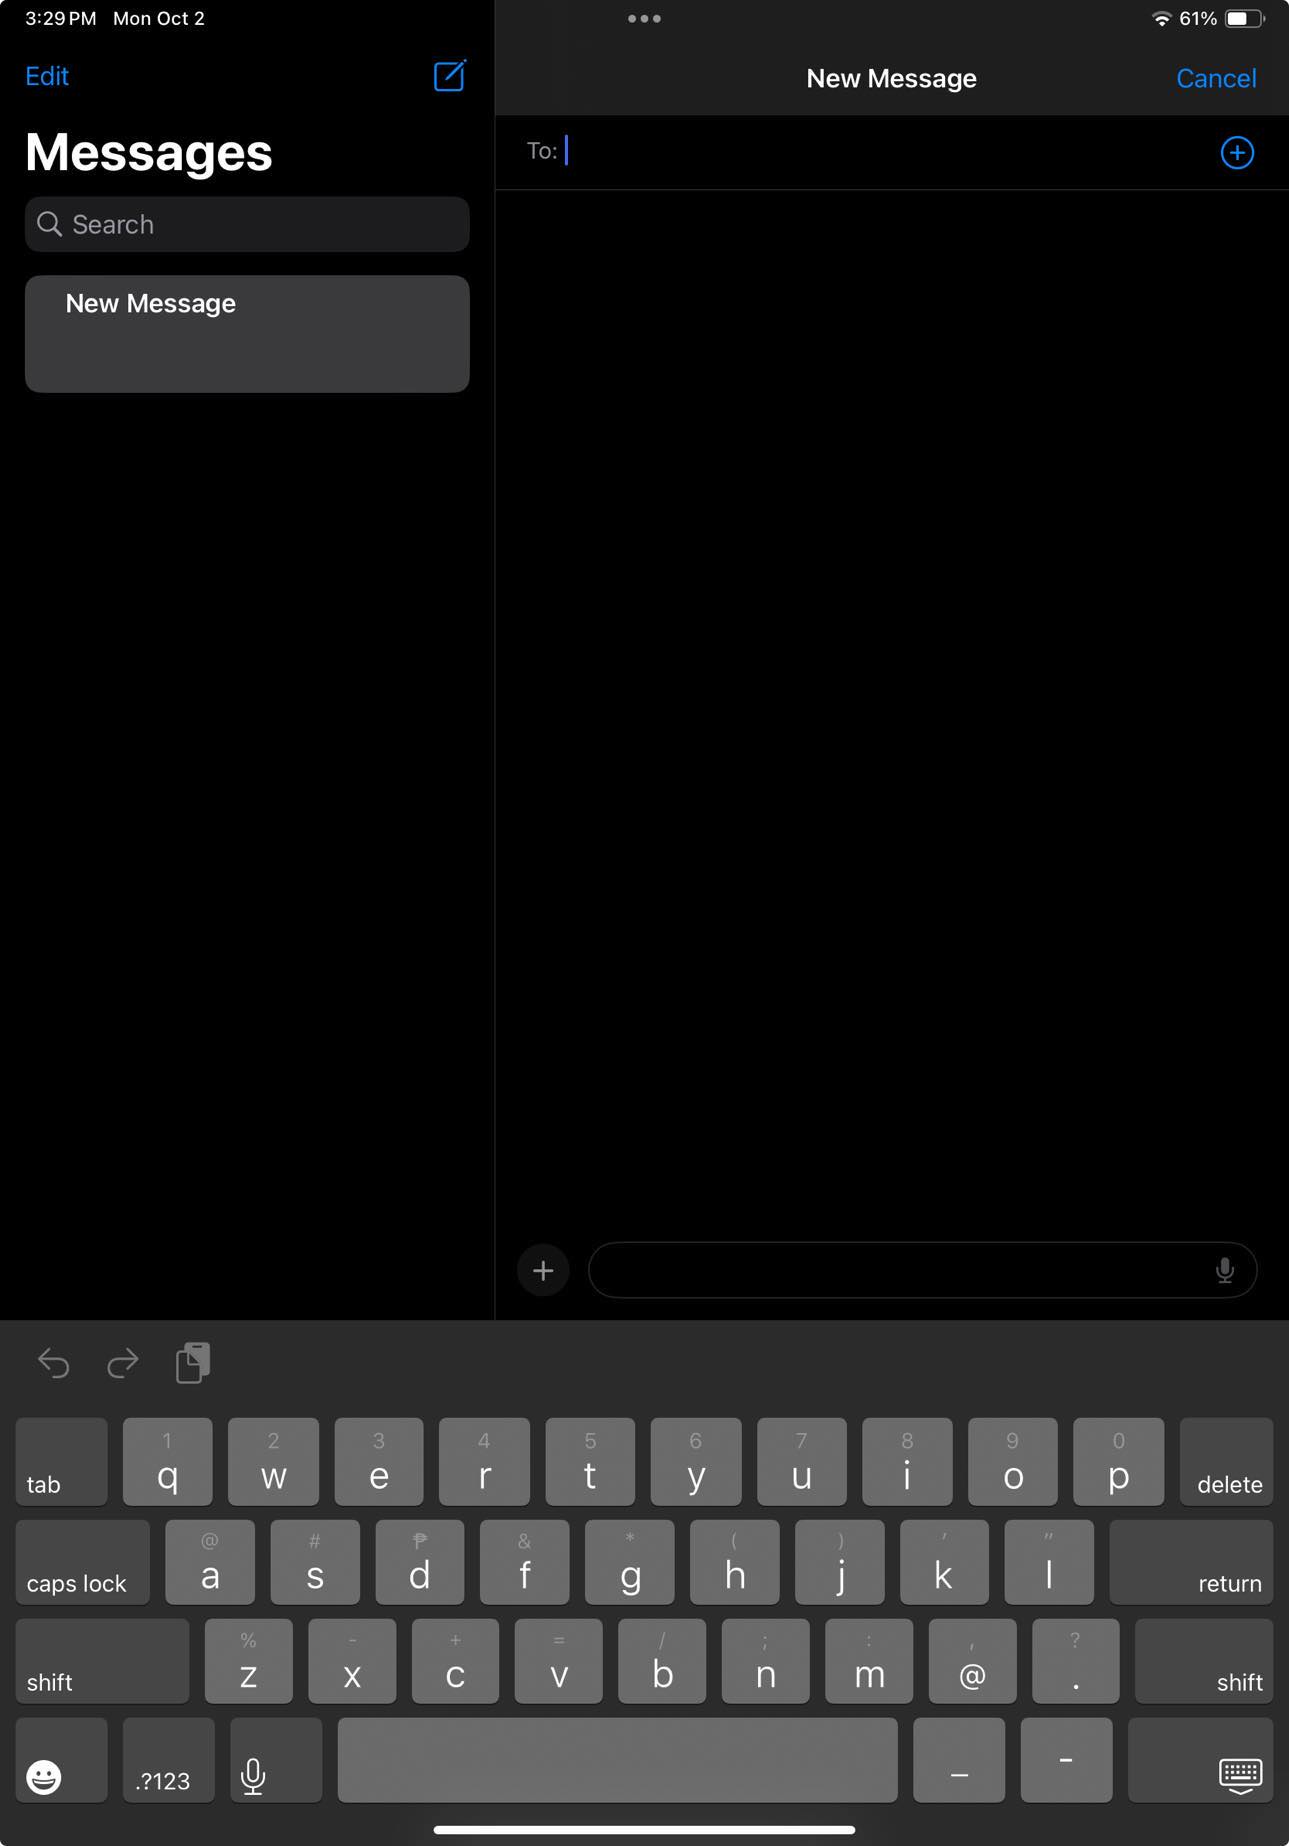
Before assuming iMessage is entirely broken, first check if the problem is isolated to just one contact or widespread. Try sending iMessages to several friends or family members who you know are using Apple devices.
If messages fail to send to one person only, the issue is likely on their end. But if you can’t iMessage multiple contacts, your iPad is probably the culprit.
If you don’t have many contacts with Apple devices to test with, try sending messages through iMessage on another iPhone or iPad you own if possible. This can clarify whether the problem stems from just one device or all.
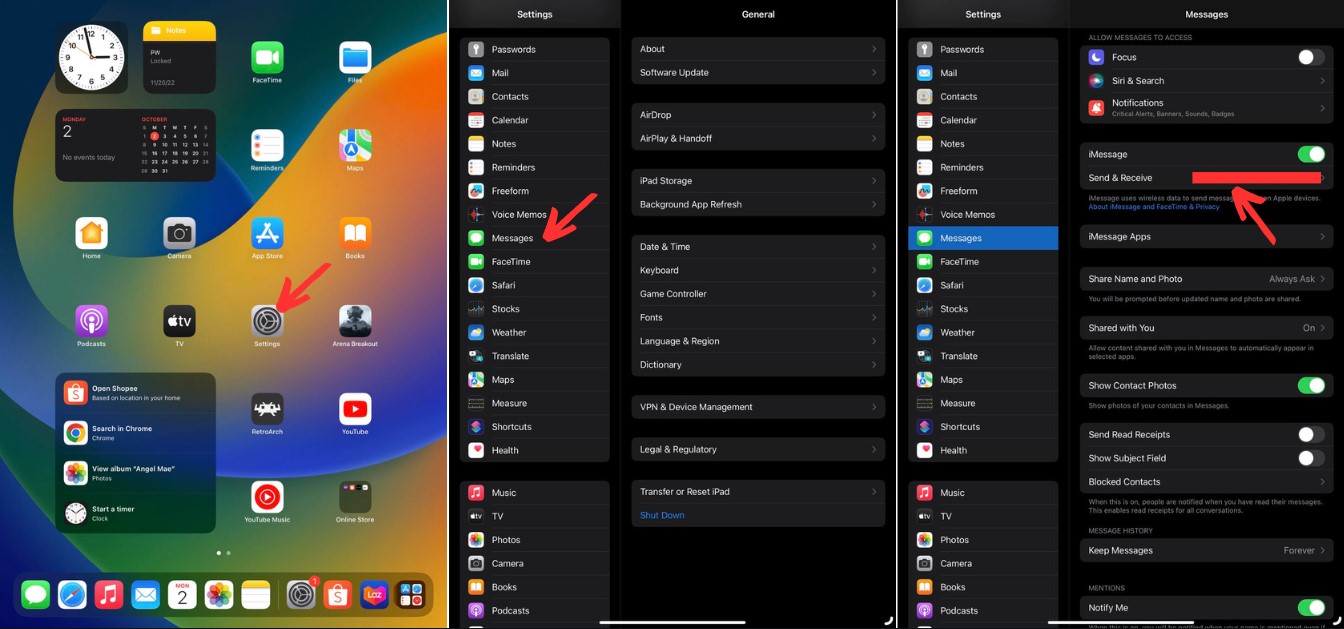
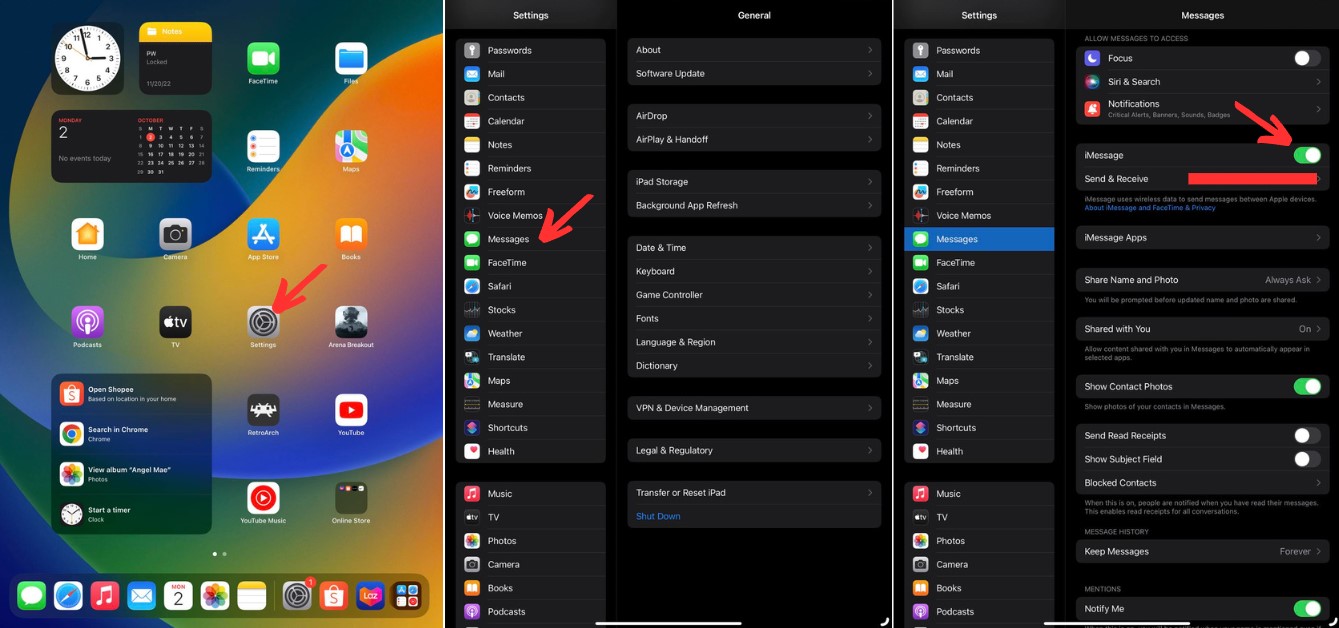
Ensure iMessage Is Enabled Properly on iPad
Even if you’ve used iMessage successfully in the past, your settings could have become disabled. Open the Settings app and tap “Messages.” Ensure the switch next to “iMessage” is turned on.
Then, select “Send & Receive” and validate all phone numbers and email addresses you want to use with iMessage are checked. Your phone number should specifically be enabled under “Start New Conversations From.”
Toggle iMessage Settings like Send & Receive On and Off
If iMessage still won’t work, experiment with flipping various Send & Receive options on and off. Start by only allowing your mobile number and disabling everything else. Test iMessage, then try other combinations if needed.
Many users also recommend choosing your phone number as the sole place to Start New Conversations.
Sign Out and Back Into iMessage
Logging out of iMessage then logging back in can potentially resolve software glitches preventing it from functioning.
Head to Settings > Messages > Send & Receive and tap your Apple ID. Choose Sign Out, then sign back in with your credentials when prompted.
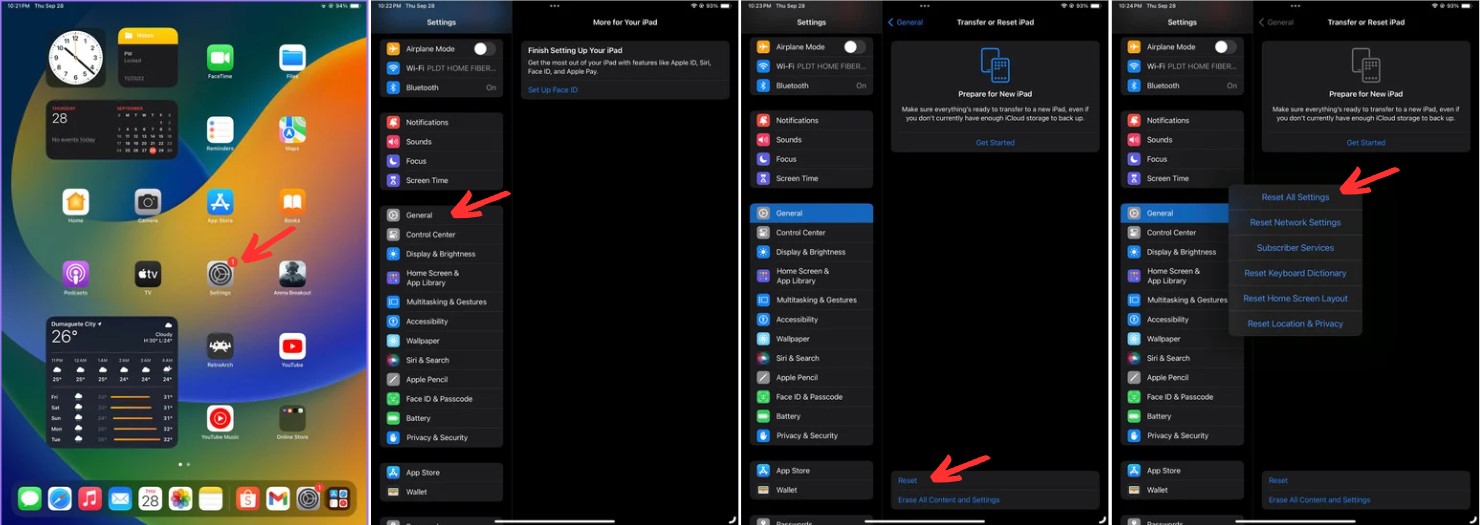
Restart and Reset iPad
Restarting your iPad or resetting all settings to factory defaults can fix numerous issues, including problems with iMessage.
To restart, hold down the Power button until “Slide to Power Off” appears. Swipe to turn off your iPad, wait 30 seconds, then press Power again to restart.
For a deeper reset, head to Settings > General > Reset and choose “Reset All Settings.” Enter your passcode if asked. This will preserve your data but restore all iPad settings to defaults.
Ensure You Have a Working Internet Connection
Since iMessage relies on either WiFi or cellular data, you must have an active internet connection for it to work.
Open Safari and try to load a webpage. If it fails to load, your internet is down, which explains your iMessage problems.
Switch between WiFi and cellular data to see if one works when the other doesn’t. Turn airplane mode on then off to refresh your connectivity.
Update Your iPad Software
If your iPad is out of date, installing the latest iOS update can potentially fix bugs related to iMessage problems.
Head to Settings > General > Software Update and install any available updates. Make sure your iPad is charged sufficiently before updating.
Reset Network Settings
Resetting your network settings restores them to factory defaults, which sometimes resolves finicky issues like iMessage failures.
Go to Settings > General > Reset > Reset Network Settings. Enter your passcode if prompted. This will erase any saved WiFi passwords, so be prepared to re-enter those.
Contact Apple Support for Further Troubleshooting
If all else fails, contact Apple Support via phone, chat, or by booking an appointment at an Apple Store. Apple technicians and geniuses can investigate and perform advanced troubleshooting steps compared to what’s possible at home.
Be prepared to answer questions about when your iMessage issues started, any recent changes before the problem popped up, and steps you’ve already tried to fix it. This information will assist Apple in resolving your dilemma quickly.
Fix Specific iMessage Problems on iPad
Beyond general troubleshooting, users sometimes encounter specific iMessage-related problems on iPad. Here are some examples and targeted solutions.
iMessage Activation Errors
New iMessage users often see activation errors like “Waiting for Activation” or “Activation Unsuccessful.”
First ensure iMessage is toggled on in Settings. If it’s stuck activating, turn iMessage and FaceTime off then back on. Restart your iPad too.
Allow up to 24 hours for activation to complete. Contact your carrier if issues persist.
Can’t Message Non-Apple Users
When you try to text someone without an Apple device, you’ll send regular SMS instead of iMessage, meaning your texts will be green not blue.
If these fail to send, ensure you have cellular signal by turning Airplane Mode on and off. SMS relies on cellular, unlike iMessage which uses WiFi.
iPad Not Receiving Messages from One Contact
If your messages from one person suddenly stopped coming through, their iMessage is likely disabled or they switched to an Android or other non-Apple device.
Have them ensure iMessage is enabled on their end and turned on for the right phone number or email.
If they no longer own an Apple device, they’ll need to deregister their phone number from iMessage, otherwise texts from you will still try sending as iMessages and fail.
Can’t Send Group iMessages
Group iMessages will revert to regular group SMS texts if just one recipient isn’t using an Apple device.
Start a fresh group conversation instead of adding a non-Apple user to an existing iMessage group thread.
iPad and iPhone Messages Out of Sync
If your iPad messages don’t match your iPhone, enable iMessage syncing. Head to Settings > [your name] > iCloud > Messages and turn on “iMessage” under the Sync section.
Final Thoughts on iMessage Not Working on iPad
From testing different contacts to restarting your iPad and ensuring iMessage is properly enabled, the tips above cover a wide range of troubleshooting steps to take when iMessage misbehaves on your iPad. Patience and slowly working through each solution often leads to success. But for tricky iMessage bugs that persist, Apple Support can provide expert assistance. With the right fixes, those reliable blue bubbles will be back in no time!