
4 Ways on How to Change Your Wi-Fi Password on iPhone
Changing your Wi-Fi password on an iPhone is simple and only takes a few minutes. Whether you want to secure your network from neighbors or just update your password after getting a new router, following these steps will allow you to change your Wi-Fi password easily.
How to change wifi password on iPhone
Prepare to Change Your Password
Before changing your password, make sure you have the following:
- Your iPhone
- The new Wi-Fi password you want to use
- Access to your wireless router (either physically or through a web browser)
Once you have those three things, you’re ready to change the password.
1. Forget the Old Wi-Fi Network
The first step is to make your iPhone forget the old network and password. Here’s how:
- Open the Settings app on your iPhone.
- Tap on “Wi-Fi”.
- Find your Wi-Fi network name and tap on the “i” icon next to it.
- Tap on “Forget this Network”.
- Confirm you want to forget the network when prompted.
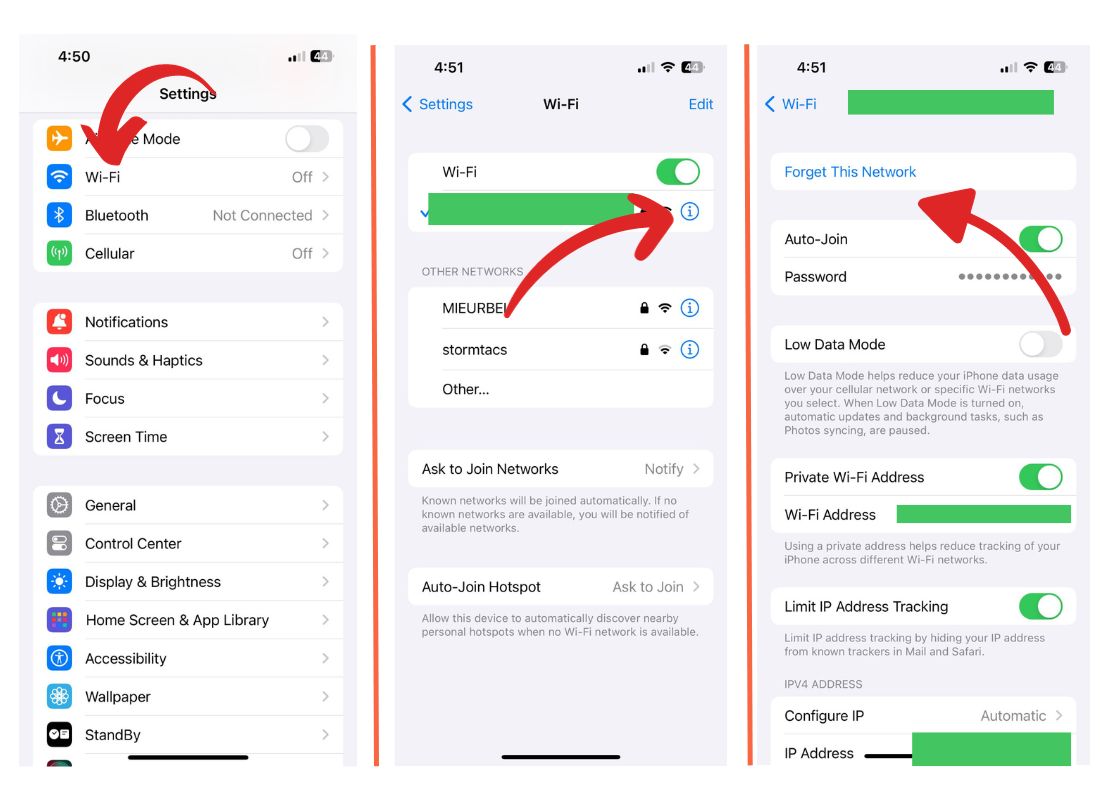
Your iPhone will no longer automatically connect to that Wi-Fi network.
2. Connect to the Network and Enter New Password
Now that your iPhone has forgotten the old network, follow these steps to connect to it again using the new password:
- Go back to the list of available Wi-Fi networks in Settings.
- Tap on your Wi-Fi network name to re-join.
- When prompted, enter the new Wi-Fi password.
- Tap “Join” to connect to the network.
As long as you entered the new password correctly, your iPhone should connect successfully.
Troubleshoot Connectivity Issues
If your iPhone won’t connect after you enter the new password, here are some tips:
- Double check that you entered the correct new password.
- Move closer to your wireless router for a better signal.
- Turn your router off and back on again to reset the connection.
- Forget the network on your iPhone and re-enter the password again.
Resetting your network hardware is often the quickest way to resolve connection problems after changing a Wi-Fi password.
3. Change Your Mobile Hotspot Password
If you use your iPhone as a mobile hotspot for other devices, changing that Wi-Fi password is easy:
- Go to Settings > Personal Hotspot.
- Tap the Wi-Fi Password field.
- Enter your new password.
- Tap “Done” to save it.
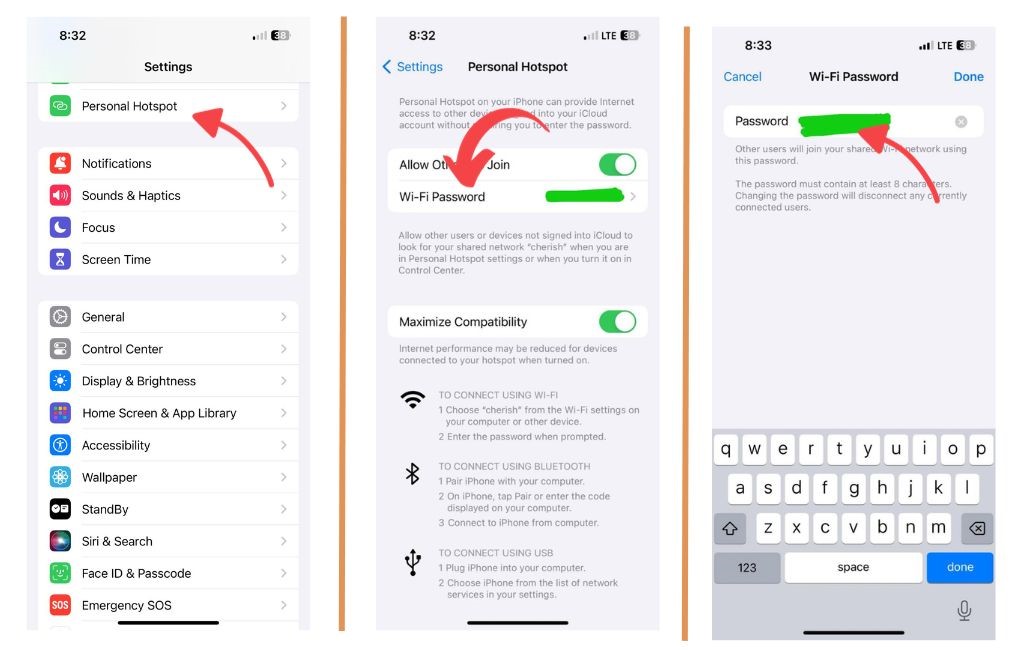
Now other devices can connect to your iPhone’s mobile hotspot using the new password.
Tips for Creating a Strong Wi-Fi Password
When changing your Wi-Fi password, take the opportunity to improve your network security:
- Use at least 8 characters, combining upper and lower case letters, numbers, and symbols.
- Avoid using personal information like birthdates or dictionary words.
- Don’t use the same password for multiple accounts.
- Change your Wi-Fi password every 6 to 12 months.
Using strong and unique passwords for all your devices and online accounts helps protect against hacking attempts.
4. Reset Your Password If You Forget It
If you forget your new Wi-Fi password, all is not lost. Here is how to reset it:
- Physically connect to your wireless router using an ethernet cable.
- Open your web browser and visit your router’s IP address.
- Enter your router admin username and password (check your router’s manual for this).
- Navigate to your router’s wireless settings.
- Here you can view or change your Wi-Fi name and password.
Just be sure to update all your devices again with the new password after resetting it.