Just upgraded your iPhone 11 to the latest iOS version and now having issues with iPhone 11 WiFi And Bluetooth Not Working? You’re not alone. Many iPhone 11 users have reported problems like WiFi disconnecting, Bluetooth turning off randomly, and more after installing iOS updates. The good news is – these issues can often be fixed with a few simple troubleshooting steps.
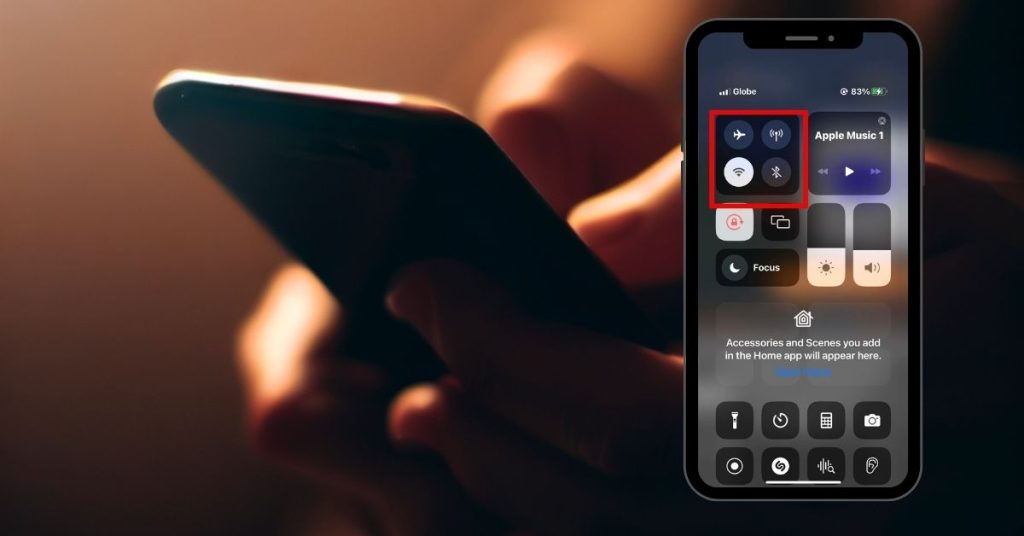
Troubleshooting a problem on the iPhone 11 WiFi And Bluetooth Not Working
Experiencing issues with Wi-Fi and Bluetooth connectivity on your iPhone 11 can be frustrating, as these features are essential for staying connected and using various wireless devices. If you’re facing problems where Wi-Fi or Bluetooth is not working on your iPhone 11, there are several troubleshooting steps you can take to diagnose and resolve the issue.
In this section, we will explore the possible causes behind the iPhone 11 Wi-Fi and Bluetooth not working problem and provide practical solutions to help you restore wireless connectivity on your device.
First solution: Restart your iPhone (soft reset)
For symptoms that have just showed up, they could be among other random system glitch triggered by some minor firmware crashes. Usually the transpiring symptoms are minor and therefore they can easily be remedied by rebooting the system. That said, you can try a soft reset on your iPhone 11 as the first potential solution to apply. Here’s how it’s done:
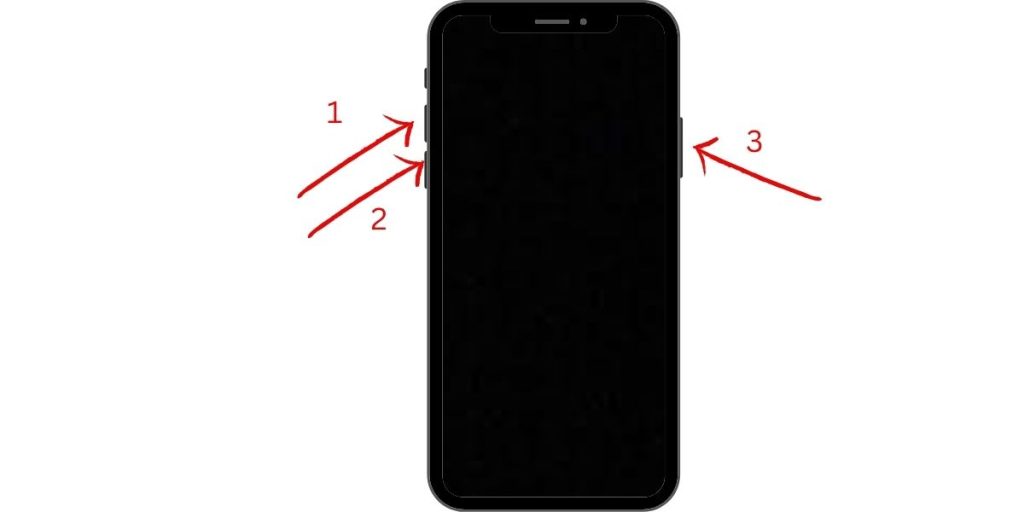
- Press and hold both the Side and Volume Up buttons for a few seconds.
- Release both buttons when the Slide to Power off bar appears.
- Swipe or drag the bar to turn your device off.
- After about 30 seconds, press and hold the Side button and then release when the Apple logo appears.
Allow your phone to finish its boot sequence and the Wi-Fi signal on its status bar to become stable. If you don’t see any Wi-Fi signal indicator, head back to Settings-> Wi-Fi menu and then toggle the Wi-Fi switch to turn the feature on. If the Wi-Fi switch doesn’t turn on and remains grayed out, it means it’s still stuck and needs to be fixed. Thus, you will need to continue troubleshooting and try other options to rule out other possible culprits.
Second solution: Toggle Airplane Mode on and off
When Airplane Mode is turned on, wireless radios of your iPhone are disabled and that includes the Wi-Fi feature. Many of those who were faced with the grayed out Wi-Fi button issue have later found that the main reason behind was the Airplane mode being enabled on their device. Thus, turning the feature off resolved the issue. Other people on the other hand, have utilized Airplane mode to fix the same problem on their iOS device. And here’s what they did:
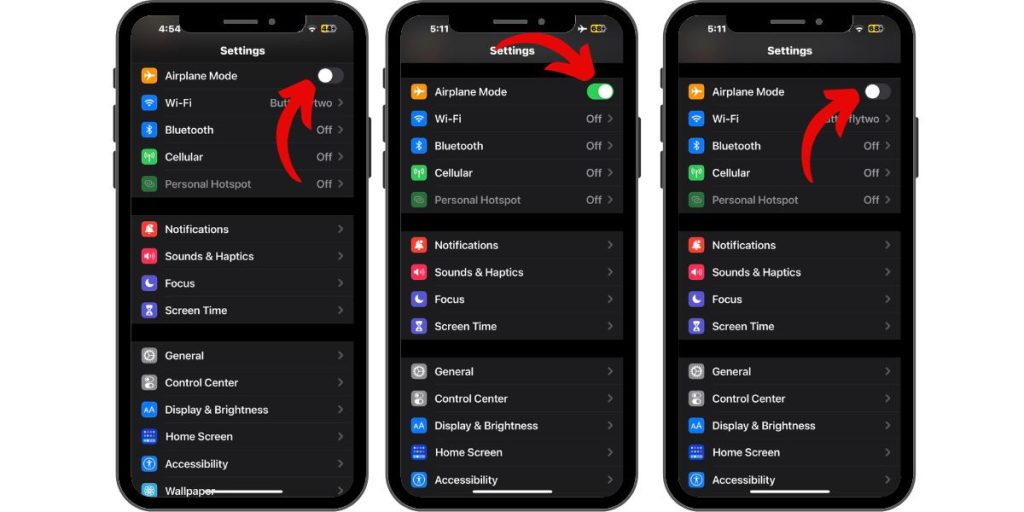
- From the Home screen, tap Settings.
- Select Airplane Mode.
- Toggle the Airplane Mode switch to turn the feature ON. Doing so disables your iPhone’s wireless radios and associated features like Wi-Fi and Bluetooth.
- While Airplane Mode is turned on, reboot or soft reset your iPhone to clear out network cache.
- After it reboots, go back to Settings-> Airplane Mode menu.
- Then toggle the Airplane Mode switch to turn it OFF again.
Give your iPhone a few moments to re-establish wireless signals and then go back to Wi-Fi settings menu then retry toggling the Wi-Fi switch to see if it’s already working as intended.
The above steps demonstrate a simple workaround known as the Airplane mode trick. This trick has been known to have done wonders to a lot of iPhone owners who have dealt with various types of wireless connectivity issues including a grayed out Wi-Fi button or stuck Wi-Fi switch attributed to some system issues.
Third solution: Install new iOS update to fix your iPhone 11 grayed out Wi-Fi button
System problems depicted by recurring symptoms are usually deemed major issues that require dedicated fixes. To deal with these types of problems on an iOS device, installing the latest iOS version is highly recommended. These updates are usually rolled out along with some programmed patches to eliminate stubborn system bugs that trigger adverse system behaviors on the device. To check on available OTA system updates, your phone must be connected to the internet. But since this couldn’t be done since your iPhone’s Wi-Fi button is grayed out, you will need to use iTunes as an alternative solution. This also means the need for you to secure a computer that has the latest version of the application. Once you have all things set, just follow these steps to start check for and installing new iOS update on your iPhone 11:
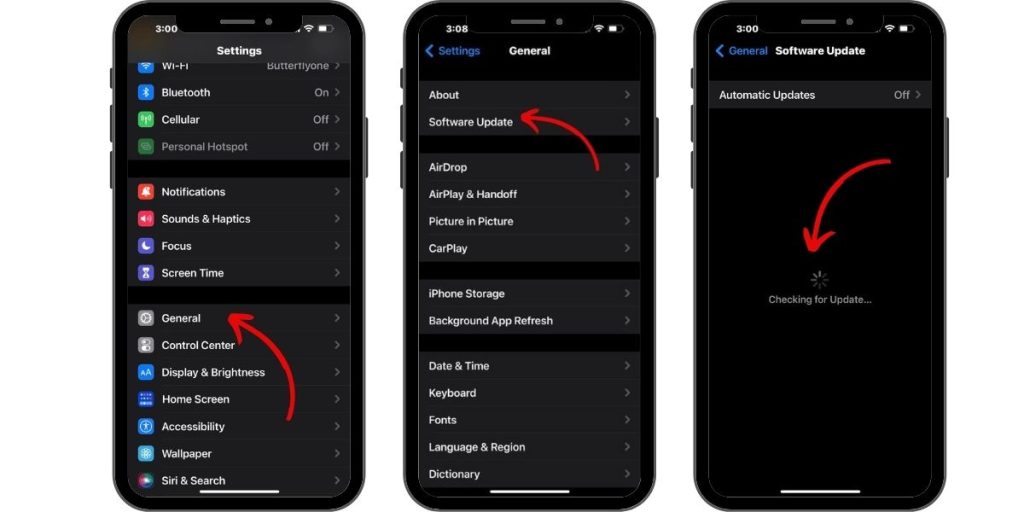
- Connect your iPhone to the computer using the original USB or Lightning cable.
- Open iTunes on the computer and wait for it to recognize and sync with your iPhone.
- Select your iPhone 11 when it appears on the computer.
- Navigate to the Summary section and then click the button to Check for Update.
- If an update is available, click the button to Download and Update your phone.
- Enter your passcode, if prompted to continue.
When network-related issues arise and the affected devices are all from a specific carrier, there is a higher chance that the transpiring problem is isolated to that carrier. And if that’s been reported and confirmed to be a carrier-related network problem, the affected carrier will do some means to address such a widespread issue and then solve the problem. The said solutions are typically imposed automatically or manually through so-called carrier settings updates. Aside from network bug fixes, carrier updates are also pushed to provide new carrier features for network system enhancements. To make sure you haven’t missed to implement some of these critical updates, follow these steps to check and install new carrier updates on your iPhone 11:
- Connect your iPhone to the computer and then open iTunes. Be sure to use the latest version of iTunes app to avoid bumping into some system conflicts.
- Wait for your device to sync and back up with iTunes.
- Click to select your iPhone 11 when it appears in iTunes.
- Navigate to the Summary section and then hold down the Shift key on the keyboard and click Check for Update. Doing so will prompt iTunes to install an iOS image (*.ipsw).
- Change the file type to iPhone/iPad Carrier Configuration File (*.ipcc).
- Select the desired file and then follow the rest of the onscreen instructions to complete the process.
Wait until the carrier update installation is complete then turn your iPhone off. You can safely disconnect your iPhone from the computer while it’s powered off.
Fourth solution: Reset network settings on your iPhone 11
A network settings reset can also be considered among the possible solutions to deal with network-related errors on your iPhone. This reset will erase all your current network preferences including Bluetooth connections, Wi-Fi settings, APNs and other relevant information. Personal data saved on your iPhone storage will not be affected, so you don’t have to worry about losing critical information in the process. Just be sure to follow these steps:
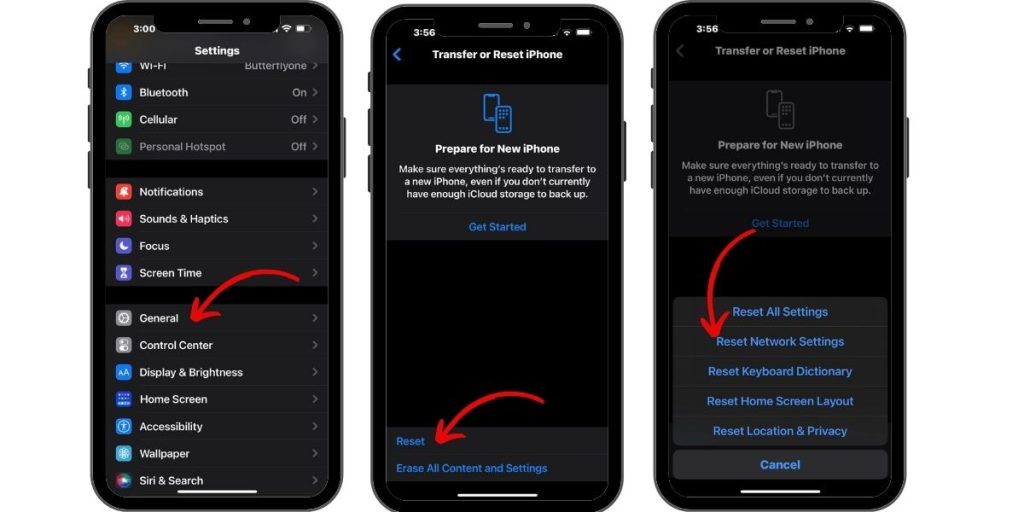
- From the Home screen, tap on Settings.
- Select General.
- Scroll down and tap on Reset.
- Tap Reset Network Settings from the given options.
- Enter your passcode if prompted to continue.
- Confirm action by tapping on Reset Network Settings again.
When the reset is finished, your iPhone should restart on its own and then loads up the default network configurations. This means all network features and functions that disabled by default will have to be re-enabled on your device, if you want to use them again later. And that includes the Wi-Fi feature.
That said, head back to Settings-> Wi-Fi menu and then try to toggle the Wi-Fi switch to see if it’s already turning on.
Fifth solution: Reset all settings to fix the problem on your iPhone 11 grayed out Wi-Fi button
This is another type of reset that can be considered handy when it comes to resolving devices issues that are attributed to some messed up system settings or invalid system customization on your iPhone. In this reset, network settings are not only the ones that are deleted but also all other customized system settings on the phone. Any associated errors are likewise removed and so as the transpiring symptoms.
There’s no need to back up files beforehand because this reset does not affect any saved data on your iPhone storage, just like a network settings reset. If you wish to try your luck in this reset, then you may refer to these steps:
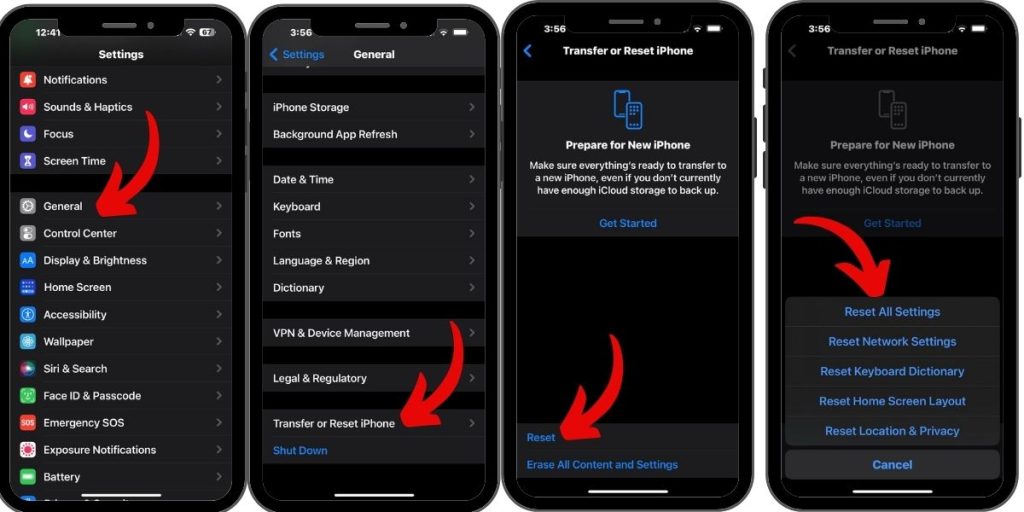
- From the Home screen, tap on Settings.
- Select General.
- Scroll down and tap on Reset.
- Tap to select Reset all settings from the given options.
- Enter your passcode if prompted to continue.
- Confirm action by tapping the option to reset system settings on your iPhone.
Wait for your phone to restart on its own as that indicates that the reset is finished. By then you can start re-enabling necessary features so you can use them again on your phone. And that includes the Wi-Fi feature.
Last resort: Factory reset your iPhone 11
If all else failed to fix the problem and your iPhone 11 Wi-Fi button remains grayed out or disabled, your next option would be to eliminate major system errors that might have ruined the Wi-Fi system of your iPhone. And to get this done, you can resort to a factory reset using iTunes. This will erase everything from your iPhone system including all saved information on the internal memory, downloaded apps and content, saved contacts and other personal information along with complex system errors and stubborn system bugs that trigger recurring system issues. Just don’t forget to back up all your important data beforehand so you’d still be able to recover them afterwards. Just refer to these steps whenever you’re all set to wipe your iPhone 11:
- Open iTunes on your computer, if you haven’t already.
- Connect your iPhone to the computer with the USB cable or Lightning cable that came with it.
- Wait for iTunes to recognize your device and when it does, you should see your iPhone’s icon in iTunes.
- Click to select your iPhone 11 when it appears in iTunes.
- Then navigate to the Summary section.
- Click on the Restore [iPhone] button.
- If prompted, click on the Restore button again to confirm factory settings reset.
Follow the rest of the onscreen commands to finish wiping data from and restoring factory default settings on your iPhone.
Still couldn’t fix your iPhone 11 grayed out Wi-Fi button
If the above solutions failed to fix the problem and your iPhone’s Wi-Fi button remains grayed out, then you should contact Apple Support to report the problem for further recommendations. Your device might have obtained some sort of physical or liquid damage that resulted in some damage to your phone’s Wi-Fi components. You can also visit the nearest Apple-authorized service center in your place and ask an iPhone technician to examine your device. If your iPhone is still under warranty, then you should avail for iPhone warranty instead.
ALSO READ: Dealing with common Wi-Fi problems on Apple iPhone 11