How to fix Wi-Fi that is not working on iPhone after iOS 13 update

All you did was updated your iPhone to iOS 13 but some reason, Wi-Fi is no longer working on your iPhone. It’s a bummer indeed, considering that most of your iPhone features and apps require Wi-Fi internet connection in order to work as intended. Apparently, this is a problem that needs prompt solution. To give you some input, I’ve mapped a few potential solutions for you to refer to. Read on and get help.

Before we proceed, if you’re looking for a solution to a problem with your phone, try to browse through our troubleshooting pages to see if we support your device. If your phone is in the list of our supported devices, then go to the troubleshooting page and look for similar problems. Feel free to use our solutions and workarounds. Don’t worry it’s free. But if you still need our help, then fill up our iOS issues questionnaire and hit submit to contact us. 

YouTube video

Troubleshooting Apple iPhone with Wi-Fi issues after iOS 13

One of the many post-update issues transpiring on iOS devices is on Wi-Fi connectivity. Among the common symptoms are Wi-Fi drops, disabled Wi-Fi, slow Internet browsing, and no Internet connection at all. Problems like these typically need to be addressed quickly as a lot of features and apps are affected. And as anticipated, that same problem still emerges among the post-update symptoms from the recently rolled out iOS 13 software. If you’re one of those iPhone users who are troubled with the same issue on Wi-Fi that suddenly stops working after installing the iOS 13 update, then this post is for you. Keep reading to have some extra inputs on how to troubleshoot and deal with the iOS 13 Wi-Fi problem.

Don’t forget to do test browse after performing each of the following solutions to determine whether or not the problem is resolved. You may start whenever you’re ready.

First solution: Power cycle the network equipment.

The very source of your Internet connection at home is the network equipment — either a wireless router or a modem. With that said, if something’s wrong with the network equipment, all devices that are connected to it will also experience internet problems from slow browsing to intermittent or no internet connection at all. If all your devices are experiencing the same problem, then the network equipment is likely to blame. Oftentimes, the emerging symptoms are inflicted by minor firmware crashes on the network equipment. And the simplest yet very effective solution to these is the so-called modem/router power cycle. If you can access the router/modem at the moment, then you can give this tweak a try first. Here’s how it works:

  1. Turn off the network equipment by pressing on its power button/switch until it shuts down.
  2. While it’s turned off, unplug its AC adapter from the power source for about 30 seconds to 1 minute. That should be enough breather for the network equipment.
  3. After the elapsed time, plug its AC adapter back into the power source.
  4. Then press the power button until the network equipment turns on again.
  5. Wait until the Wi-Fi signal indicator becomes stable. 

A few moments later, you should see that the Wi-Fi signal indicator on your iPhone regains signal bars. If you haven’t configured your iPhone to connect to the Wi-Fi network automatically, then you will need to reconnect to Wi-Fi just like the way you did before.

Wait and see if your iPhone successfully connects to Wi-Fi and if it does, open a browser app to do some test browsing. Try to navigate as many websites as possible to determine if the internet connection is back up and running properly again. You can also try loading internet-based applications for further testing. If online apps are able to load up and work as intended, then that denotes the problem is fixed. Otherwise, proceed to the next possible solution.

ALSO READ: How to fix iOS 13 “Stuck on Verifying Update” error on iPhone or iPad

Second solution: Turn Wi-Fi off then reboot the iPhone (soft reset). 

Your iPhone’s Wi-Fi functions likely need a restart from the update. It’s a common aftermath for many apps and features to suddenly stop working or fail after a new update implementation. As a result, different types of adverse symptoms emerge. In the case where Wi-Fi is showing similar symptoms, restarting the iPhone’s Wi-Fi function will likely solve it. So here’s what you should try doing next:

  1. From your Home screen, tap Settings.
  2. Select Wi-Fi.
  3. Then toggle the Wi-Fi switch to turn the feature OFF.

While Wi-Fi is turned off, soft reset or reboot your iPhone. This is imperative to clear out junk files and any corrupt temporary Wi-Fi data. It also refreshes the phone’s internal memory and operating system. The steps to performing a soft reset vary depending on what type of iPhone in use. 

If you’re using an iphone x or later variant, a soft reset is carried out through these steps:

  1. Press and hold the Side button and either Volume button until the Power off slider appears.
  2. Drag the slider to power off your iPhone completely.
  3. Then after 30 seconds, press the Side button again to turn your iPhone back on.

If you’re using an iPhone 8, 8 Plus or earlier iPhones with a Home button, a soft reset is done this way:

  1. Press and hold the Top or Side button until the Power off slider appears.
  2. Drag the slider to power off the phone completely.
  3. After about 30 seconds, press and hold the Top or Side button again to turn the phone back on.

Allow your iPhone to finish its boot-up sequence and then go back to Settings-> Wi-Fi menu. Toggle the Wi-Fi switch to turn Wi-Fi back on again. Reconnect to your Wi-Fi network and see if everything is going back to normal.

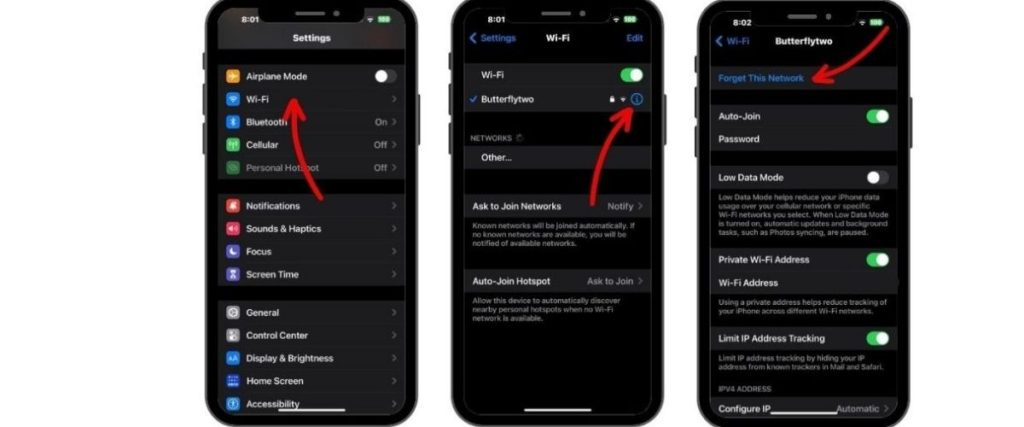
Third solution: Forget Wi-Fi network then add it back (iOS 13)

It’s possible that your Wi-Fi network has been corrupted after the new iOS version was installed. As a result, your iPhone’s wireless functions have suddenly stopped working and so as the relevant services. If this is the case, then the corrupted Wi-Fi network must be deleted to set up a new one. Here’s how it’s done:

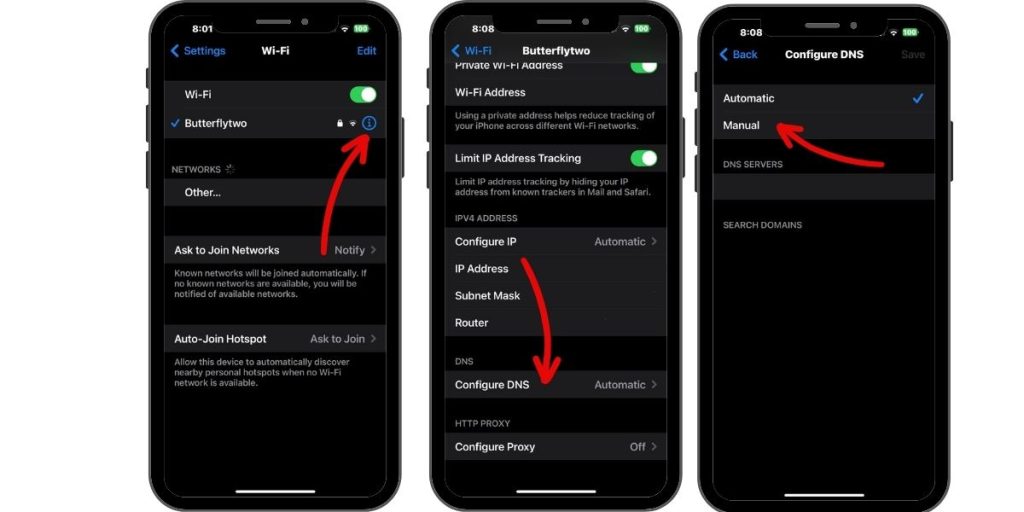
  1. From the Home screen, navigate to Settings-> Wi-Fi menu.
  2. Make sure that the Wi-Fi switch is turned on so that you’ll be able to see the list of available Wi-Fi networks.
  3. Tap the name of your Wi-Fi network (SSID).
  4. Then tap the information (i) icon next to the name of your Wi-Fi network. 
  5. Select Forget This Network. This is the command to delete the selected Wi-Fi network.
  6. If prompted, enter your passcode to confirm action and proceed.

You can also delete any other Wi-Fi networks saved on the phone so that none of them would cause conflict to the Wi-Fi network you’re using. Once you’re done forgetting all saved Wi-Fi networks, reboot/soft reset your iPhone to clear its network cache. Allow it to re-establish Wi-Fi signal after it boots up. Then go back to Settings-> Wi-Fi menu and toggle the Wi-Fi switch off and on again. Wait until the list of Wi-Fi network populates on the screen. And then select the Wi-Fi network that you wish to connect to. Be sure to enter the correct Wi-Fi password if prompted. 

Fourth solution: Toggle Airplane Mode on and off again.

Another simple old trick that have done wonders to many iPhone owners who have dealt with various types of wireless connectivity issues is the so-called Airplane Mode trick. It works by simultaneously restarting and refreshing wireless functions of the iPhone. If you haven’t done this yet, then it wouldn’t hurt if you’d give it a shot and see how it does. Just refer to these steps whenever you’re all set to start performing the Airplane Mode trick on your iPhone:

  1. From the Home screen, tap Settings.
  2. Select Airplane Mode.
  3. Toggle the Airplane Mode switch to turn the feature ON. Your iPhone’s wireless radios and relevant functions are then disabled simultaneously.
  4. While Airplane Mode is turned on, reboot your iPhone (soft reset) to clear out the cache and to refresh its internal memory.
  5. When the phone is finished rebooting, head back on to Settings-> Airplane Mode menu.
  6. Then toggle the switch to turn Airplane Mode OFF again.

This should trigger your iPhone’s wireless radios and functions to reactivate. To get back online, turn on Wi-Fi from Settings then reconnect to your Wi-Fi network. If your iPhone successfully connects, open a browser or internet-based apps to test whether or not your Internet connection is already working properly again.

ALSO READ: Apple iPhone iOS 13 update gets stuck on Resume Download

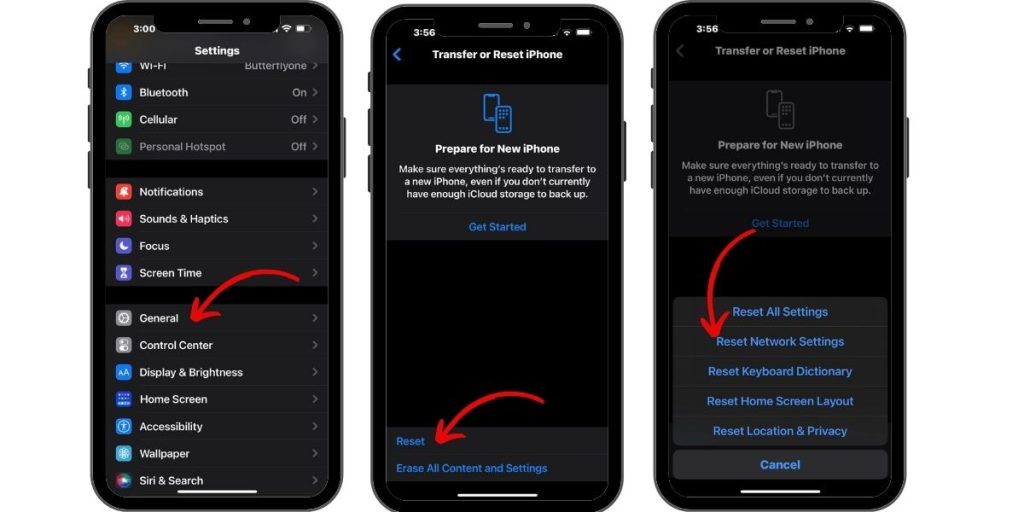
Fifth solution: Reset network settings on the iPhone.

Network-related issues that aren’t resolved by the initial procedures are usually due to complex errors. What probably happened was that your previous network settings have been overridden by the recently installed platform and eventually resulted in some conflicts. To clear this out, performing a network settings reset can help. This reset erases your recent network settings and restores the original network options and values. Any problems tied to network settings errors will therefore be resolved. This won’t affect any saved information on the internal memory thus creating backups won’t be necessary. Here’s how it’s done:

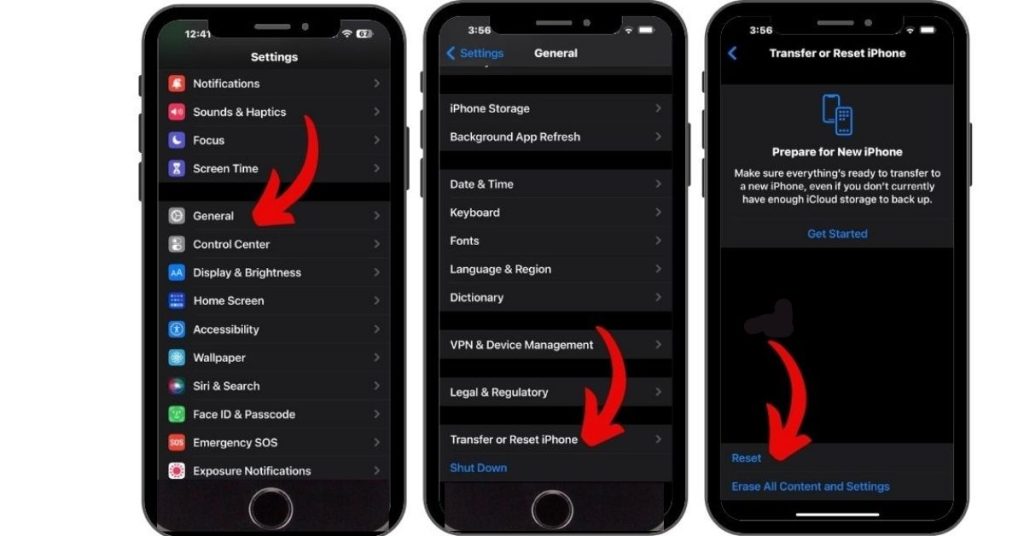
  1. Go to the Home screen then tap on Settings.
  2. Tap General.
  3. Scroll down to and tap on Reset.
  4. Choose the option to Reset network settings.
  5. If prompted, enter your passcode to proceed.
  6. Then tap the option to confirm that you want to reset network settings on your iPhone.

When the reset is finished, your iPhone should restart on its own and then loads up the original network configurations. Don’t forget to reconnect to your Wi-Fi network to get back online and use online services.

Sixth solution: Reset all settings on the iPhone.

If the previous reset doesn’t solve the problem, then you can try this next reset to deal with post-update symptoms attributed to incorrect system settings. Here’s how it works:

  1. From the Home screen, tap on Settings.
  2. Tap General.
  3. Scroll down to and tap on Reset.
  4. Choose the option to Reset all settings.
  5. Enter your device passcode when asked to continue.
  6. Confirm that you want to reset all settings on your iPhone.

All your customized settings are deleted after the reset as default configurations and settings values are restored. This means the need for you to re-enable features that are disabled by default (including) so you can use them again on your phone. This reset doesn’t result in permanent data loss as it doesn’t affect internal data saved on your phone memory.

ALSO READ: How to fix iPhone battery draining faster after iOS 13 update

Still couldn’t get Wi-Fi to work on your iPhone after iOS 13 update?

Perhaps it’s about time for you to escalate the problem to your Internet service provider or Apple Support. The fact that you’re still facing the same dilemma after carrying out all the aforementioned procedures is an indication that the problem isn’t rectifiable on your end. There might be some temporary outage affecting wireless network services in your place. You can ask your Internet service provider to check on their outage board if necessary. If you suspect that the problem is with the network equipment (modem/router), then you can ask your service provider to troubleshoot modem/router issues. If necessary, they can reset the network equipment remotely.

Or you can just report the problem straight to Apple Support so that they can make further assessments to determine whether or not this problem really is inflicted by an iOS 13 bug. If that’s confirmed to be a post-update bug, then Apple is obliged to develop the required fix patch. 

Connect with us

We are committed to helping our readers fix the problems with their phones as well as learn how to properly use their devices. So, if you have other issues, you may visit our troubleshooting page so you can check by yourself the articles we’ve already published that contain solutions to common problems. Also, we do create videos to demonstrate how things are done on your phone. Visit our Youtube Channel and please subscribe to it. Thanks.