Does your iPhone keep disconnecting from Wi-Fi after updating iOS? Don’t lose signal, this guide will help troubleshoot and resolve Wi-Fi dropping issues.
Reliable Wi-Fi connectivity is essential for uninterrupted access to apps, email, and internet browsing when cellular data isn’t available. But sometimes after an iOS update, your iPhone may keep losing connection to Wi-Fi networks and reporting no internet. Understandably frustrating when this vital feature falters!
While intermittent Wi-Fi after iOS updates is irritating, the problem can often be quickly resolved through some basic user-level troubleshooting. Let’s examine potential causes of Wi-Fi dropping issues and proven steps to get your iPhone maintaining reliable wireless connections again.
Why Does My iPhone Keep Losing Wi-Fi?
Wireless connectivity issues transpiring from an update are usually due to some unforeseen firmware bugs and glitches. Most of these problems are resolved by DIY troubleshooting, if not, follow-up updates containing patches.
Some common reasons your iPhone may keep disconnecting from Wi-Fi include:
- Bug introduced in latest iOS version
- Outdated router firmware needing an update
- Wi-Fi antenna damage from drops or moisture
- Incorrectly configured DNS settings
- Too many devices connected overcrowding router
Identifying the specific trigger points us to the right solution. So let’s go ahead and try to fix it.
Troubleshooting Intermittent Wi-Fi Connection on iPhone
To rule out common factors that may be destabilizing your iPhone’s wireless functions, performing these subsequent actions is recommended.
Here’s what to do in order to restore and maintain consistent Wi-Fi connections on your iPhone in iOS 17:
Step 1: Install the latest iOS version (iOS 17.x)
Apple regularly releases iOS updates to fix known bugs and issues. If your iPhone is experiencing Wi-Fi drops after a recent update, it’s possible that the next update will include a fix.
iOS updates also include security updates to protect your device from malware and other threats. These updates can sometimes help to resolve Wi-Fi issues as well. Furthermore, these new updates can improve the overall performance of your iPhone, including its Wi-Fi connectivity.
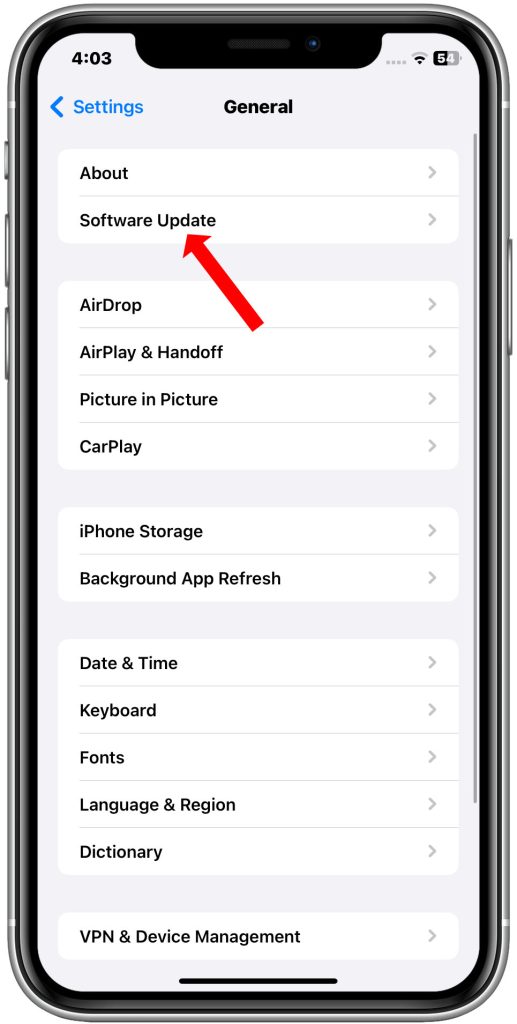
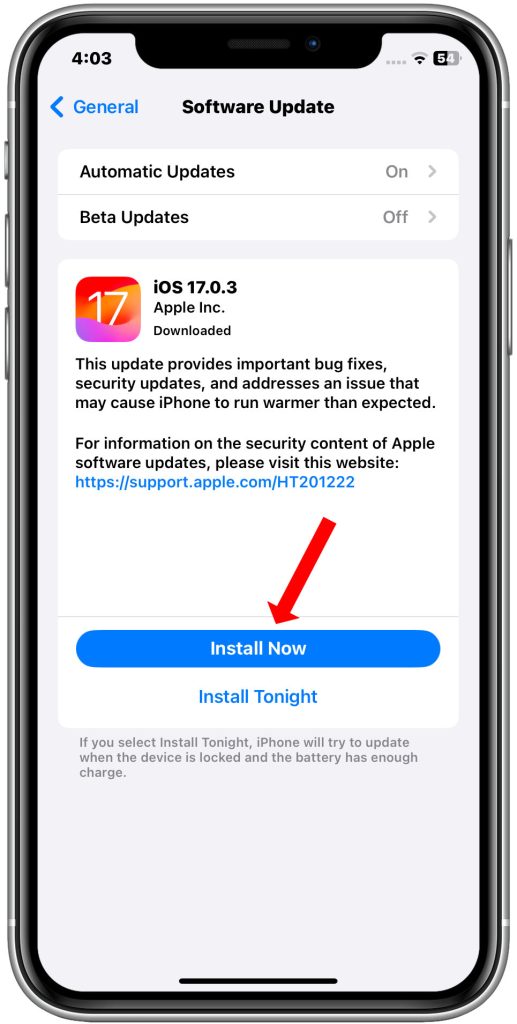
- To install the latest iOS update, go to Settings > General > Software Update. If an update is available, you’ll see a red dot next to the Software Update option. Tap Download and Install to install the update.
Check and see if your Wi-Fi is already stable after updating. If it’s still dropping, try the next solution.
Step 2: Toggle Wi-Fi off and on to re-establish connection
Toggling Wi-Fi off and on can help deal with post-update Wi-Fi drops on iPhone by clearing any temporary glitches or bugs that may have occurred during the update process. It can also help to refresh the connection between your iPhone and your Wi-Fi router.
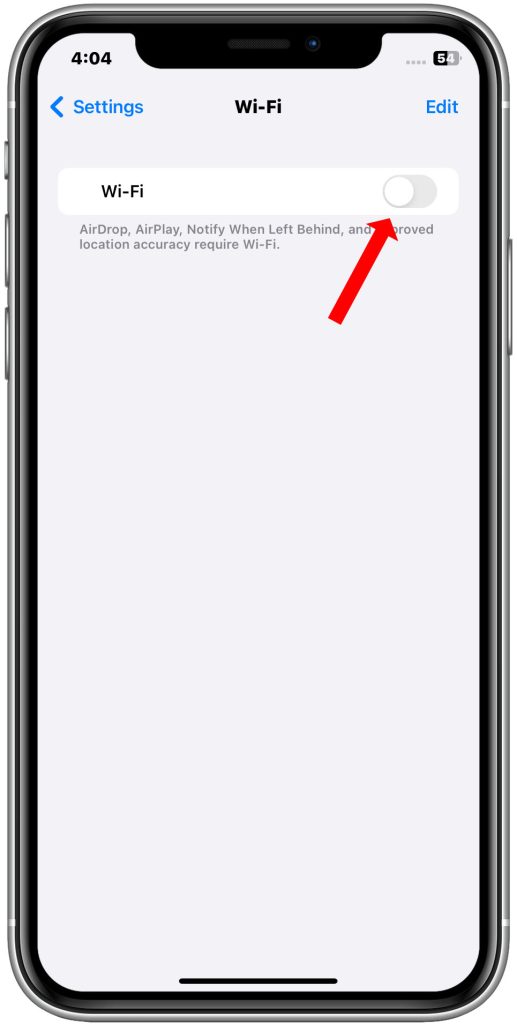
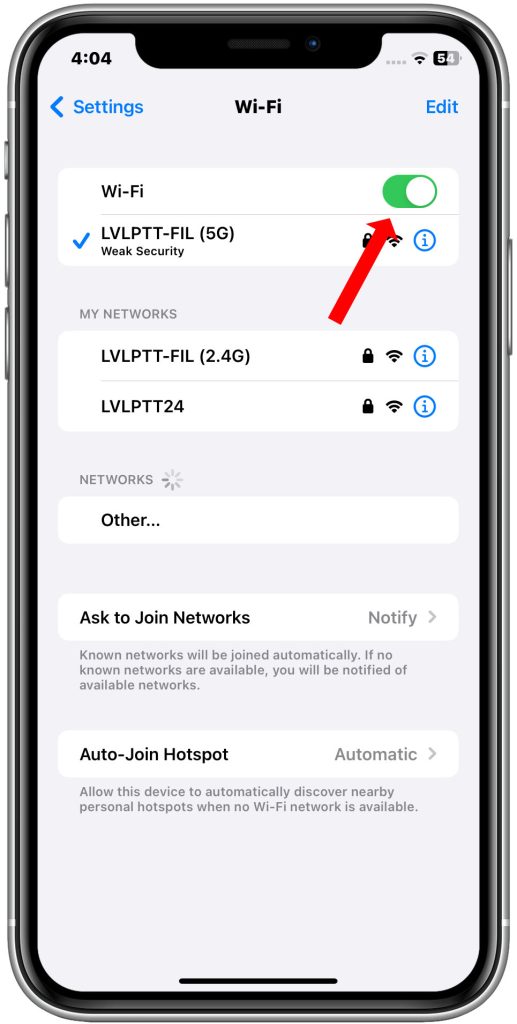
To toggle Wi-Fi off and on on your iPhone:
- Open the Control Center by swiping down from the top right corner of the screen (or swiping up from the bottom of the screen on iPhones with a Home button).
- Tap the Wi-Fi icon to turn it off.
- Wait a few seconds, then tap the Wi-Fi icon again to turn it back on.
Step 3: Forget Wi-Fi network then reconnect
One possible reason why your iPhone’s Wi-Fi connection suddenly keeps dropping from an update is due to a corrupted Wi-Fi network. In this case, forgetting the errant Wi-Fi network and then re-adding can help.
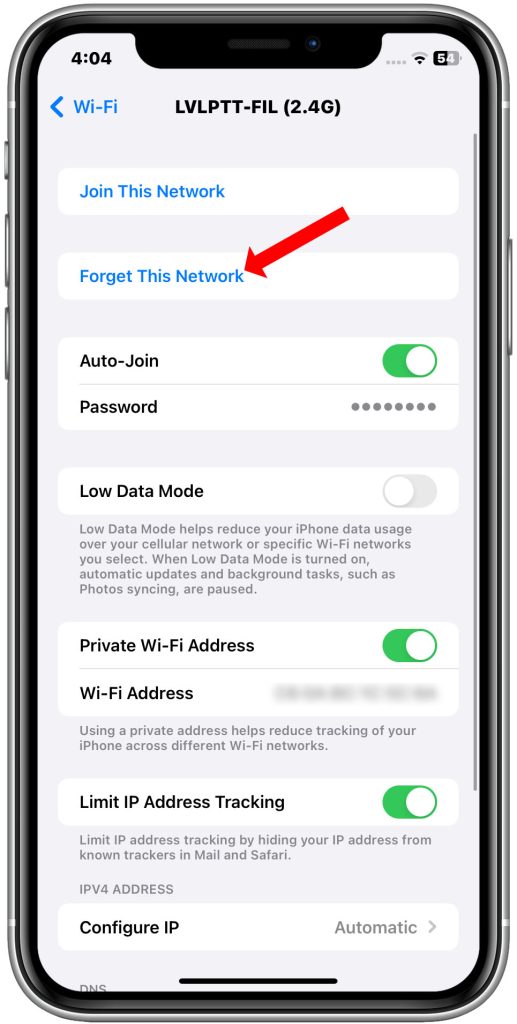
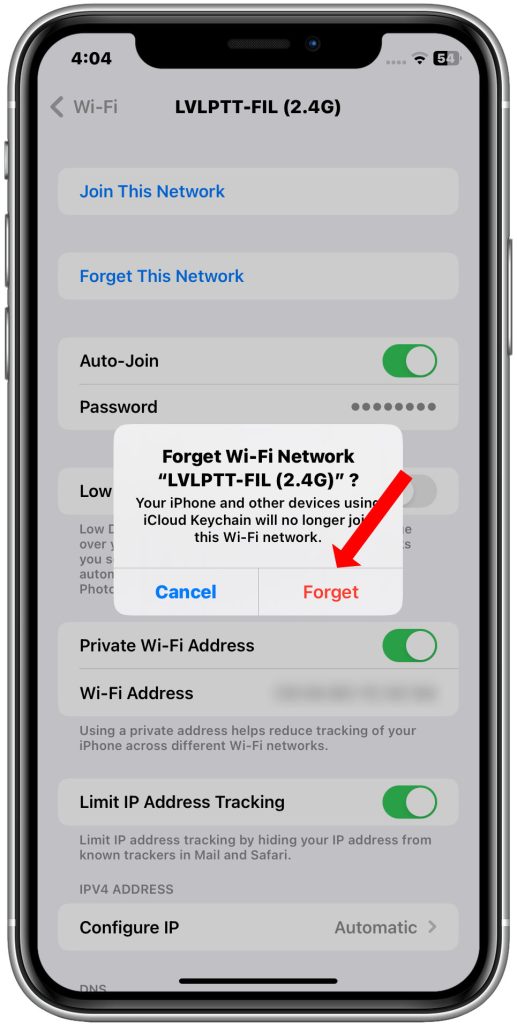
To forget and reconnect to a Wi-Fi network on iPhone:
- Open the Settings app.
- Tap Wi-Fi.
- Tap the i icon next to the name of the Wi-Fi network you want to forget.
- Tap Forget This Network.
- Tap Forget to confirm.
- Go back to the Wi-Fi settings screen.
- Tap the name of the Wi-Fi network you want to rejoin.
- Enter the password for the network.
- Tap Join.
Once you have rejoined the network, try using your iPhone to see if the Wi-Fi drops have been resolved.
Step 4: Reset Network Settings to restore network defaults
If you are still having problems, you can try resetting your iPhone’s network settings. This will clear all of your network settings, including your saved Wi-Fi networks and passwords.
To reset your network settings:
- Open the Settings app.
- Tap General.
- Scroll down and tap Transfer or Reset iPhone.
- Tap Reset.
- Tap Reset Network Settings.
- Enter your iPhone passcode to confirm.
Once your network settings have been reset, you will need to rejoin all of your Wi-Fi networks.
This can help to resolve any issues that may have been caused by the update, such as incorrect network settings or corrupted network data.
Note: Resetting your network settings will not erase any of your personal data, such as your photos, contacts, or messages. However, you will need to reconnect to all of your Wi-Fi networks and enter your passwords again.
Step 5: Update router firmware and confirm security mode
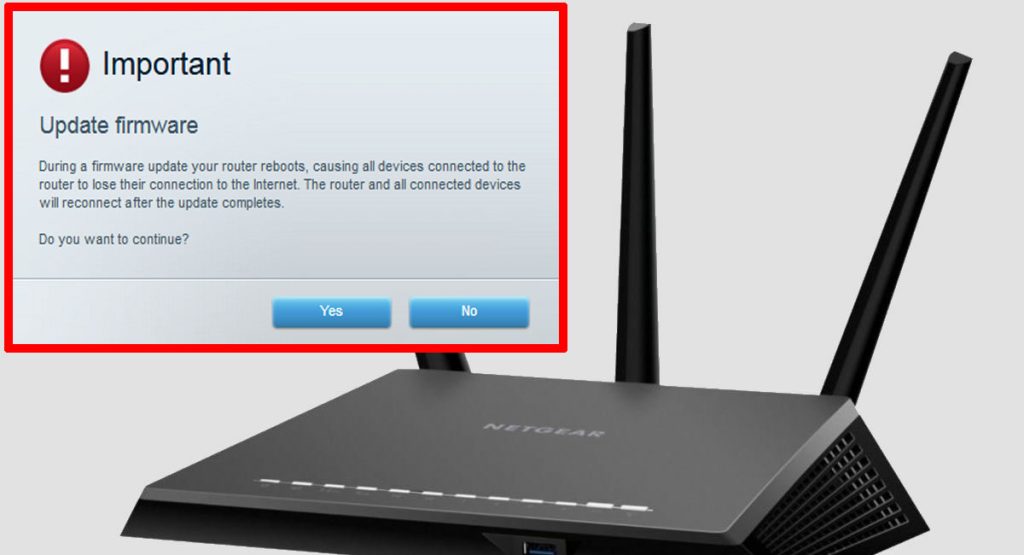
Updating router firmware and confirming security mode can help deal with post-update Wi-Fi drops on iPhone in a few ways:
- Firmware updates often include bug fixes and performance improvements that can resolve Wi-Fi connectivity issues. For example, a firmware update may fix a bug that is causing your iPhone to disconnect from the Wi-Fi network when it goes into sleep mode.
- Security mode can affect Wi-Fi performance. If your router is using an outdated or weak security mode, it may be more susceptible to interference from other devices or networks. This can cause Wi-Fi drops and other connectivity problems.
To update your router firmware, you will need to log in to the router’s admin interface. This is usually done by entering the router’s IP address into a web browser. Once you are logged in, look for a section labeled “Firmware Update” or “Software Update.” From here, you can check for and install the latest firmware update.
To confirm your router’s security mode, log in to the router’s admin interface and look for a section labeled “Security” or “Wireless Security.” The security mode will be listed here. If your router is using an outdated or weak security mode, such as WEP or WPA, consider changing it to a stronger security mode, such as WPA2 or WPA3.
Step 6: Disable automatic switching between bands, if supported
Disabling automatic switching between bands on iPhone can help deal with post-update Wi-Fi drops by preventing your iPhone from connecting to a weaker band when a stronger band is available. This can be especially helpful if you are experiencing Wi-Fi drops in areas with poor signal strength.
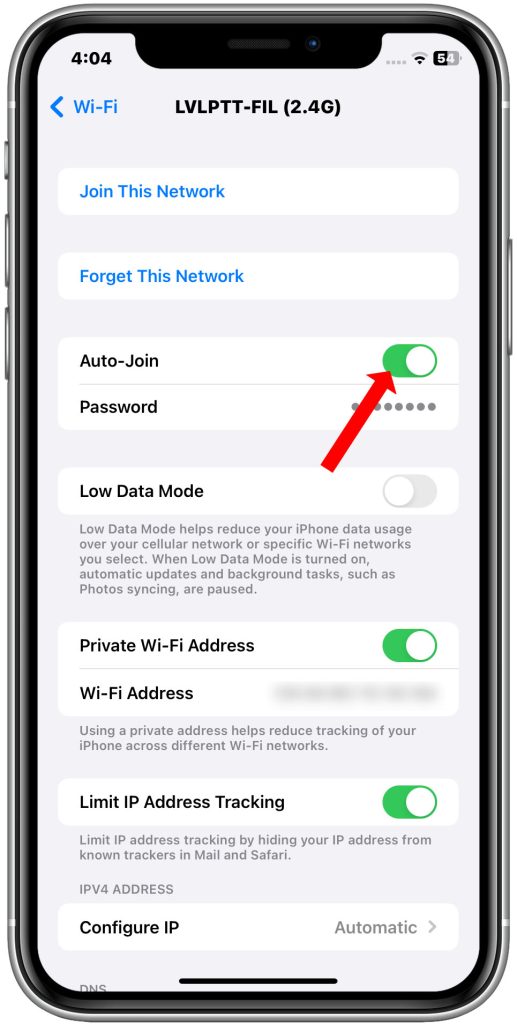
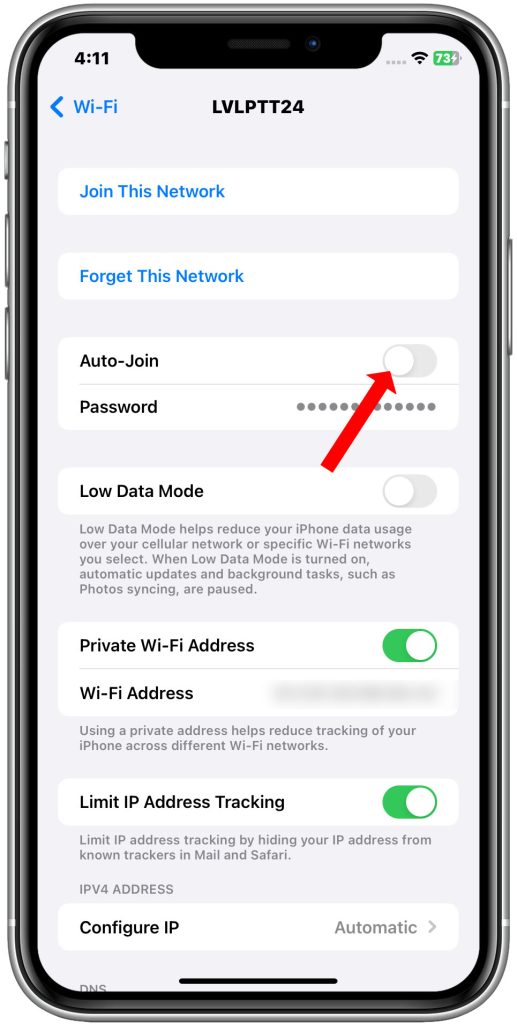
To disable automatic switching between bands on iPhone:
- Go to Settings > Wi-Fi.
- Tap the i icon next to the Wi-Fi network that you are having trouble with.
- Scroll down and tap Auto-Join.
- Select Ask to Join.
Once you have disabled automatic switching between bands, your iPhone will only connect to the Wi-Fi network that you select. This will help to ensure that your iPhone is always connected to the strongest Wi-Fi band available.
With concerted effort, your Wi-Fi will likely stabilize again!
Preventing Future Wi-Fi Connection Problems
Proactive measures like these prevent many problems. Follow these guidelines to reduce the chance of repeat Wi-Fi drops:
- Avoid “beta” iOS versions prone to bugs
- Position router centrally to maximize coverage
- Set device-specific bandwidth limits and priority
- Use 5GHz band for reduced interference
When your iPhone keeps losing Wi-Fi after an iOS update, it’s frustrating but fixable. Methodically installing updates, resetting networks, reconfiguring routers, and toggling settings will get connectivity working reliably again.
With some diligent troubleshooting, you’ll be browsing and streaming without annoying drops again in no time.