Are you among the many Apple users trying to log into iTunes or Apple Store but keeps getting a Verification Failed error prompt “There Was An Error Connecting To Apple ID Server” Or perhaps having difficulty accessing or connecting to your Apple ID? There have been reports of Apple users experiencing issues when they try to sign into their iCloud after updating to iOS 13. This error means that your Apple device does not allow you to connect to iCloud verification servers. Why is this so? Most of the time this error occurs because of some issues that may or may not be related to your Apple ID. The problem still persists despite entering the correct username and password. The prompt shows up every time try to sign into their iCloud on their device. Below are ways you can try to fix the problem.
If you own an Apple iPhone that supports iOS 13 or any other iPhone models, we will be glad to assist you with any concerns that you may have with your device, feel free to contact us using this form. This is a free service by the way. We asked, however, that when you do contact us, please try to be as detailed as possible about your concern so that we can accurately assess and give appropriate solutions.
HERE ARE POTENTIAL SOLUTIONS ON HOW TO FIX VERIFICATION FAILED ERROR PROMPT AFTER UPDATE TO iOS 13
Check Apple System Status: you will see on the Apple System Status page when an Apple System is experiencing any problems or technical issues.. On the Apple System page, if every is green that means everything is working perfectly. However when you see a yellow sign, it means there is an active issue on that particular system and Apple servers are trying to resolve it. You can also press the
By checking their Apple Status System page, you will immediately know if the Verification Failed issue is on Apple or you need to do some troubleshooting on your end to resolve it.
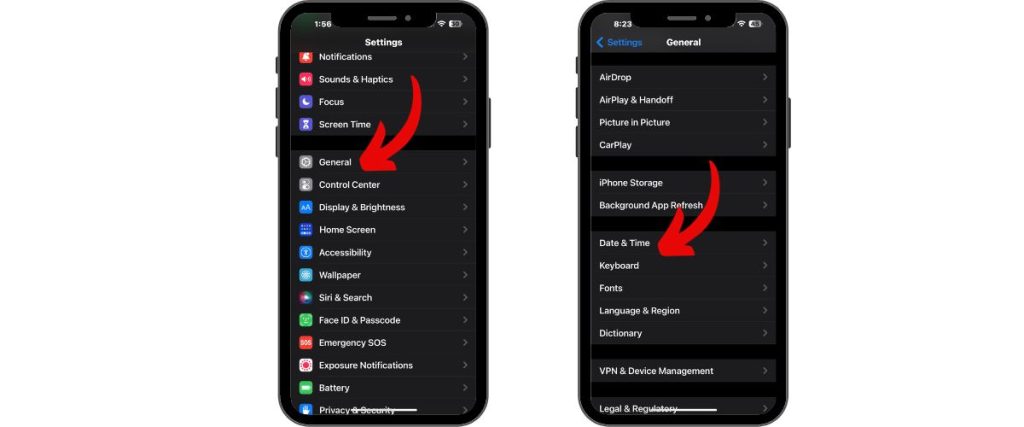
Update Date & Time: At times after an upgrade, in this case iOS 13 upgrade, the system settings of Date & Time on your device usually goes out of sync. That is why make sure to switch ON the “Set Date & Time Automatically” option on your device:
- Go to Settings from the Home Screen of your device
- Tap on General
- Tap on Date & Time.
- Toggle ON Set Automatically tab .
- Restart your device
- Try to access again using your Apple ID.
Sign Out and Sign In again from App Store and iTunes. Sometimes system apps that are having some issues that usually requires log-in details gets resolved by logging out and logging in again.
- Go to the Settings App from the Home Screen
- Scroll down from the list of options to find iTunes & App Store, tap on it.
- Tap on the Apple ID at the top portion of the screen.
- A pop-up window appears with options such as View Apple ID, Sign Out, iForgot and Cancel. Choose Sign Out.
- Restart your iPhone.
- Once it sings you out, sign in back again using your Apple ID details.
- Try to Access again App Store or iTunes to see if the problem resolves.
Force Restart or Reboot your Device: A simple step that actually resolves issues with iPhone devices because it refreshes your device after restarting and rebooting it. The steps on how to restart or reboot may vary as not all iPhone models that supports iOS 13 have the same location for the buttons used.
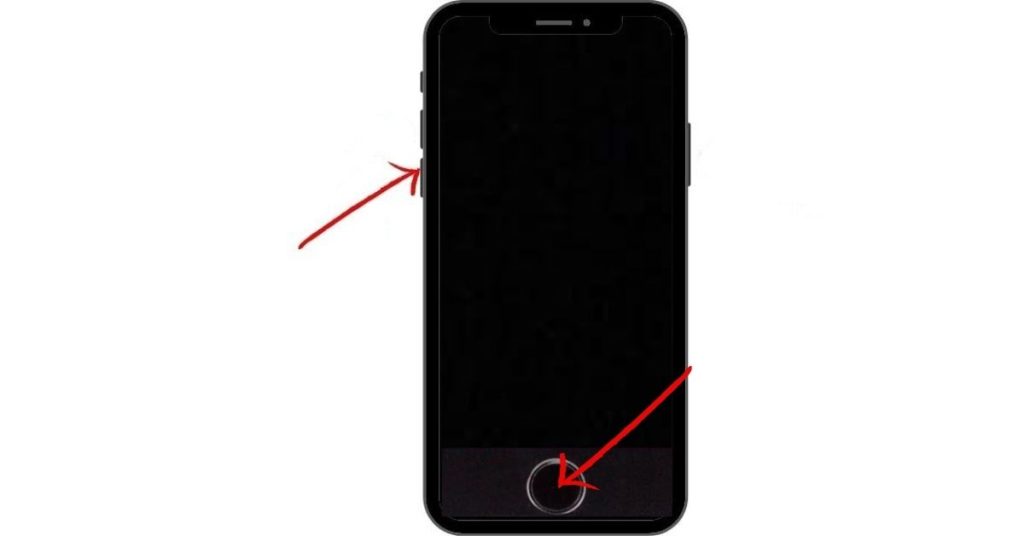
To reboot/restart iPhone 6S, 7, 7 Plus, 8 and 8 Plus Devices, follow these steps:
- Simultaneously press and hold Power/Sleep & Wake and the Volume Down Button. Power/Sleep & Wake button are found at the right side of your iPhone device while the Volume Down Button is located at the left side of your iPhone.
- Wait for it to turn OFF then release.
- iPhone Automatically turns back ON. Wait for it to normally start.
- Try to Access again App Store or iTunes to see if the problem resolves.
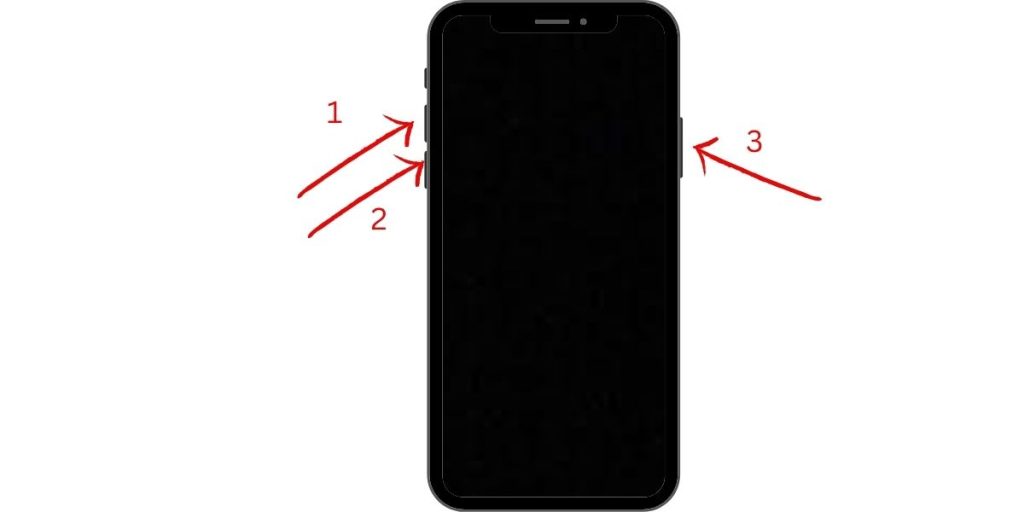
To Restart/Reboot iPhone Models X, XS, XR, 11, 11 Pro & 11 Pro Max:
- First, Press and release the Volume Up Button, located at the left side of your device.
- Press and release the Volume Down Button, located just below the Volume Up button.
- Then, press and hold the Power Button, located at the right side of your iPhone device.
- When device display turns off, release the buttons.
- After a few seconds, iPhone will restart automatically. Wait for it to normally start
- Try to Access again App Store or iTunes to see if the problem resolves.
Use WiFi instead of Data: if you are using a data connection to access App Store or iTunes with your iCloud and having Verification Failed error message, then most likely the cause is with your network status.
It is highly recommended to use a WiFi connection instead of a Data Connection since WiFi tends to have a strong and reliable signal than with Data. There have been reports that switching from 3G/4G data to a WiFi connection often resolves the issues on Verification Failed error messages.
Check Network Status and Restart if Necessary: Still after switching to WiFi connection the issue still exists, you now have to check your WiFi connection. Make sure that you are getting the strongest signal on your WiFi to prevent getting Verification Failed error from Apple servers.
Follow these simple steps to check network status:
- Make sure your router is Turned ON and is working properly.
- If it is turned ON, try to restart it by switching it Off for about 2-5 minutes.
- After at least 5 minutes, switch your router back ON again
- Connect your iPhone to your WiFi
- Once your iPhone now connected to the WiFi, try to access again iTunes and App Store.
Change Apple ID Password: sometimes old passwords does not always seem to meet Apple’s recommendations for Password strength especially after a major update as in this case an update to iOS 13 that perhaps caused the Verification Failed Prompt.
Changing a new Apple ID password is so simple and very easy to do:
- Head over to the Apple ID website (https:appleid.apple.com/)
- Click on the Manage your Apple ID option
- Sign in with your Account log-in details
- Now, click on Password and Security option. This option is located on the left side
- You might be asked to verify your identification by answering security questions.
- Next, click on Change Password. You will be redirected to a new page.
- You will be asked to enter your current password.
- You will then be asked to Enter your new password twice for verification and matching purposes.
- Apple ID password has now been changed. If you are syncing your Apple ID to other Apple Device, you might need to update it all to avoid problems later on.
- Try to access again iTunes and App Store.
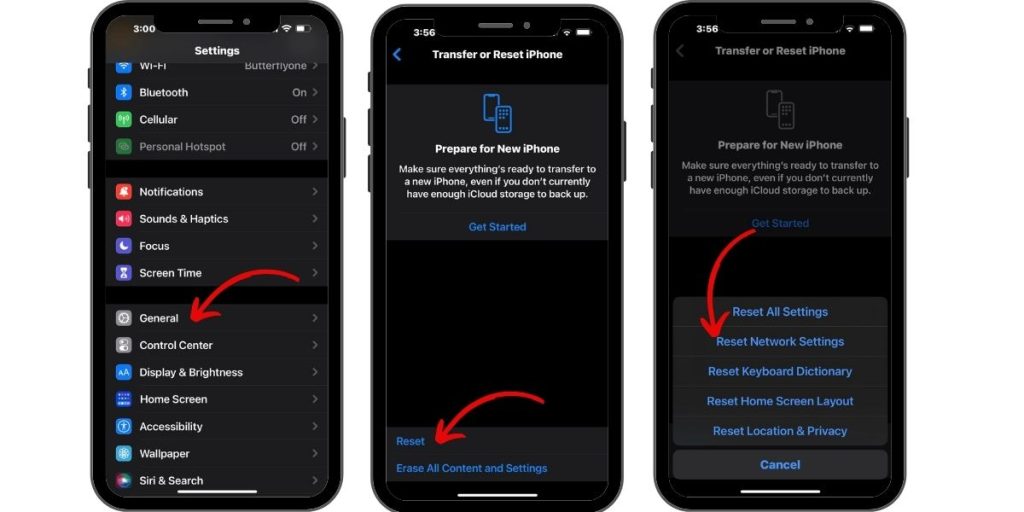
Reset Network Settings: if all of the above methods fails to fix iOS 13 Verification Failed Prompt, this method Reset Network Settings should be of help. Not to worry because this does not delete personal files and contents, but it does deletes saved passwords on apps and settings. It is very important to backup a list of your passwords to be able to log back in again. To reset all settings:
- Go to Settings from the Home Screen
- Tap on General
- Tap on Reset, located on the lower part as you scroll down from the list of options just before the Shutdown tab.
- Tap on Reset Network Settings
- If required, enter Passcode to confirm action.
- Restart your iPhone. Then wait for it to start normally.
- Input all passwords on WiFi and other settings.
- Try to access again iTunes and App Store.
Getting a Verification Failed prompt can be frustrating at times and can be a little bit as well. We do hope that the potential solutions mentioned above helped resolves issue on Verification Failed Prompt “There was an error connecting to Apple ID server” after update to iOS 13.
If not, Connect with us:
Did any of the solutions mentioned above resolve your error issue of Apple iPhone Software update on iOS 13.1.1? If you have any questions & concerns regarding your iPhone , feel free to connect with us using this form. We will be of help and will provide you with a free technical support. Just make sure to provide us with the details as possible for us to make an accurate assessment and provide you appropriate intervention. Also, do let us know your experience along the way. I look forward to hearing from you.