How to fix Apple iPhone No SIM error [Troubleshooting Guide]

The SIM card serves as the primary key to activate network services on your phone. This small chip or smart card is usually provided by your carrier and must be inserted into your phone in order to activate cellular-based services. Once the SIM card is inserted, it allows your phone to tap into your mobile network based on the GSM cellular phone data it holds. And that’s when you can start making and receiving calls, SMS, and other relevant services on your phone. But what if for some reason, the SIM card stops working on your phone? This is when SIM-related errors occur. Among the errors you might see are Network unavailable, No Service, and No SIM error. Tackled in this post is the iPhone No SIM error. Read on to learn what to do if your iPhone can’t send or receive calls and messages due to No SIM error.

When dealing with iPhone No SIM error or other relevant errors, scrutinizing both the hardware and software aspects on the device is necessary. Such errors can exist if hardware damage is present and likewise when triggered by random system glitches. Unless you’re certain that hardware damage is present, you can still try performing some tweaks to fix the problem on your end. To give you some inputs, I’ve mapped out the most effective and widely-used solutions to a No SIM card error on an iPhone. You can try applying each of these methods before taking a trip to a service center.

First solution: Remove then reinstall your SIM card.

Given that the error says something about the SIM card, it is imperative to work on the iPhone’s SIM card first. The error message implies that the iPhone does not recognize or detect any SIM card even if the SIM card is inserted. Perhaps it’s telling you the truth especially when the SIM card was dislodged or loose. To make sure that this isn’t causing trouble, try reinstalling the SIM card on your iPhone. This means you’ve got to remove and then re-insert the SIM card on the phone.

Before removing the SIM card, be sure to turn off your iPhone. While the phone is turned off completely, follow these steps to properly remove and reinstall SIM card on your iPhone:

  1. Get the SIM ejector tool or a small paper clip ready.
  2. Insert the SIM ejector tool or paper clip into the tiny hole on the SIM card tray of your phone.
  3. Gently push the ejector tool until the tray pops out.
  4. Then pull the tray out and then remove the SIM card from it.
  5. Check the SIM card and SIM card slot for any visible signs of damage like scratches or liquid traces. If everything looks good, place the SIM card back into the tray in the same orientation before you removed it.
  6. Secure the SIM card in place and then put the SIM tray back into the phone.
  7. Lock the SIM card tray to prevent any dust or liquid from entering the phone.
  8. Once the tray is secured in place, turn on the phone.

Wait until it boots up and then see if the No SIM error is gone. If it comes back, then you’ve got to move on and rule out other software-related factors.

ALSO READ: Facebook won’t open on Apple iPhone XR. Here’s the fix.

Second solution: Toggle Airplane Mode on and off.

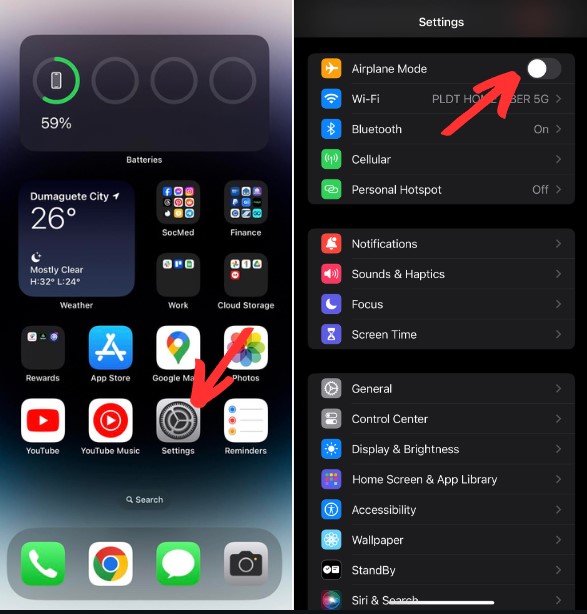
The first things that you need to rule out are minor errors affecting the phone’s cellular or wireless network system. And the simplest yet very effective solution these type of errors is the Airplane mode tweak. It works by giving a quick refresh and restart on the phone’s wireless radios and thereby eliminates associated errors and glitches. If you’re wondering how it’s done, then just refer to these steps:

  1. Go to the Home screen and then tap on Settings.
  2. Select Airplane Mode.
  3. Then toggle the Airplane Mode switch to turn ON. Doing so disables the phone’s wireless radios and so wireless features including Wi-Fi, Bluetooth and cellular connections are disabled. The Airplane Mode icon shows up on the status bar of your iPhone screen when the feature is enabled.
  4. While Airplane Mode is turned ON, reboot/soft reset your iPhone. A soft reset is done by turning the phone off for a few seconds and then turning it back on again.
  5. After the phone reboots, head back to Settings-> Airplane Mode menu.
  6. Then the Airplane Mode switch to turn it OFF again.

The Airplane Mode then disappears from the status bar. At this point, the phone’s wireless services are then re-activated. See if that also eliminates the No SIM card error on your iPhone.

Third solution: Update carrier settings on your iPhone.

Network-related errors are also addressed by some updates particularly the ones rolled out by your network service provider or carrier. These updates are called carrier settings updates. They usually contain patches that will help enhance the phone’s network functions and relevant features for better and optimized network services. Some carrier updates are mandatory or implemented on the phone system automatically while others require manual installation. To check and see if any pending carrier update on your iPhone, simply refer to these steps:

  1. From your Home screen, tap on Settings.
  2. Tap General.
  3. Select About.

Scroll to the Carrier section and see if a new carrier update is available. A notification will show up for every new update to install. Just follow the given instructions to start installing carrier updates if available. After updating your phone’s carrier settings, perform a soft reset or reboot your iPhone to save the recent changes and to refresh the phone’s network services.

Then see if that fixes the No SIM error on your iPhone. If the error recurs, then you’ve got to try some other options.

ALSO READ: How to fix poor Wi-Fi reception or weak Wi-Fi signal on your Apple iPhone XR

Fourth solution: Update to the latest iOS version.

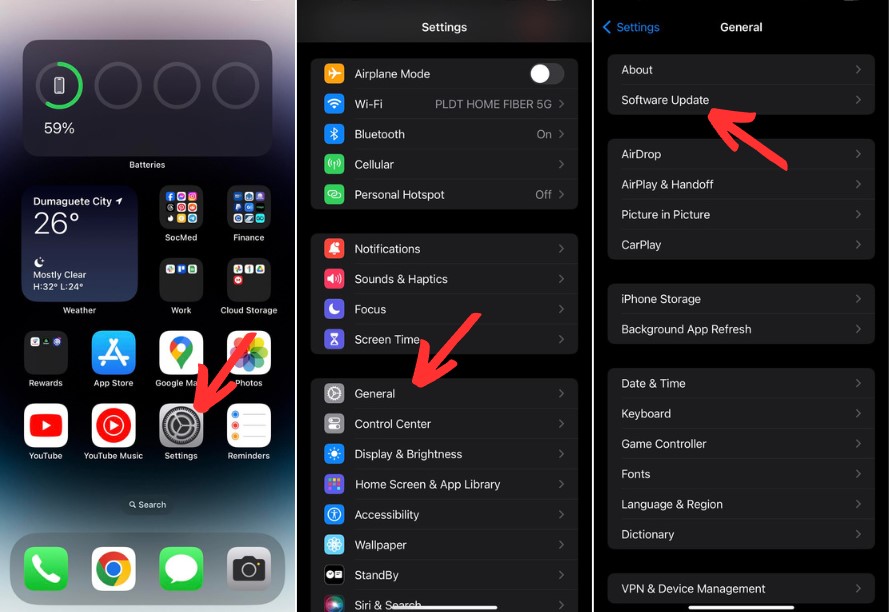
Aside from carrier updates, installing the latest iOS version for your iPhone is also among other potential solutions. Updates rolled out by Apple usually embed some fix patches that are programmed to eliminate bug-inflicted errors on the phone. Hence, they’re widely referred to as bug fixes. Normally, you’ll get an update notification if a new iOS version is available for your device. But just to ensure that you haven’t missed installing some critical updates to iOS, better check on your iPhone’s update menu. Here’s how:

  1. From your Home screen, tap on Settings.
  2. Select General.
  3. Then tap Software Update.

If a new iOS version is available, you should see a notification containing the details of the update as well as its integrated bug fixes. Read and review the update information before updating so that you’ll figure what it’s for.

Before you start updating, make sure that your phone has stable Internet connection, sufficient memory space, and at least 50 percent of battery life. This way you can ensure that there’ll be no interruption during the update. Once you’re all set, follow the steps to download and install the update on your iPhone.

When the update is finished, reboot your iPhone to refresh the system and to prevent apps from acting up following the recent system transition. Restarting also ensure that all new system changes are properly applied or saved.

Fifth solution: Reset network settings on your iPhone.

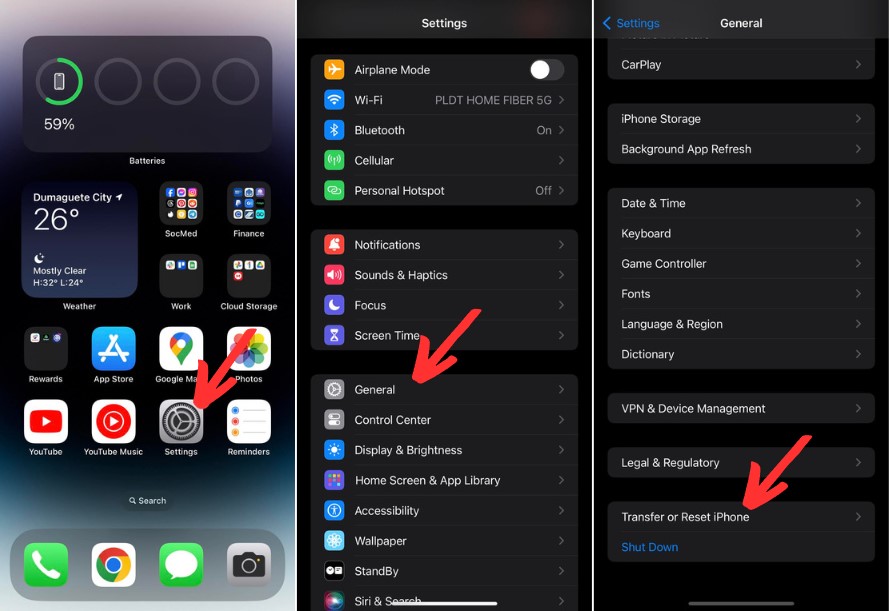
Network-related errors that could not be rectified by the prior procedures are usually remedied by a network reset. Thus the next option and possible solution you can try on is a network settings reset on your iPhone. This reset will erase your current network settings and configurations including Wi-Fi, Bluetooth and cellular connections, APN settings, and other relevant information. Errors from invalid network settings are likewise cleared out in the process. Just be sure to note your Wi-Fi passwords as you’ll need to re-enter them later in order to connect to the Internet and use online apps and services. Once you’re all set, proceed with these steps:

  1. Tap Settings from the Home screen to get started.
  2. Select General.
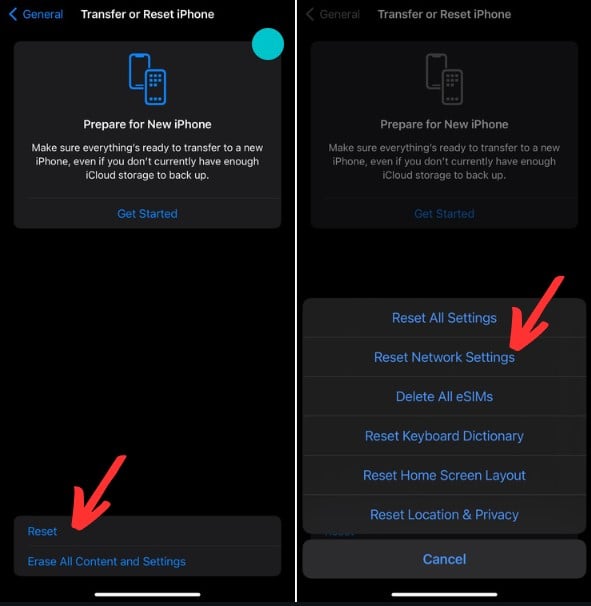
  3. Scroll down to and then tap on Reset.
  4. Select the option to Reset Network Settings.
  5. Enter your phone’s passcode when asked to proceed.
  6. Then tap the option to confirm that you want to reset network settings on your phone.

Allow the phone to finish resetting the network settings and then restores the default network values. After the reset, the phone restarts by itself. Just wait until it’s finished booting up and then you can start enabling network features including Wi-Fi and cellular data network so you can use them again on your phone.

Sixth solution: Reset all settings on your iPhone.

If performing a network reset doesn’t solve the problem, then you can try resetting all settings on your phone instead. This reset is often recommended to clear out minor but persistent errors from an update installation. If the No SIM error on your iPhone instigated from an update either on particular apps or iOS patches, then resetting all settings will likely be able to fix it. Be sure to note though that this reset will erase all your customized settings as it restores the default options and values. So your iPhone will load up its default configuration but without affecting saved information on the internal memory. If you wish to give it a try, then here’s how it’s done:

  1. Tap Settings from the Home screen.
  2. Select General.
  3. Scroll down to and then tap on Reset.
  4. Choose the option to Reset All Settings.
  5. If prompted, enter your device passcode to proceed.
  6. Then tap the option to confirm that you want to reset all settings on your iPhone.

Your phone will then start erasing all customized information and then loads up the original options and values. When the reset is finished, the phone restarts automatically. By then you can start enabling features that are disabled by default so you can use them again on your phone.

ALSO READ: How to fix an Apple iPhone XR that’s suddenly crashing or shutting down unexpectedly

Seventh solution: Erase your iPhone and restore its factory defaults.

The ultimate solution to complex system errors that caused persistent issues on the phone is the so-called master reset or factory reset. As the name implies, this reset wipes everything from your phone system including saved contacts, downloaded apps, customizations, and personal information. Fatal errors that could not be corrected by prior methods are also resolved by this reset unless corrupted iOS is the underlying cause. While this reset is promising conclusive solutions, it also results to permanent data loss. That being said, it should only be regarded among the last options. Should you wish to proceed with this reset, creating backups of your critical files is recommended beforehand. You can back up your iPhone files to iCloud or iTunes for that matter. Once you have secured the most recent backup, you can proceed with the reset. Here’s how to factory reset an iPhone from the settings menu:

  1. Tap Settings from your Home screen.
  2. Tap General.
  3. Scroll down and tap on Reset.
  4. Choose the option to Erase all content and settings.
  5. Enter your device passcode if prompted.
  6. Then tap the option to confirm that you want to erase and restore your iPhone to its factory defaults.

The reset will then instigate and once it’s done, your phone should reboot itself. As soon as it boots up, you can use the start-up wizard to set up your iPhone as new.

If the No SIM error reappears after performing a factory reset, then you can try restoring your iPhone in iTunes. Some system errors are tough enough to withstand that usual reset process via settings and therefore requires tougher solutions. So here’s what you should try doing next:

  1. To get started, launch or open iTunes app on your computer.
  2. Connect your iPhone to the computer using the Apple-supplied cable or Lightning cable that came with it.
  3. If prompted to enter your device passcode or Trust This Computer, simply follow the onscreen instructions to proceed.
  4. Select your iPhone when it shows up in iTunes.
  5. Navigate to the Summary section, then click the button to Restore [iPhone]. You may also opt to back up files from your iPhone before restoring it. Just click the Back Up iPhone button to do so.
  6. Finally, if prompted with a warning message, click the Restore button to confirm.

You may opt to restore from a previous iOS backup or set up your iPhone as new. Just follow the command prompts to finish the entire restore process in iTunes. Do not disconnect your iPhone from the computer unless iTunes tells you that it’s safe to disconnect your device.

Still getting No SIM error on your iPhone?

The SIM card you’re using might have been damaged and therefore needs to be replaced with a new one. You can rule this out be using a different SIM card on your iPhone. If the No SIM card error disappears when using a different SIM card, then it clearly denotes that your original SIM card is at fault. In that case, contact your carrier or service provider to ask for a new SIM card replacement. If available, you can ask your carrier if your iPhone is eligible for an eSIM (digital SIM) so you can consider it among other options.

If none of the given solutions is able to fix the No SIM error, then you can visit the nearest Apple service center in your place and ask an Apple technician to examine your device for any indications of hardware damage. The No SIM card error can persist up to this point, if a network component on your iPhone has obtained some sort of physical or liquid damage. In that case, iPhone repair or SIM card replacement is needed.

I hope that we’ve been able to help you fix the problem with your device. We would appreciate it if you helped us spread the word so please share this post if you found it helpful. Thank you so much for reading!

Connect with us

We are committed to helping our readers fix the problems with their phones as well as learn how to properly use their devices. So, if you have other issues, you may visit our troubleshooting page so you can check by yourself the articles we’ve already published that contain solutions to common problems. Also, we do create videos to demonstrate how things are done on your phone. Visit our Youtube Channel and please subscribe to it. Thanks.