Just got your hands on the latest iPhone 8? One of the first things you’ll want to do is figure out how to take a screenshot, or capture whatever is on your screen. Taking screenshots on an iPhone is easy and only takes a few seconds.
How to screenshot on iPhone 8

Two Ways to Take Screenshots on an iPhone 8
There are two main ways to take screenshots on an iPhone 8. You can use the side button and home button method, or enable AssistiveTouch to create a virtual home button.
Method 1: Press Side Button + Home Button
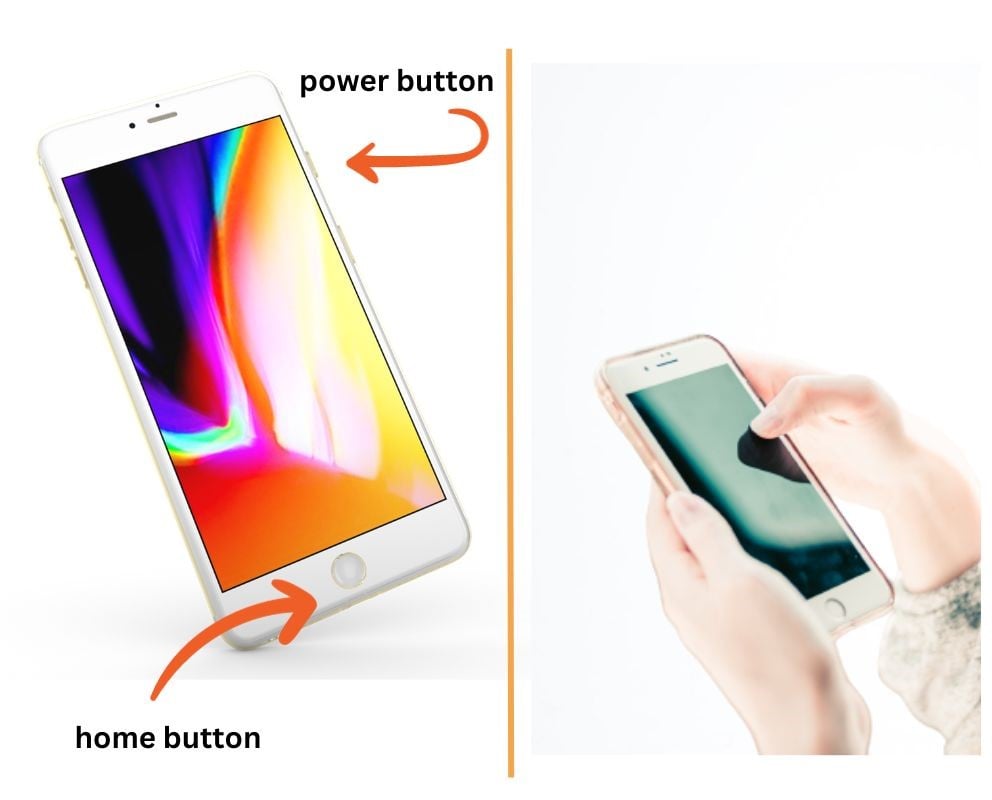
The quickest way to take a screenshot on iPhone 8 is to press the side button and home button at the same time.
Follow these simple steps:
- Open the screen you want to capture. This could be a website, text message, funny meme – anything!
- Press and hold the side button/ power button on the right side of your iPhone 8.
- While holding the side button, press the home button at the bottom center of your screen.
- Release both buttons.

You’ll know the screenshot worked when your screen flashes white and you hear the camera shutter sound.
Method 2: Use AssistiveTouch for One-Handed Screenshots
If you have trouble pressing two buttons at once, use AssistiveTouch to create a virtual home button.
Here’s how:
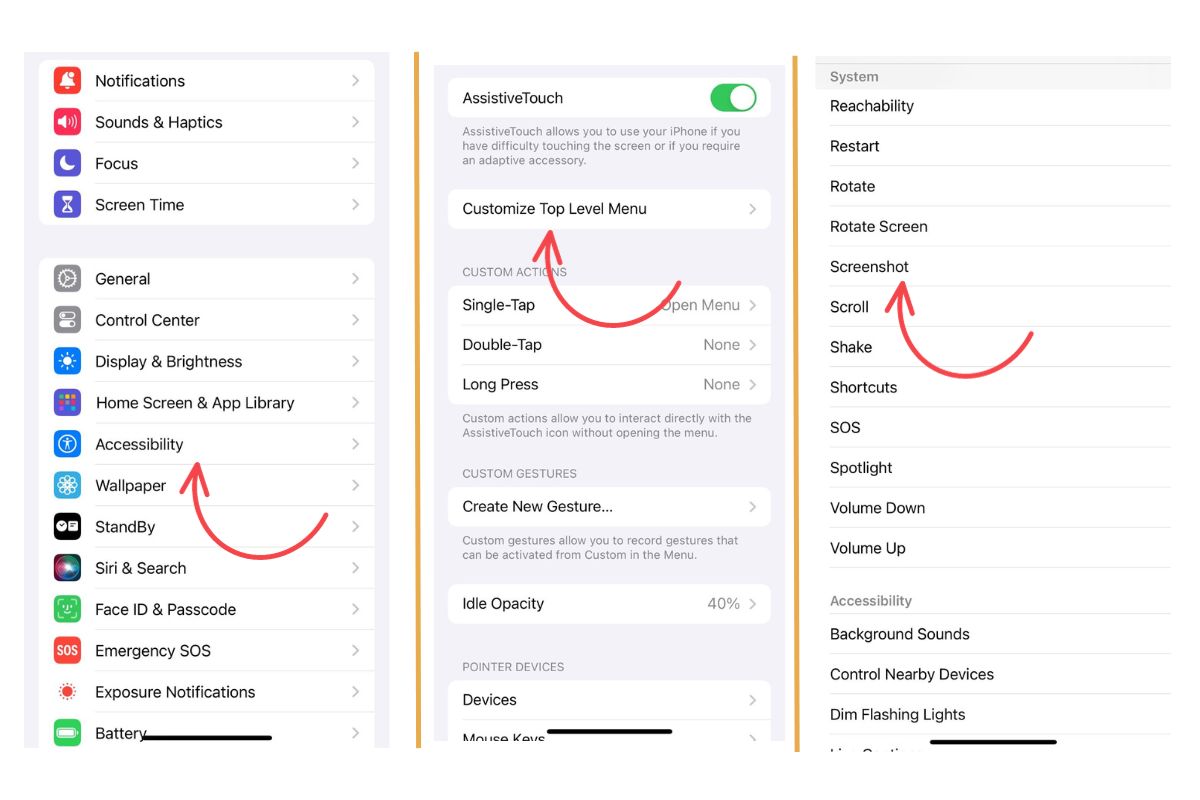
- Open Settings > Accessibility > AssistiveTouch and toggle it on.
- Tap “Customize Top Level Menu” and select “Screenshot” to add it.
- To take a screenshot, tap the AssistiveTouch floating button and select “Screenshot”.

AssistiveTouch makes it easy to take iPhone screenshots with one hand!
Preview and Edit Your Screenshots
After you take a screenshot, a mini thumbnail temporarily appears in the bottom left corner of your screen.
Tap the thumbnail to open editing tools that let you crop, draw on, or annotate your screenshot.
When you’re done editing, tap “Done” to save your screenshot or “Delete Screenshot” to get rid of it.
Find Screenshots in Your Photos App
All saved screenshots are automatically stored in the Screenshots album inside the Photos app.
To find your screenshots:
- Open the Photos app.
- Tap “Albums” in the bottom right.
- Scroll down and select “Screenshots”.
You’ll see small previews of all your saved screenshots here. Tap one to view or share it.
Share iPhone Screenshots in Just a Few Taps
Sharing screenshots is almost as easy as taking them!
After taking a screenshot, tap the thumbnail preview then hit the share icon in the upper right corner. Select the app you want to share with like Messages, Mail, Facebook, Instagram, and more.
You can also share screenshots directly from the Photos app. Just tap the share icon on a screenshot while viewing the Screenshots album.
Pro Tips for Taking Better iPhone Screenshots
- Clean up your screen first by closing apps and removing clutter.
- Turn off distracting red notification badges in Settings.
- Toggle on Do Not Disturb to silence calls or alerts during your screenshot.
- For long website or chat screenshots, drag the handles to capture the entire page in one nice clean image.
- Hold your iPhone steady or use a tripod mount for crisp, clear screenshots.
- Screenshot important information like boarding passes, recipes, contact info, etc to access it offline later.
- Get creative! Use screenshots to capture funny moments, memories with friends, high game scores, and more.
Taking and sharing screenshots on iPhone 8 is quick, easy, and fun. Just press the side and home buttons at the same time, tap to preview your screenshot, and share away.
Enable AssistiveTouch if you need an on-screen home button. Find all your saved screenshots in the Photos app.
With these simple steps, you can now capture special moments, funny memes, and important info right from your iPhone screen in seconds.