We understand how frustrating it can be when your iPhone 7 Plus battery starts draining much faster than usual after an iOS update. You rely on your phone daily and expect the battery to last reasonably long per charge. When it starts emptying faster than normal, it’s incredibly inconvenient having to frequently recharge your 7 Plus. Don’t worry though – in most cases you can fix battery drain issues caused by an update with just a few troubleshooting steps. Let’s look at effective ways to restore normal battery life again.
Abnormally quick battery drain after updating is usually caused by buggy code in the iOS update itself, incompatible apps needing updates, new background activities, or incorrect settings. By thoroughly troubleshooting your battery usage, updating apps, and adjusting settings, you can narrow down and resolve whatever is unnecessarily draining your 7 Plus battery after the iOS update.
ALSO READ: How to fix an iPhone battery that dies so fast, rapid battery drain
What causes your iPhone battery to drain so fast after the update?
Other battery life issues were tied to a bad battery on the device. Cases like that are tagged among other hardware-related issues. But that should not be the case with your iPhone 7 Plus especially if there were no previous instances of liquid exposure or dropping incident that might have damaged the battery in any way.
Given that the problem started right after implementing the new update to iOS, most likely the update was at fault. But there are also other cases where a certain app is to blame. It is possible that an app has gone rogue after installing the new iOS update especially if that app doesn’t meet the minimum system requirements to function normally with the latest iOS platform.
It is also possible that the new update has automatically reset your iPhone settings or enable some settings or apps that can contribute to a faster power consumption on the device. Or it could be just a software bug, something in the update is forcing your iPhone to become always busy and quickly run out of power.
As much as possible try narrow down the cause as it will help you in getting the best possible resolution to the poor battery life on your iPhone.
How to fix iPhone 7 Plus battery life issues
Outlined below are potential solutions that are used to resolve problems associated with the battery on your iPhone. All these can help you determine the underlying cause and eventually obtain the solution. You can try these things first before you go for a tech service or upgrade to a later iPhone model.
1st solution: Check Battery Usage Details
As a first step, closely check the battery usage details in Settings to see which apps and system activities are consuming the most power. This can reveal any obvious culprits.
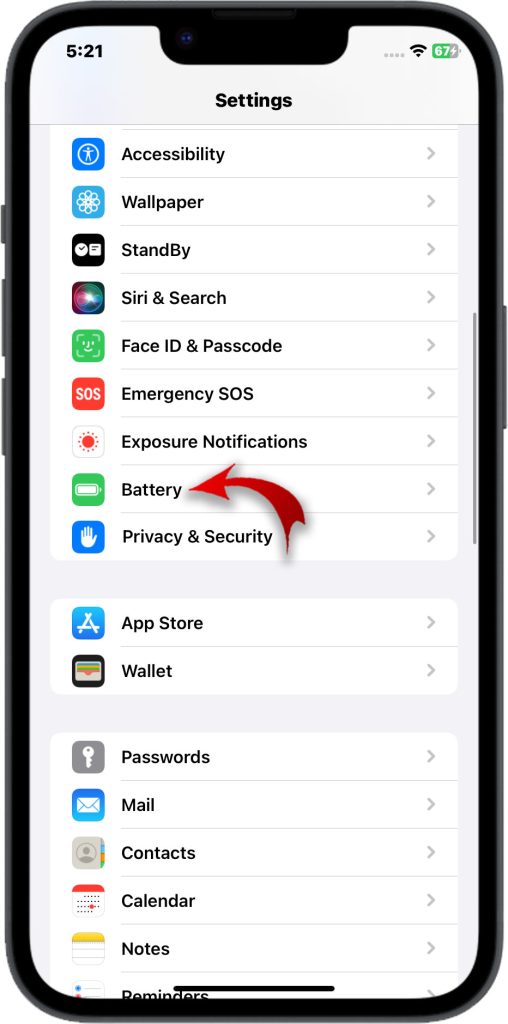
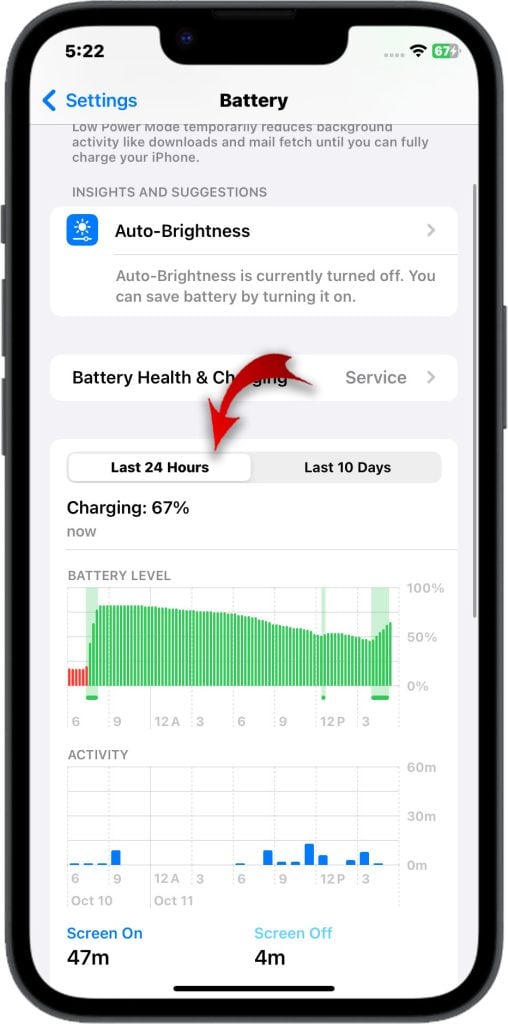
To check battery usage details on an iPhone 7 Plus, follow these steps:
- Open the Settings app.
- Tap Battery.
- You will see a graph of your battery usage for the last 24 hours or 7 days.
- To see more details, tap Show Detailed Battery Usage.
- This will show you a list of all the apps that have used battery during the selected time period, along with the percentage of battery used by each app.
- To see more detailed information about an app’s battery usage, tap the app name.
Make note of any apps, services, or system functions using more power than seems reasonable. Update or uninstall problem app offenders.
This will show you the following information:
- Screen On: The percentage of battery used by the app while the screen was on.
- Background Activity: The percentage of battery used by the app while the screen was off.
- Location Services: Whether or not the app used Location Services.
- Push Notifications: Whether or not the app received Push Notifications.
- Audio: Whether or not the app played audio.
- Background App Refresh: Whether or not the app was allowed to refresh in the background.
You can also use the Battery Health section to see information about your iPhone’s battery health, such as its maximum capacity and peak performance capability.
Tips for reducing battery usage:
- Reduce screen brightness.
- Turn off Background App Refresh for apps that you don’t use often.
- Disable Location Services for apps that don’t need it.
- Use Wi-Fi instead of cellular data whenever possible.
- Avoid using your iPhone in extreme temperatures.
2nd solution: Update Apps to Latest Versions
Next, make sure all your apps are fully updated to their latest versions from the App Store. Apps not optimized for the new iOS update could be draining extra battery in the background. To update apps on an iPhone 7 Plus, you can either update them manually or automatically.

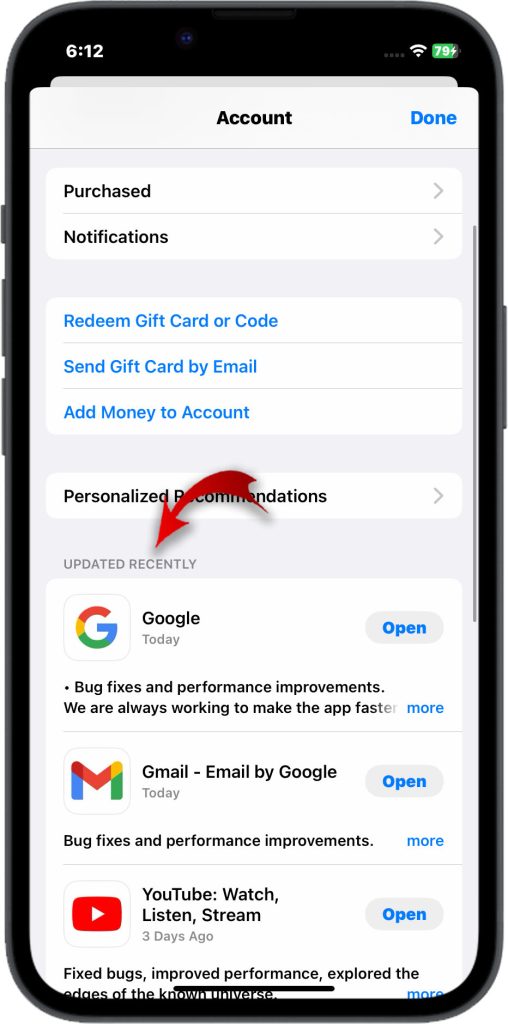
To update apps manually, follow these steps:
- Open the App Store.
- Tap your profile icon in the top-right corner of the screen.
- Scroll down to see a list of all your apps, along with any available updates.
- Tap Update next to the app you want to update.
- Repeat steps 3 and 4 for any other apps you want to update.
To update apps automatically, follow these steps:
- Open the Settings app.
- Tap App Store.
- Toggle on the switch next to Automatic Downloads.
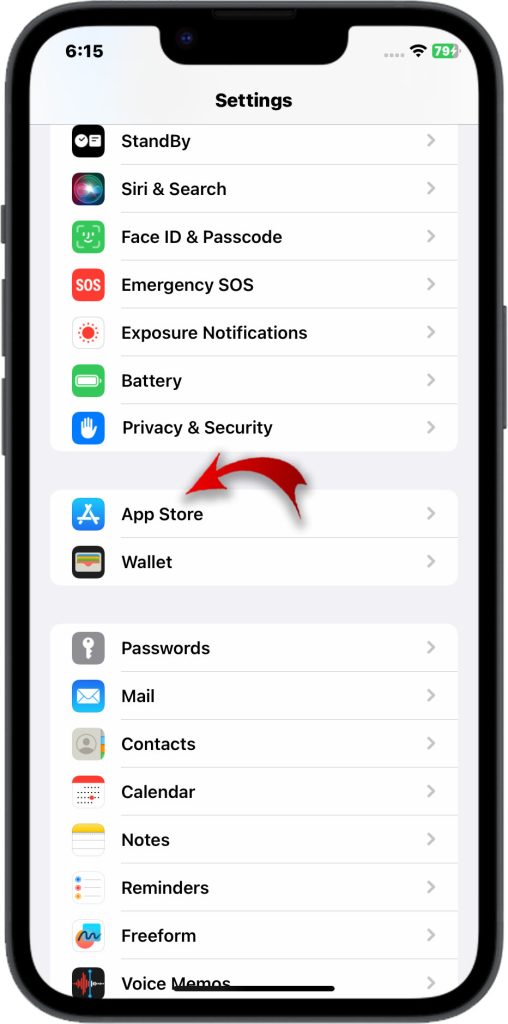
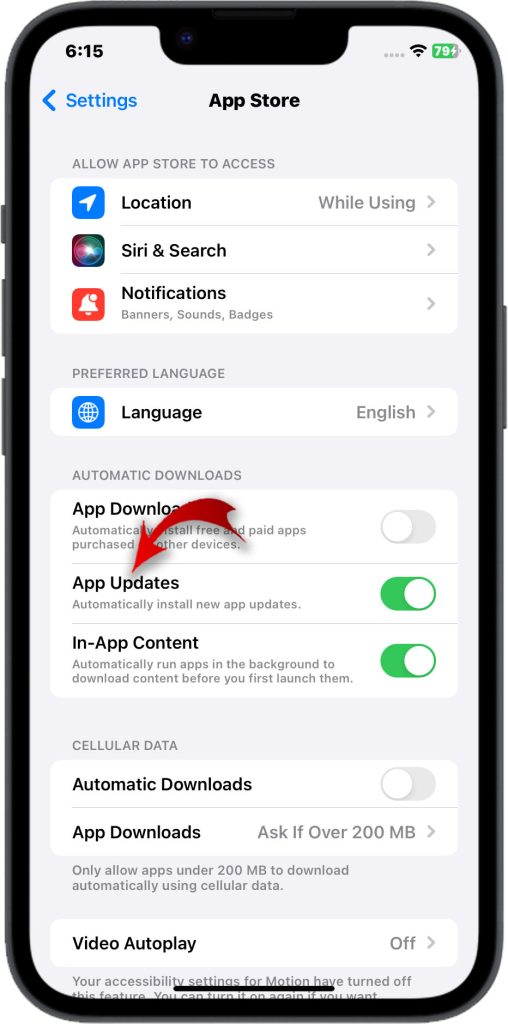
This will ensure that your apps are automatically updated whenever new updates are available.
Note: To update apps automatically, you must be connected to a Wi-Fi network.
Tips for updating apps:
- Make sure that your iPhone is connected to a Wi-Fi network before updating apps. This will help to avoid any data charges.
- If you are having trouble updating an app, try restarting your iPhone.
- If you are still having trouble updating an app, you can contact the app developer for assistance.
Updating apps ensures compatibility with the latest iOS and prevents any unnecessary background battery drain.
3rd solution: Enable Low Power Mode
Take advantage of Low Power Mode to temporarily reduce background activity and extend battery life. Low Power Mode limits background refresh and CPU usage.
There are two ways to enable Low Power Mode on an iPhone 7 Plus:
From Settings:
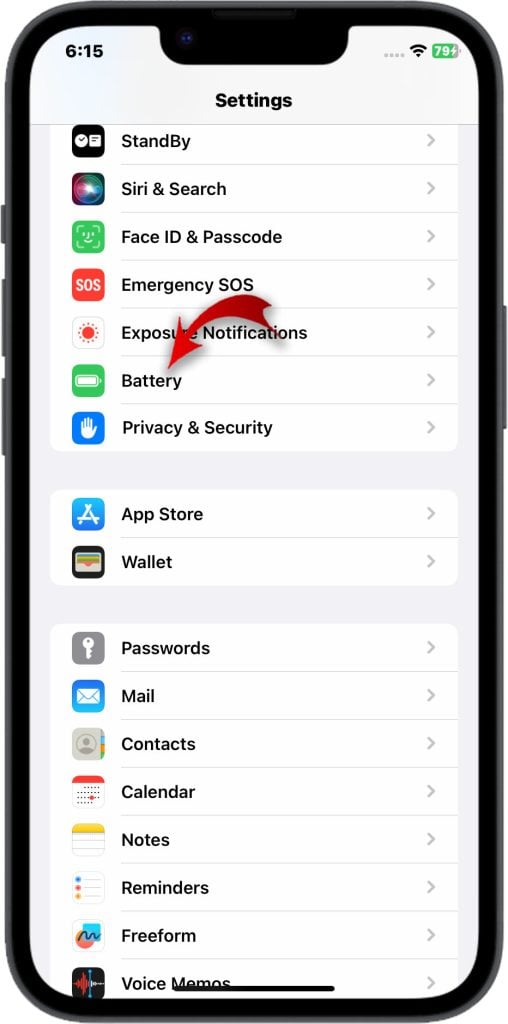
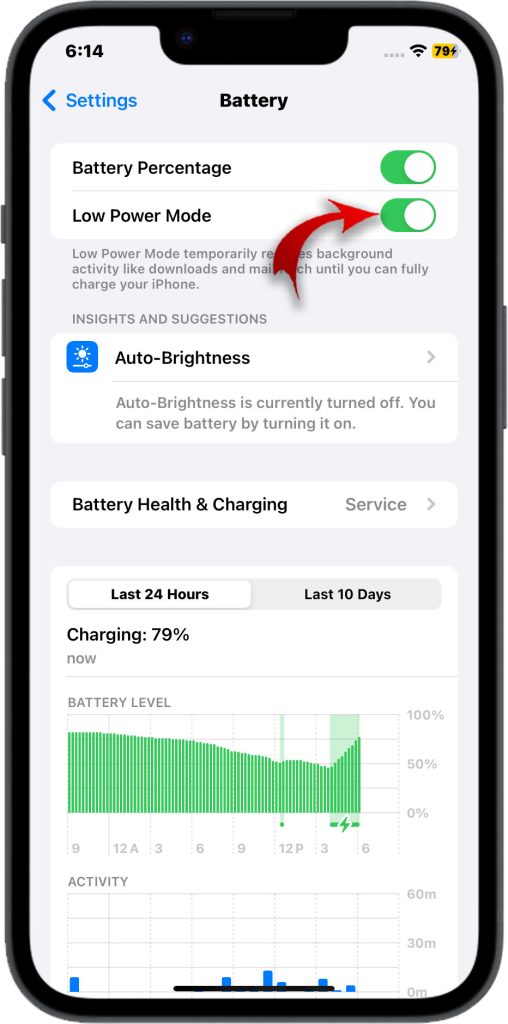
- Open the Settings app.
- Tap Battery.
- Toggle on the switch next to Low Power Mode.
From Control Center:
- Swipe down from the top-right corner of the screen to open Control Center.
- Tap the Low Power Mode button (it looks like a battery with a lightning bolt next to it).
When Low Power Mode is enabled, your iPhone will reduce its power consumption by:
- Reducing screen brightness
- Disabling some background features
- Reducing the frame rate of animations
- Disabling certain visual effects
- Disabling automatic email fetch
Low Power Mode will automatically turn off when your iPhone’s battery reaches 80%. You can also turn it off manually by following the steps above.
Tips for using Low Power Mode:
- Enable Low Power Mode when your battery is low to extend your battery life.
- Disable Low Power Mode when you want to use all of your iPhone’s features and performance.
- You can also create a shortcut to toggle Low Power Mode on and off quickly. To do this, open the Shortcuts app and create a new automation that triggers when your battery level reaches a certain percentage. Then, add the “Toggle Low Power Mode” action to the automation.
4th solution: Reset All Settings
Resetting all settings on your 7 Plus can also fix battery issues in case any system settings were changed incorrectly by the update.
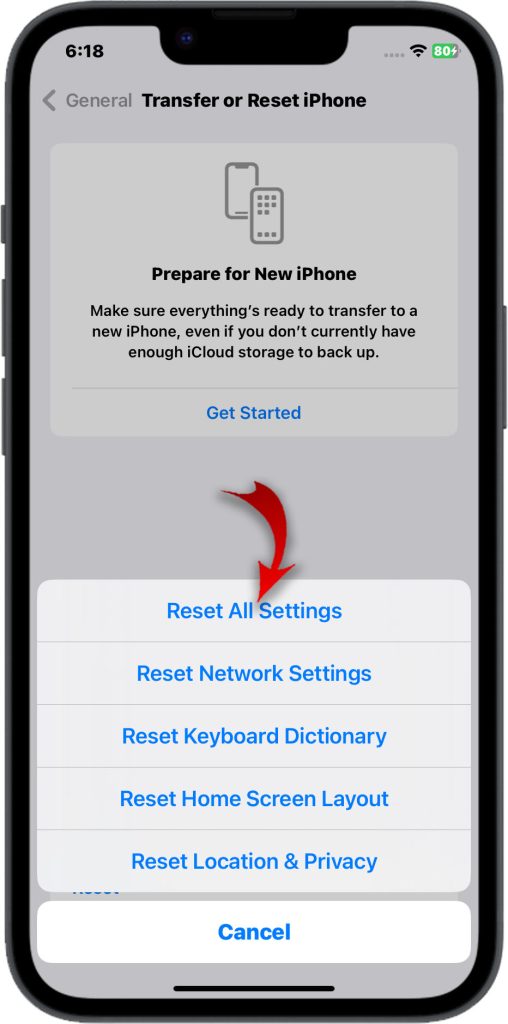
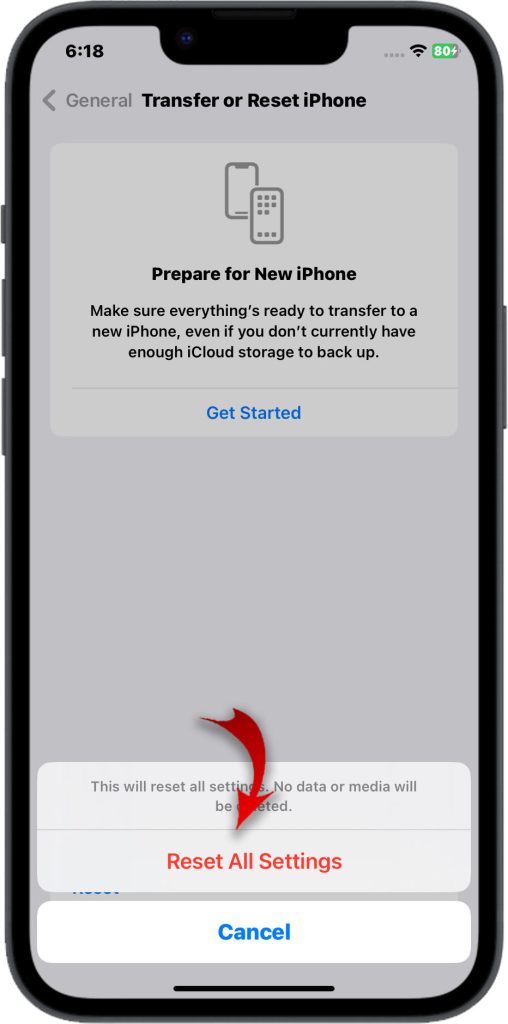
To reset all settings on an iPhone 7 Plus, follow these steps:
- Open the Settings app.
- Tap General.
- Scroll down and tap Transfer or Reset iPhone.
- Tap Reset.
- Tap Reset All Settings.
- Enter your passcode, if prompted.
- Tap Reset to confirm.
Resetting all settings will erase all of your custom settings, such as your Wi-Fi passwords, Bluetooth connections, and volume settings. However, it will not erase any of your personal data, such as your photos, contacts, or messages.
Tips for resetting all settings:
- Make sure that you have a backup of your iPhone’s data before resetting all settings. This way, you can restore your data if something goes wrong.
- If you are having trouble with your iPhone, resetting all settings can sometimes fix the problem.
Resetting to default settings often resolves battery drain issues caused specifically by an iOS update. Test to see if it helps.
Contact Apple Support
If battery drain persists, contact Apple support for further help. They can run diagnostics on your iPhone’s battery health and performance to check for degradation issues.
You can contact support through the Apple Support app, online chat, or by booking an appointment at an Apple store. Provide details on when the battery drain started and steps attempted.
With focused troubleshooting – analyzing usage, updating apps, enabling Low Power Mode, resetting settings, and contacting Apple – you should be able to resolve battery drain problems on your iPhone 7 Plus caused by a recent iOS update. Be patient and take it one step at a time.