Are you constantly running out of storage space on your iPhone 7? Don’t worry – with some simple tips, you can easily free up room on your device. In this guide, we’ll walk you through the best ways to clear space on your iPhone 7 so you can keep snapping photos, downloading apps and enjoying your phone without storage restrictions.
iPhone 7 Storage
Check Your Current Storage Usage
The first step is to check how your storage is currently allocated across different types of content. This allows you to identify the biggest space hogs so you can target them directly.
Here’s how to check your iPhone 7’s storage usage:
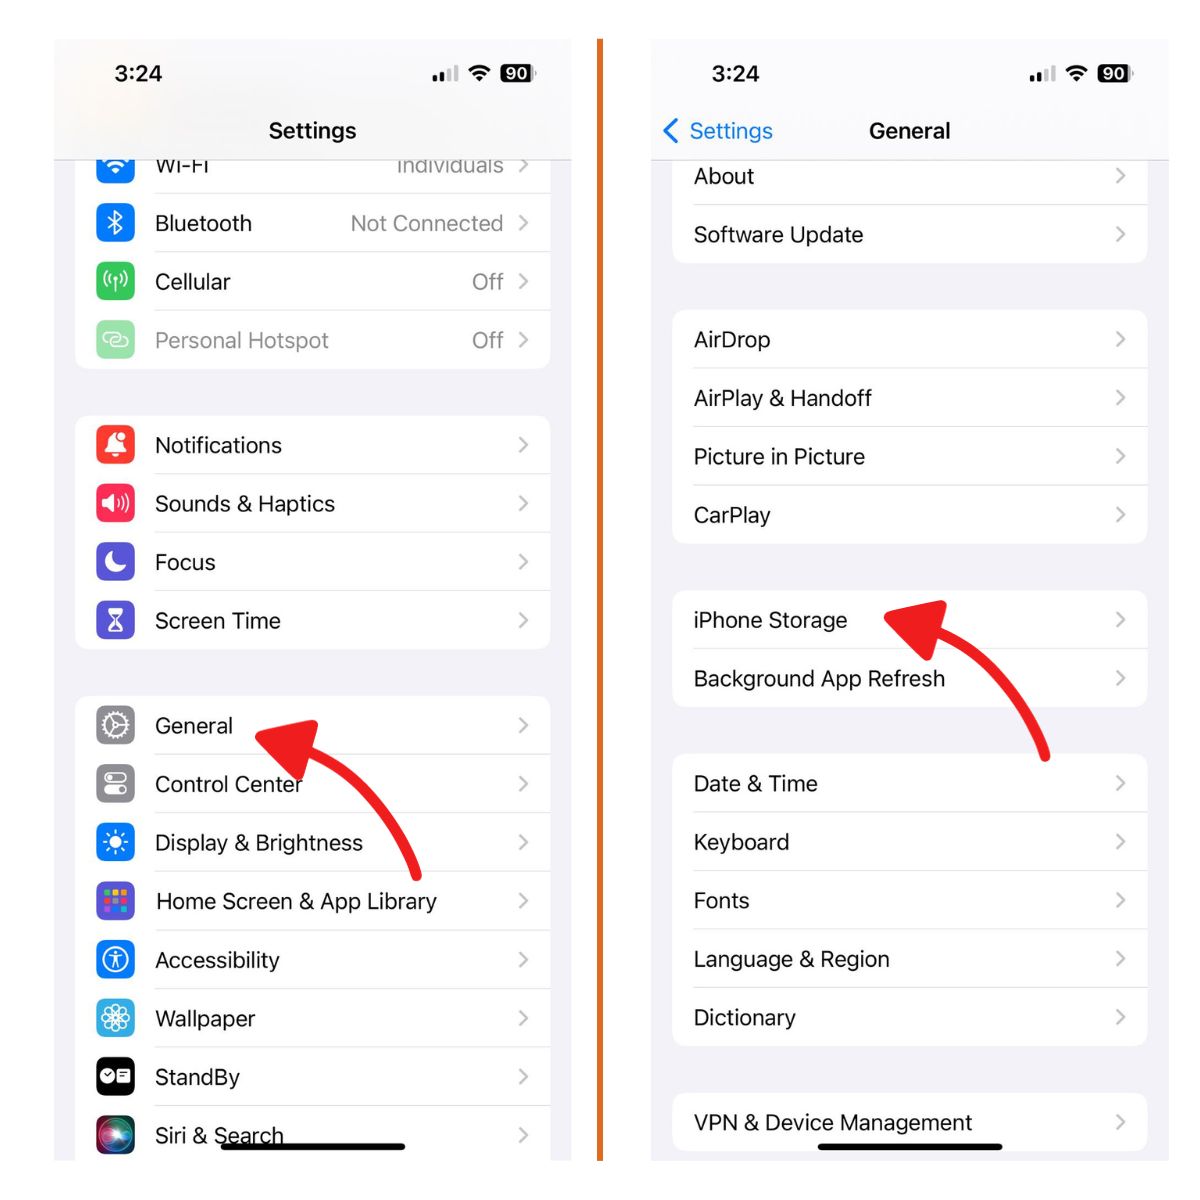
- Open the Settings app
- Tap “General”
- Choose “iPhone Storage”
- Review the breakdown by category – This shows you how much space is taken up by apps, photos, messages, videos, music and more.

Now that you know where most of your storage is going, you can take steps to free up space in those high-usage areas.
Clear Cached Data and Temporary Files
Your iPhone 7 automatically clears cached files and temporary data when it’s running low on storage. But you can also trigger this manually for an immediate space boost.
To clear cached and temporary files:
- Go to Settings > General > iPhone Storage
- Tap “Review Downloaded Videos” under Recommendations
- Delete any cached or temporary files here
This should free up a chunk of “other” storage on your phone.
Offload Unused Apps
Apps can take up a surprising amount of storage, especially with their downloaded data and content. If you have apps you no longer use, offloading them can recover a lot of space.
To offload unused apps:
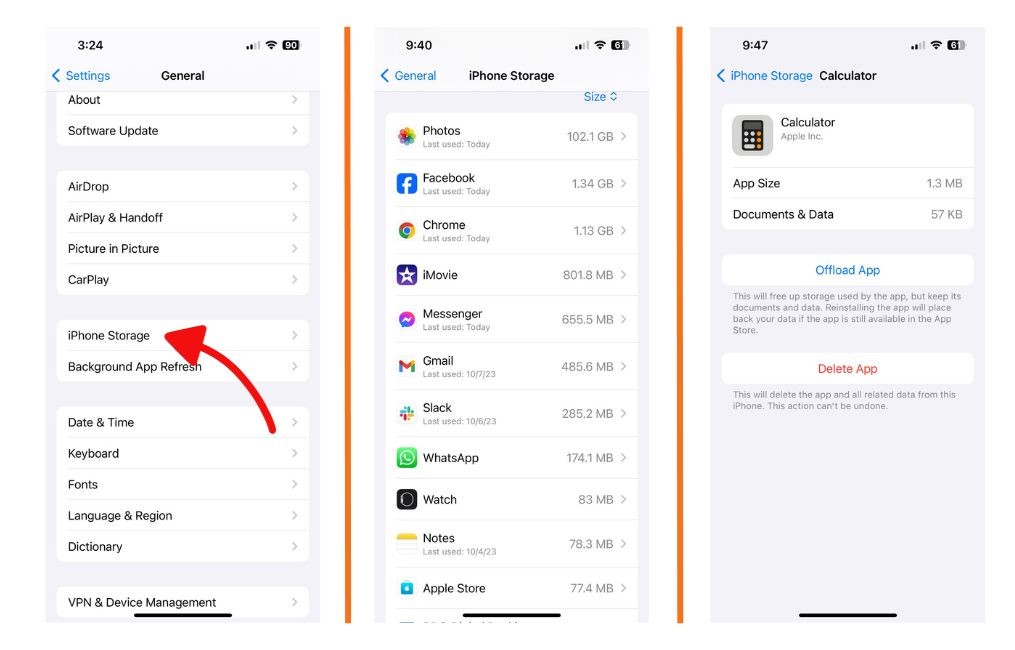
- Go to Settings > General > iPhone Storage
- Tap on the app you want to offload
- Choose “Offload App”

Offloading removes the app from your phone, but keeps its data in case you want to reinstall later.
Delete Messages Attachments
The Messages app stores every attachment you’ve ever received, which can eat up storage over time. Pruning these can help lighten the load.
To delete Messages attachments:
- Open the Messages app
- Tap on a conversation with attachments
- Long press on the attachment
- Choose “Delete” to remove
Repeat this for all conversations and attachments you no longer need.
Use iCloud for Photos
The Photos app is usually one of the biggest storage hogs. A clever way to free up space is to offload images to iCloud using the “Optimize iPhone Storage” option.
Here’s how to activate it:
- Go to Settings > Photos
- Tap “iCloud Photos”
- Choose “Optimize iPhone Storage”
This will keep full-res versions of your photos in iCloud while smaller versions stay on your iPhone 7, saving tons of space.
Stream Music Instead of Downloading
Downloaded music and playlists can quickly eat up gigabytes of storage. Streaming your tunes from Apple Music, Spotify or other services is a great way to avoid this.
Some streaming tips:
- Set songs and playlists to stream only, not download
- Browse and play music from streaming service instead of Apple Music app
- Delete downloads already on your device
Transfer Photos to Computer
If you have a desktop computer, you can free up iPhone storage by transferring photos and videos there for backup.
To transfer photos to your computer:
- Connect iPhone 7 to computer with USB cable
- Open Photos app on computer
- Click “Import” and select images to transfer
- Delete originals from iPhone after transfer complete
Upgrade iCloud Storage
If you rely heavily on iCloud to store your photos, documents, backups and other data, upgrading to a higher storage tier can help.
To upgrade iCloud storage:
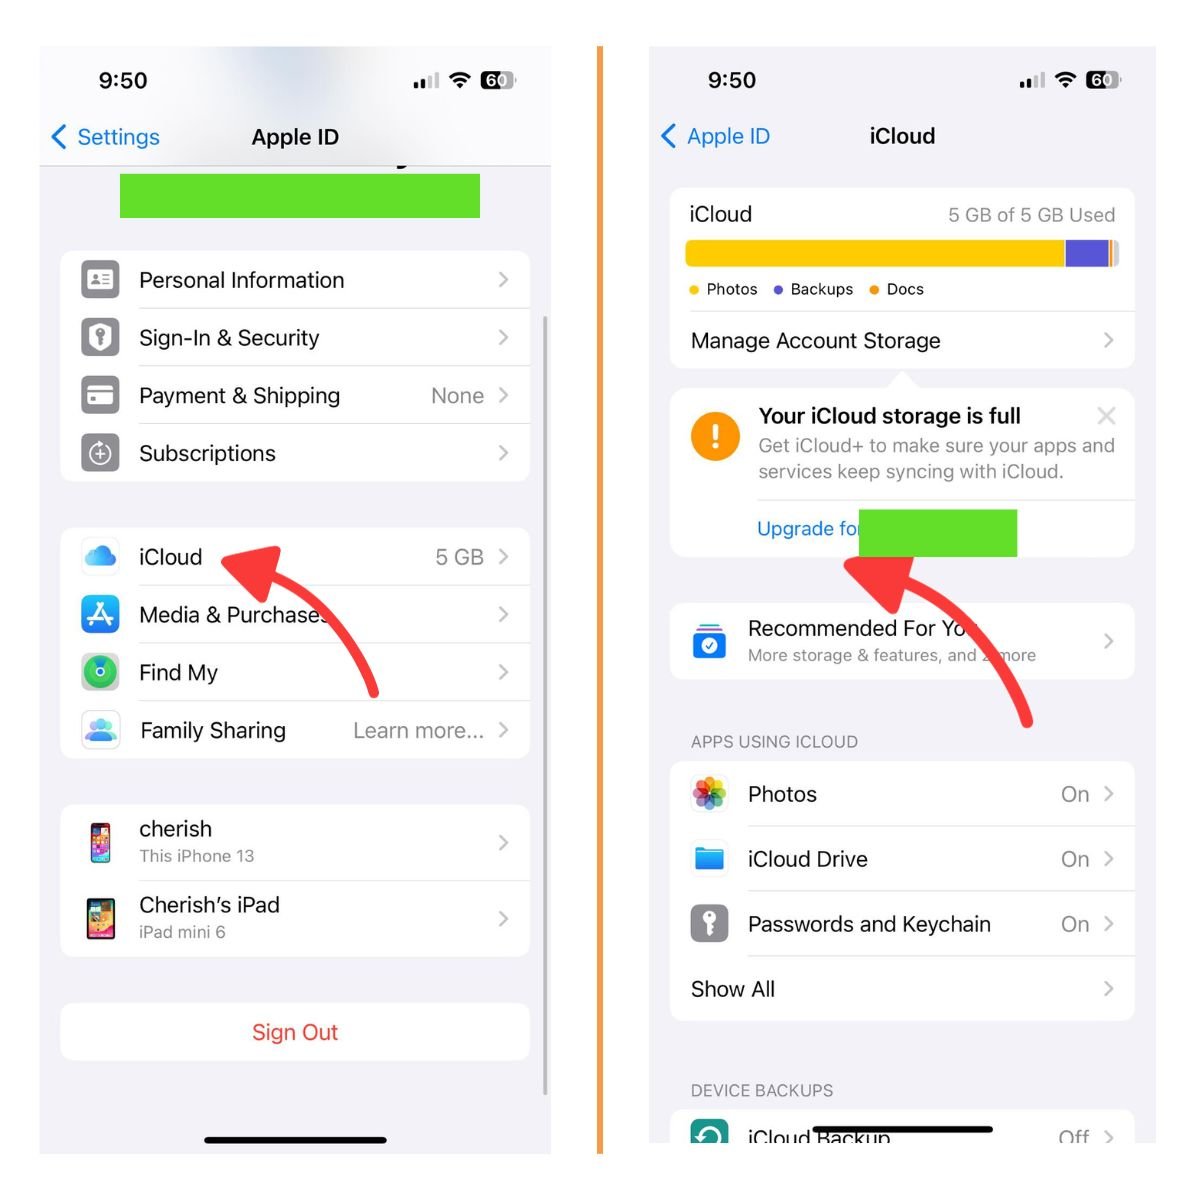
- Go to Settings > Your Name > iCloud
- Tap “Manage Storage”
- Choose your new desired storage amount

50GB, 200GB and 2TB plans are available for a monthly fee.
Delete Videos You’ve Watched
We all have videos that we watch once and likely won’t watch again. Deleting these can provide an easy storage boost.
To remove watched videos:
- Open the Videos app
- Browse your collection and delete videos you’ve watched and don’t need anymore
This also works great for TV shows and movies you’ve finished.
Reduce Email Attachments
If you use your iPhone 7 for work, large email attachments can quickly consume storage, especially on lower capacity models like 32GB.
Some tips for reducing email storage:
- Set emails to delete after 30 days or 1 year
- Save attachments to cloud storage instead of device
- Review conversations and delete unneeded attachments
Every little bit of reclaimed space helps!
Remove Music You Don’t Listen To
Be honest – we all have music on our phones we haven’t actually listened to in months or years. Pruning these tracks can free up significant storage.
To remove unplayed music:
- Open the Music app
- Tap the “Songs” tab
- Sort songs by “Last Played”
- Delete tracks you haven’t listened to in a long time
Bonus tip: Use the offline mixtape in Spotify to automatically curate a selection of your favorite music that fits the storage you have available.
Clear Large Message Attachments
In addition to clearing attachment clutter in your messages as mentioned above, you can specifically target extra large attachments for quicker gains.
To remove large attachments:
- Open the Messages app
- Tap the magnifying glass to search messages
- Type “large attachments”
- Delete any very big files here
This surfaces the hidden storage hogs in your conversations.
Check for iOS Update
Installing the latest iOS update can sometimes help optimize storage and clear “other” data that may be stuck.
To update iOS:
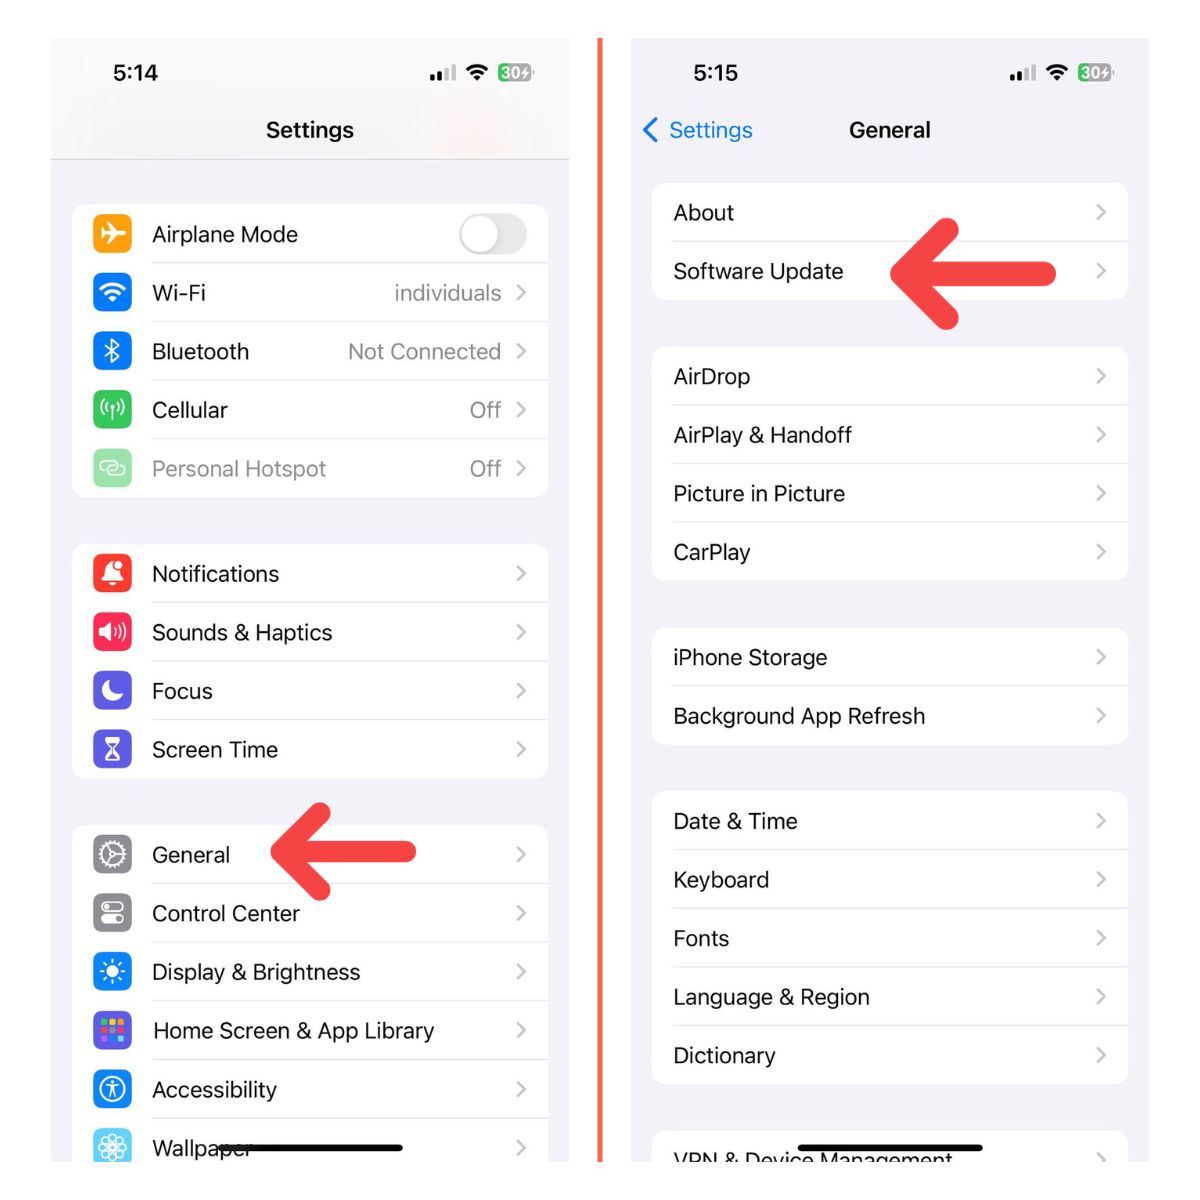
- Go to Settings > General > Software Update
- Install any available updates

Keeping iOS up-to-date also provides the latest optimizations.
Conclusion
With strategic steps like offloading unused apps, streaming music, leveraging iCloud and deleting unneeded files, you can take control of your iPhone 7 storage. Use the tips in this guide to easily clear space and stop those pesky “Storage Full” messages for good. Implement a few maintenance habits and your phone’s storage will stay under control.
What are the icloud folders on my iPhone internal memory? I may have much as 10 folders name icloud.
Hi,
I have a newiPhone 7 Plus 128GB, after I installed 2 APPs thw windows poob out said iPhone 7 storage full, I can not install more APP, but when I chck about this iPhone memory, it said I still have 116 GB free memory can use, I got confused,? how can I resolve this issue? thank you for your great help!