Having trouble with your iPhone 6s blurry photos are the iOS 13 update? If that’s so, then this post might be able to help you. Keep scrolling to view more detailed solutions.
The iPhone 6s comes with a decent camera specs, particularly a 12-megapixel camera with a f/2.2 aperture, 5-element lens, True Tone flash and a 5-megapixel FaceTime HD camera. It is also able to render 4K video recording. With these specifications alone, this phone is expected to render highly quality camera outputs. Nonetheless, there are several factors that could negate these expectations. Random firmware issues including those inflicted by post-update bugs, invalid camera settings, environmental factors, and worst hardware damage are usually the underlying causes. Tackled in this post is a camera issue on the iPhone 6s that’s suddenly rendering blurry photos after the iOS 13 update. Read on to find out why this happens and what must be done in order to resolve the issue on your end.
Before moving on, feel free to browse through our troubleshooting pages to find potential solutions to other problems with your other Apple devices. If your iOS handset is in the list of our supported devices, then you can visit its exclusive troubleshooting page and find the problem that you need help dealing with. You can refer to or use our provided solutions and workarounds if needed. In the case where you’d prefer to get direct assistance from us, simply fill up our iOS issues questionnaire and hit submit to contact us.
Troubleshooting a camera issue on the iPhone 6s blurry photos in iOS 13
Before you begin to troubleshoot, remove any protective casing or third-party accessories from your device as these could likewise affect the overall quality of its camera outputs. If there’s none, then you may go ahead and start ruling out software-related culprits.
First solution: Force close camera app then restart your iPhone.
Like other apps, built-in applications can also end up becoming unstable from a major system transition, resulting in some unexpected flaws. If this is what has occurred on your iPhone 6s camera app, then restarting the application will likely sort things out. If you’ve recently opened the Camera app and haven’t closed it, follow these steps to end the application from being suspended:
- Double-press the Home button to pull up the Apps Switcher or Multitasking screen. This contains the previews/cards of all app you’ve recently used and left open on your phone.
- Tap and drag the Camera app card/preview to the top-corner of the screen to close the application.
If you see any other applications running in the background, follow the same steps to end them all. This would be necessary to ensure that none of these apps is causing conflicts to your iPhone’s camera functions.
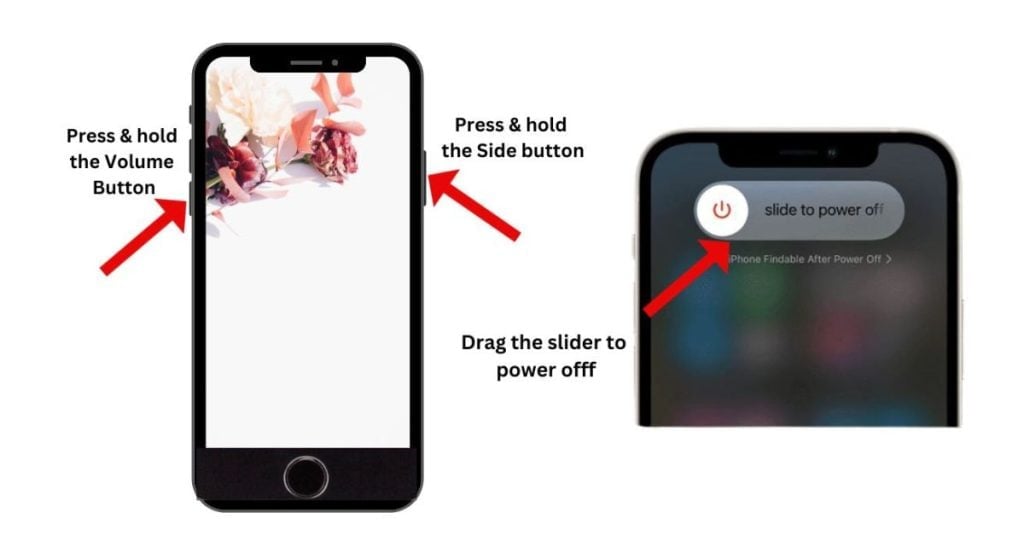
Once you’re done clearing all background applications, reboot or soft reset your iPhone to clear cache and to refresh its system functions. Just follow these steps to continue:
- Press and hold down the Side (Power) button for a few seconds until the Slide To Power Off appears.
- Drag the slider to the right to power off your device completely.
- After 30 seconds, press and hold down the Side (Power) button again until the Apple logo appears.
Wait for your iPhone to finish rebooting and then relaunch the camera app to test and see if it’s still producing blurry photos.
ALSO READ: How to fix a problem on the iPhone X swipe up that’s not working in iOS 13
Second solution: Check and manage your camera settings.
Your iPhone camera might have been set to portrait mode. If this is the case, then having blurred backgrounds are normal because this camera feature allows you to blur the background in your photos. In normal instances, the subject should appear sharp. Finding the perfect mode for your subject is therefore imperative. There are different camera modes to choose from.
- To switch between camera modes, simply swipe left or right on the camera screen.
From portrait, you can switch to photo, video, time-lapse, slo-mo, square, and pano modes to see if the camera outputs are still blurry.
To shoot more stunning photos, make sure that the subject is in sharp focus. Here’s how you do it:
- Open the Camera app then frame your shot.
- Tap on the screen where you want to set focus, usually the main subject of your picture.
- Wait for the yellow box to show up. This indicates the focus point.
The subject that you set focus on will appear crisp and sharp.
Adjusting exposure can also help achieve perfect brightness level for your photos. Making adjustments to your iPhone 6s camera exposure is simple. Just follow these steps:
- Open the camera app and then tap to set focus on your subject.
- Then swipe up or down on the screen to adjust exposure.
- To make the image brighter, swipe up on the screen.
- to make the image darker, swipe down.
- Try to avoid under-exposed shadows and over-exposed highlights to ensure vivid color and detail on the captured image.
Making a few adjustments to other camera settings and features can also help improve the overall quality of your pictures. These settings may need to be re-adjusted after the recent iOS installation.
Third solution: Reset all settings to fix a problem on your iPhone 6s blurry photos after iOS 13 update.
System settings that aren’t properly configured or modified incorrectly can also cause other applications to experience some sort of random flaws and fail to work as intended. This is usually what happens if the recent iOS update had brought in some automatic settings overrides that ruined your previous camera settings. To clear this out, resetting all settings can help. This will erase all your current settings and then restores the original values and options, without deleting any saved information. If you wish to give it a try, then you may do so through these steps:
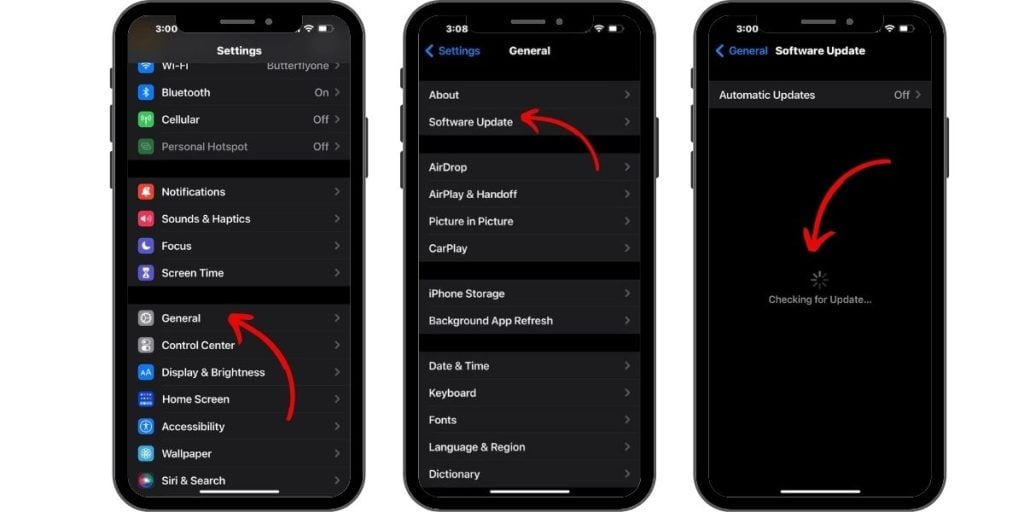
- From your Home screen, tap Settings.
- Select General.
- Scroll down to and tap on Reset.
- Select Reset All Settings from the given options.
- Enter your device passcode if prompted to continue.
- Then tap the option to confirm that you want to reset all settings on your iPhone.
The phone should restart automatically after the reset and then restores the original options. To use necessary features, particularly those that are disabled or turned off by default, you will need to enable them individually first.
Also verify and ensure that your camera settings are properly configured.
ALSO READ: How to fix an iPhone with no sound in iOS 13, no sound bug fixes
Fourth solution: Erase your iPhone and restore its factory defaults.
If none of the previous methods is able to fix the problem and your iPhone 6s still renders blurry photos in iOS 13, ruling out complex system errors is likely needed. At this point, your next option and potential solution to try would be a factory reset. This will erase everything from your iPhone system including fatal system errors that caused the camera app to experience such a persistent flaw. Before you proceed, back up all your critical files from your iPhone to iCloud or iTunes. Once you have secured your backup, follow these steps to factory reset your iPhone 6s through settings:
- From the Home screen, tap Settings.
- Select General.
- Scroll down and tap on Reset.
- Select the option to Erase all content and settings. This will erase all customized options and new settings overrides from the recent update, including all saved information on the phone storage.
- Enter your device passcode if prompted to continue.
- Then tap the option to confirm that you want to erase and factory reset your iPhone.
You can also use iTunes to manually back up and erase your iPhone on a computer.
Fifth solution: Restore your iPhone from an iOS backup (recovery mode restore).
Software issues that could not be handled by a factory reset usually require more advanced solutions like a recovery mode restore. This will put your iPhone in a recovery state and allows iTunes to repair any corrupted system features, following the major system transition. To get started, you will need to secure either a Windows or Mac computer that has the latest version of iTunes app in it. Then proceed to these steps when everything is set:
- Connect your iPhone to the computer using the Apple-supplied US cable/Lightning cable. While your phone is connected, proceed to the next steps.
- Press and hold both the Home button and the Top/Side button simultaneously.
- Keep holding the buttons until the Recovery Mode screen appears.
- Wait until you see the message prompt asking you to restore or update your device.
- Select Update if you want iTunes to reinstall iOS on your phone without erasing any saved data. Otherwise, choose Restore to erase your device and restore from a recent iOS backup.
Wait for iTunes to finish downloading the software for your device then follow the rest of the onscreen commands to finish restoring your iPhone.
ALSO READ: How to fix your iPhone’s Snapchat app that’s not working in iOS 13
Still troubled with the same issue on your iPhone 6s blurry photos in iOS 13?
If you’ve reached this point having the same problem, then you could be dealing with something worse than an iOS bug. It is possible that your iPhone’s physical camera has obtained some damage that requires hardware fixing. In this case, your best hope to get your device fixed is a service center. You can head on to the nearest Apple Genius bar in your place and ask an authorized iPhone technician to examine your device then repair or replace any damaged camera component.
Connect with us
We are committed to helping our readers fix the problems with their phones as well as learn how to properly use their devices. So, if you have other issues, you may visit our troubleshooting page so you can check by yourself the articles we’ve already published that contain solutions to common problems. Furthermore, we do create videos to demonstrate how things are done on your phone. Visit our Youtube Channel and please subscribe to it. Thanks.